|
|
 Rank: Super-Elite       Groups: Registered
Joined: 28/07/2014 Posts: 4,269 Points: 12,713 Location: Scotland
|
Great updates  you are really making a difference with your mods  well done  regards Phil COMING SOON =1/72 Italeri diorama`s Battle for the Reichstag and Stalingrad battle at the tractor factory 1/16 Trumpeter King Tiger with loads of extras ON THE GO= refurbishment of 1/25 Tamiya tiger 1 , amt Star trek kits and space 1999 models
So Much to Build,But What a Hobby!
|
|
|
 Rank: Amateur level 2  Groups: Registered
Joined: 20/02/2016 Posts: 45 Points: 135 Location: SoCal
|
|
|
|
|
|
Impressed by your build methods, very nice work throughout..... Regards Alan
|
|
|
Rank: Amateur level 2 Groups: Registered
Joined: 20/02/2016 Posts: 45 Points: 135 Location: SoCal
|
Gandale wrote:Impressed by your build methods, very nice work throughout..... Regards Alan Thanks, I call it "making it up as I go" 
|
|
|
Rank: Super-Elite   Groups: Registered
Joined: 31/05/2010 Posts: 5,679 Points: 17,011 Location: Wiltshire
|
Well i am very impressed by what you are doing. Its all beyond my capabilities but really good to see the resilts from someone that has the skills to do this. Happy Modelling
BUILDING: Hachette Spitfire Mk 1A, Constructo Mayflower
SUBSCRIPTION COMPLETE (Awaiting building): USS Constitution, Sovereign of the Seas, 1:200 Bismarck (Hachette)
COMPLETED: Porsche 911, E-Type Jaguar, Lam Countach
|
|
|
Rank: Amateur level 2 Groups: Registered
Joined: 20/02/2016 Posts: 45 Points: 135 Location: SoCal
|
Hello again, So I was wanting to go hard on the 3'rd deck planking but I've been delayed waiting on stuff to dress up the 2'nd deck. I've already made up some stuff on my own, I made a couple of racks to hold some barrels, a staircase going down and a sliding hatch cover for the stairs.   So as I wait for more grates in the mail I decided to put some work on the launch. I wasn't really planning on working on this until I had all the decking done on the big girl but I need something to do. I've had some ideas on how I would proceed on the launch for awhile. The first one was to sand and break the inside edges of the ribs before they get glued onto the jig. I thought this would be the best time as once it's planked and split from the jig access would be compromised.  I'm not sure how much this picture shows but all the sharp edges and blends have been sanded and softened a bit. The results will show when the inside is painted I was also thinking to infill the whole thing because the ribs are so thin and prone to breakage when fairing. the bow section was pretty straight forward, just filled in with balsa bits and scraps on hand. I had bought a 1" x 2" x 12" piece of balsa I had planned to use to fill the bulk of the launch but as I proceeded it went south rapidly. Cutting 1/4" slices turned out being... Problematical  Plan B was a no brainer. I bought a plethora of 1/8" x 1/4" x 24" balsa for the gun port framing. It took a minimal amount of sanding and fitting to get at least some support for the ribs.  As you can see I also infilled the stern section for fairing which worked out very well.  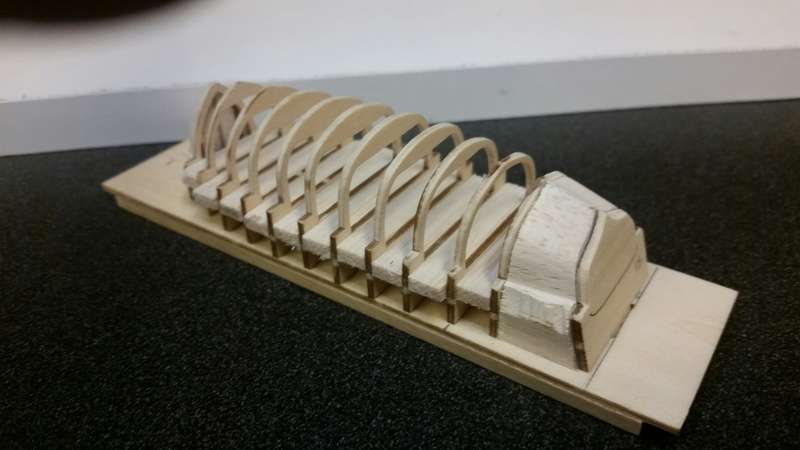 In case anyone is wondering, the infills are only glued to the jig, they will come away when the boat is cut apart. I'm ready to start planking now. This should be interesting... 
|
|
|
|
|
Very nice work indeed.... Regards Alan
|
|
|
 Rank: Pro Groups: Joined: 24/08/2009 Posts: 48,051 Points: -13,308
|
Looking good and interesting watching how your going about the build
|
|
|
Rank: Amateur level 2 Groups: Registered
Joined: 20/02/2016 Posts: 45 Points: 135 Location: SoCal
|
Hello again, It's been awhile since the last update. I moved the build to the house over the holidays. I wasn't able to spend as much time on it as I would like at work. Continued work on the launch. A bit more fiddley than I thought.  The hardest part was finding a way to hold the strips in place while setting. I went with rubber bands. Lots and lots of rubber bands  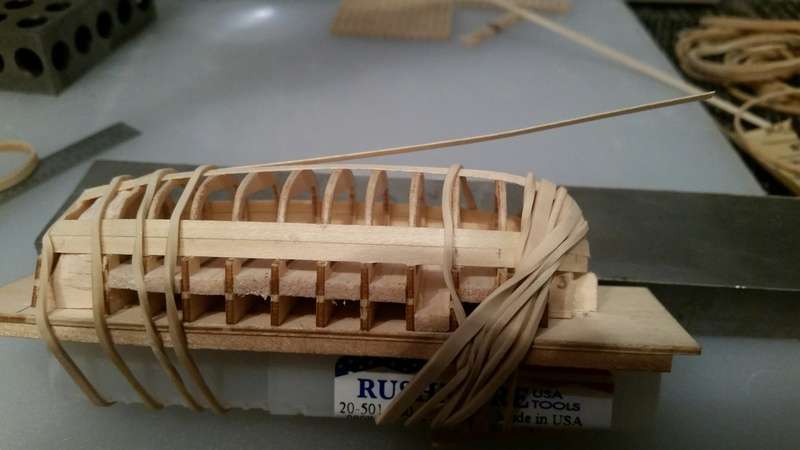 I ended up with 8 strips laid down by the time I got all the stuff I was waiting on to continue work on the big girl. Actually I had more but ended up pulling some back off that I didn't like how they were going. So... Back to the ship. I made 2 more grates for the 2'nd deck. These turned out really well , better than the first 2 I think. The first ones I was engineering the how's as I was building. My machinist tendencies come out, concentrating on making sure everything is perfectly flat, square and parallel. Not bad things to aspire to, but my edges were a bit too sharp. I did a bit more softening of the edges this time. A little more of a used, worn feel.   So lets just go ahead and get everything buttoned up on deck 2 and on to decking  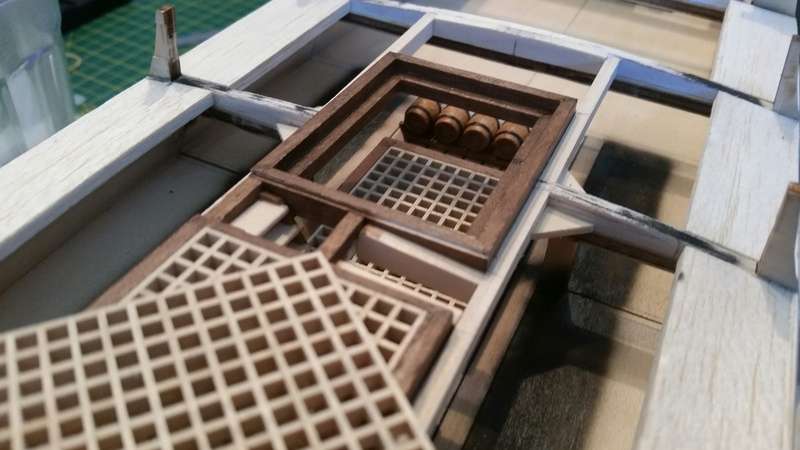 Decking. Yeah..... I had the concept of what I wanted to achieve and a pretty good idea of how to do it. The bit I did on the 2'nd deck was a good proof of concept, but that was planking over a flat deck. They were glued down to the deck along their entire length, where planking over ribs leaves them only glued down on the tops of the ribs. I could tell after the first plank this was going to be a problem. Too much flexibility. I need to be able to sand it when it's done. Plan B was glue the edges together too. I thought that would be messier than I like so wasn't a fan. I really like to be able to clamp or weight or compress things together when I glue. So, plan C. And this one was a good one. I can glue strips parallel to the planks on the bottom side in between the ribs. This will give at least 80% glued area. And I'll be able to clamp. Nice!!  Well, the High fives and back slaps came to a screeching halt almost immediately. #1 I wasn't actually able to clamp. #2 I would be slowly planking over the gap I needed to be able to glue them to the underside  Damn, I really liked this idea but out it comes  OK, plan D. Lets stick with the underside support but I'll go perpendicular instead. Evenly spaced supports can reach to the balsa I put in between the ribs. I'll glue then to the center plank before I install it, I can get them perfectly flat. This is important because as I plank from the center out the deck curves down, which will press the supports into the bottom of the deck planks. Basically self clamping.  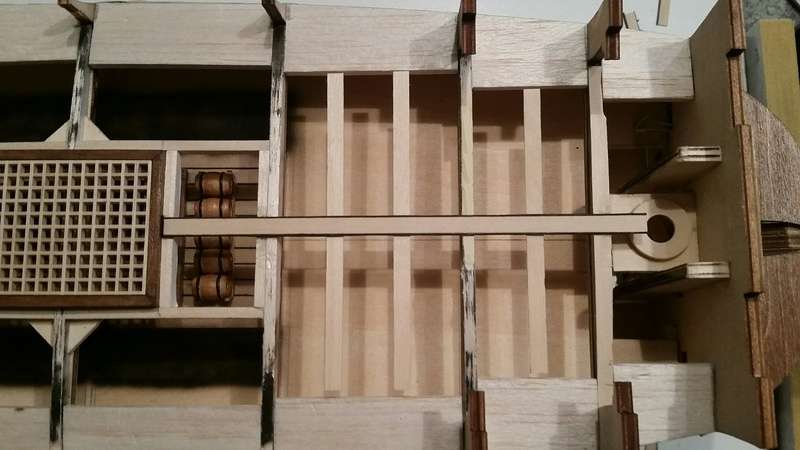   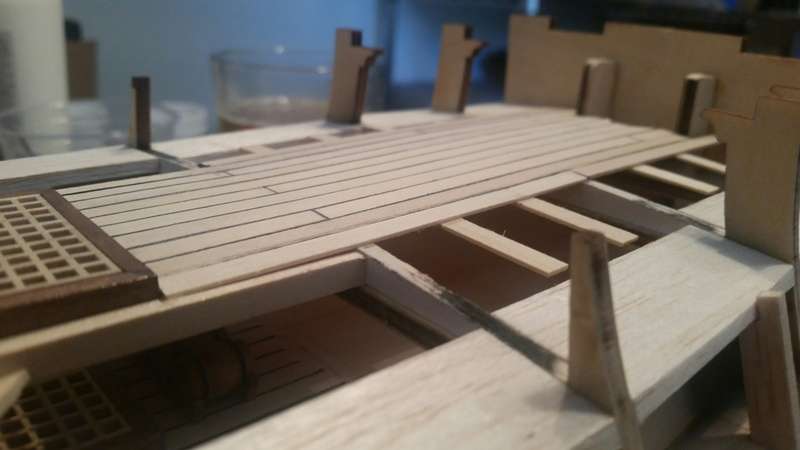
|
|
|
Rank: Pro Groups: Joined: 24/08/2009 Posts: 48,051 Points: -13,308
|
Nice update
|
|
|
|
|
Great to see an update on this, she really is coming along beautifully..... Regards Alan
|
|
|
|
|
Some nice steady work, she looking really good.  Mark
|
|
|
Rank: Superelite  Groups: Registered
Joined: 10/05/2010 Posts: 2,608 Points: 7,519 Location: Lincolnshire
|
What a fantastic build diary! A true pleasure to read. Are you sure this is your first boat build? Some of your solutions are outstanding, as is your build.  . Keep up the great work Regards Gray
|
|
|
Rank: Super-Elite  Groups: Registered
Joined: 11/11/2009 Posts: 3,432 Points: 10,280 Location: Bâe Colwyn, Wales
|
Very nice work indeed, your doing such a great job .
Chris On the bench 1/350 Revell Tirpitz Platinum Edition (Pontos PE and Wooden deck) plus extra Eduard PE set and extra MK1 door sets.
|
|
|
Rank: Administration  Groups: Registered, Forum Support Team, Administrators, Global Forum Support Team, Moderator, Official Builds Joined: 09/11/2012 Posts: 7,963 Points: 23,078 Location: East midlands
|
Looking very good. Excellent work with the sloped deck. Regards delboy271155 (Derek) COME BACK GUY FAWKES "YOUR COUNTRY NEEDS YOU"
|
|
|
Rank: Amateur level 2 Groups: Registered
Joined: 20/02/2016 Posts: 45 Points: 135 Location: SoCal
|
|
|
|
|
|
Interesting approach and beautifully worked.... Regards Alan
|
|
|
|
|
Nice work, looks excellent. Mark
|
|
|
Rank: Superelite Groups: Registered
Joined: 10/05/2010 Posts: 2,608 Points: 7,519 Location: Lincolnshire
|
Great idea with the foredeck. Loving your build
Regards Gray
|
|
|
|
|
Very nice work and looking good Current builds:-C57,Zero, Lamborghini Countach, Caldercraft HMS Agamemnon,Robi,R2-D2, MFH Cobra .
|
|
|
|
Guest
|
 US
US

