|
|
 Rank: Semipro Level 1  Groups: Registered
Joined: 25/03/2019 Posts: 66 Points: 191 Location: S Yorkshire, UK
|
A question regarding the build of the 'Mary Rose' from Caldercraft. Searching the forum, I find only one build diary - dated June 2010 !! And it is (was?) only 4 entries long … At least there is a photo of a completed ship. However, that does not answer my question. I am more used to seeing the detailed instructions from Deagostini with good photos etc. Unfortunately for me this build uses plans (8 x A0 sheets of paper  ) with not-clear detail and brief 'Builders Notes'. 'Cut out and glue the lower deck camber beams into place using PVA wood glue (DRAWING D), parts 6a, 7a, 8a, 9a & 10a,) Use crocodile clips or clothes pegs to clamp the beams in position until the glue has dried.' Problem being - where to place the beams.  suey attached the following image(s):
|
|
|
Rank: Semipro Level 1 Groups: Registered
Joined: 25/03/2019 Posts: 66 Points: 191 Location: S Yorkshire, UK
|
Darn, Newbie mistake, misunderstood instruction re posting photos. So to continue the story, next picture will be a close up of 'DRAWING D' and my model as it stands so far. The camber beams are far too long to stand on the deck supports (just above the 'dummy barrel blocks'). The only way that seems to fit, is to place alongside the bulkheads, at the level of the deck supports. Only I do not think much of the diagram detail and not certain this is what is intended. Can someone with building plan experience advise me please? Sue suey attached the following image(s):
|
|
|
Rank: Administration       Groups: Registered, Forum Support Team, Administrators, Global Forum Support Team, Moderator, Official Builds Joined: 09/11/2012 Posts: 7,953 Points: 23,048 Location: East midlands
|
Hi Suey,  I have adapted your pic of the plan (attached below) The parts 6a - 10a look like curved deck support beams so looking at your plan it looks like they sit on the ribs between the vertical extensions. Have a look at the numbering of the ribs in your instructions and see if they match the numbering I have put on the pic. Check them all for fit before you go anywhere near the glue. Hope this helps. Regards delboy271155 (Derek) delboy271155 attached the following image(s): COME BACK GUY FAWKES "YOUR COUNTRY NEEDS YOU"
|
|
|
Rank: Semipro Level 1 Groups: Registered
Joined: 25/03/2019 Posts: 66 Points: 191 Location: S Yorkshire, UK
|
Thanks Derek, You and me both, would expect the camber beams to sit on top of the frame. Hurried photo. This is frame 6 with the associated camber beam loosely taped to the forward face of the frame. Although it isn't centred properly, I think you can see that it is too long to fit within the bounds of the verticals. Not so obvious with frame 6, but more so with frame 9, which has a more angled tumblehome. The ends of the camber beams match the outside face of the frames very closely. Hence my supposition that the beams should be placed alongside the frames, at the level of the main deck supports. To fit on top, I would have to saw every beam from both ends to keep the symmetry of the camber. This might also account for the use of crocodile clip/clothes pegs to clamp the beams. I don't see them being much use if sitting on top of the frame shoulder. Any opinion? Regards Sue suey attached the following image(s):
|
|
|
Rank: Administration Groups: Registered, Forum Support Team, Administrators, Global Forum Support Team, Moderator, Official Builds Joined: 09/11/2012 Posts: 7,953 Points: 23,048 Location: East midlands
|
Hi Sue, Having seen that latest pic, it makes sense what you have said and done with frame 6 and the use of clamps of some description. The lines depicting the beams look like they have been put on freehand as an after thought and very badly. What I would suggest is to clamp the beams in place from the outside of the ribs and see how the deck fits. I hope the rest of the plans are better to make your life easier. Looking forward to seeing more of your build here as you progress. Good Luck. Regards delboy271155 (Derek) COME BACK GUY FAWKES "YOUR COUNTRY NEEDS YOU"
|
|
|
|
|
Hi Sue One way to check if the beams are fixed to the sides or on top is to dry fit the deck that goes on top of those beams. If the cut outs that line up to fit the frames with the beams along the sides then you have your answer. If the cut outs on the deck parts are not fitting that way try doing the same thing but with the beams on top of the frames to see if they fit that way. Andy Current builds:-C57,Zero, Lamborghini Countach, Caldercraft HMS Agamemnon,Robi,R2-D2, MFH Cobra .
|
|
|
Rank: Semipro Level 1 Groups: Registered
Joined: 25/03/2019 Posts: 66 Points: 191 Location: S Yorkshire, UK
|
Thanks for the reassurance Derek,
I had got to the point of paranoia as to what was needed. I have a feeling there will be more points of 'unclarity'!!
The deck (0.8mm thick!!) is currently taped to a flat surface - it came out of the box trying to imitate a roughish sea.
Now I have opened up a build diary, I will post a few photos of the beginning of my build. I am intending to paint the lower deck black, around where the dummy barrel blocks indicate the presence of gun ports. Then I'll get on with the camber beams.
Regards Sue
|
|
|
Rank: Administration Groups: Registered, Forum Support Team, Administrators, Global Forum Support Team, Moderator, Official Builds Joined: 09/11/2012 Posts: 7,953 Points: 23,048 Location: East midlands
|
suey wrote:Thanks for the reassurance Derek,
I had got to the point of paranoia as to what was needed. I have a feeling there will be more points of 'unclarity'!!
The deck (0.8mm thick!!) is currently taped to a flat surface - it came out of the box trying to imitate a roughish sea.
Now I have opened up a build diary, I will post a few photos of the beginning of my build. I am intending to paint the lower deck black, around where the dummy barrel blocks indicate the presence of gun ports. Then I'll get on with the camber beams.
Regards Sue Your welcome Sue, Look forward to seeing more on your diary and Congrats on your "Blue" medal for starting a diary.  Regards delboy271155 (Derek) COME BACK GUY FAWKES "YOUR COUNTRY NEEDS YOU"
|
|
|
Rank: Semi-Pro Level 2  Groups: Registered
Joined: 11/01/2017 Posts: 89 Points: 259 Location: Lancashire, UK
|
You're right. Those beams sit next to the bulkheads, and not on them. Here's my hull... 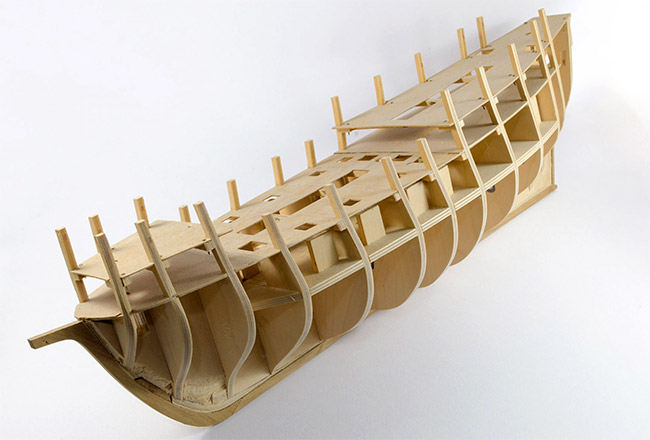
|
|
|
Rank: Semipro Level 1 Groups: Registered
Joined: 25/03/2019 Posts: 66 Points: 191 Location: S Yorkshire, UK
|
Thanks for that photo James, exactly s I was coming around to thinking! You may have the answer to my next problem!! Trying apurchase's suggestion - dry fitting the next deck. Only, how the 'eck do you get the main deck into place? Yes it is very thin but in my case he wood is pretty stiff and I get the sense of it being potentially rather brittle. I've tried sliding down sideways to try & get under the upper deck supports. One side will get there but no way does the other side want to bend enough to go under. I've tried sliding bow (or stern) section into place from centre, but again get nowhere. I'm getting to the point of considering splitting the deck in two from bow to stern & fitting it in in those two halves?? James, would you let me know how you achieved fitting the main deck please?  Regards Sue
|
|
|
Rank: Administration Groups: Registered, Forum Support Team, Administrators, Global Forum Support Team, Moderator, Official Builds Joined: 09/11/2012 Posts: 7,953 Points: 23,048 Location: East midlands
|
Hi Sue, I don`t know if you have had any joy with fitting the decks, but if flexing the deck is not going to give enough space then another possible action is maybe this: If you were to extend the cutouts of the deck where they go around the ribs on one side of the deck, (toward the centre of the deck) this may give some more movement to lower the deck into place. NB: This idea would only be ok if there is still plenty of support under the deck to hold it up where you extend the slots.Regards delboy271155 (Derek) COME BACK GUY FAWKES "YOUR COUNTRY NEEDS YOU"
|
|
|
Rank: Semipro Level 1 Groups: Registered
Joined: 25/03/2019 Posts: 66 Points: 191 Location: S Yorkshire, UK
|
Thanks Derek,
Not an idea I had thought of … Dry fitting left me totally stuck. I now have the deck beams in place. Instructions call for the for'ard and stern thirds of the main deck to be planked, prior to placing. For some reason the centre portion has to wait until 2 layers of hull planking are complete.
Once bow & stern get planked, I guess they'll be even stiffer. That's why I was hoping James H would tell me how he did it!
Think my current plan is to make a paper copy of the deck, so I can get an idea whether cutting longer slots or cutting in half would work best. Cutting longer slots would also mean figuring out how to manage the planking to subsequently cover up said slots.
Just taken another look at the not very useful instructions & it might be giving a clue;
"Cut out the main deck … and plank the two halves fore and aft, as shown … Glue the two halves of the deck into place …"
Originally, I thought the two references to 'halves' meant the same thing - a line across the deck but now I'm wondering if the second one refers to a longitudinal split. Of course, nowhere does it say anything about slicing in two ….
You know? I far prefer DeAgostini, explicit, detailed instructions!
I'll post when I decide what I am going to do.
Regards Sue
|
|
|
 Rank: Pro  Groups: Registered
Joined: 26/06/2013 Posts: 174 Points: 490 Location: Lancaster, PA
|
Greetings, I have recently ordered this kit. I will be watching this build to see how it comes out. Take care, Christopher Current builds:
HMS Victory
Black Pearl
Builds on hold:
Millennum Falcon
USS Constellation
Future Builds:
Hanse Kogge (14th C)
Mary Rose (16th C)
|
|
|
Rank: Semipro Level 1 Groups: Registered
Joined: 25/03/2019 Posts: 66 Points: 191 Location: S Yorkshire, UK
|
Don't expect it to go very quickly methinks !! Sue
|
|
|
Rank: Administration Groups: Registered, Forum Support Team, Administrators, Global Forum Support Team, Moderator, Official Builds Joined: 09/11/2012 Posts: 7,953 Points: 23,048 Location: East midlands
|
Hi Sue, As the deck lays in a slightly curved situation I`d try and avoid splitting the deck if at all possible, especially as it has to be planked. Question: Do the instructions say to plank before the deck is fitted or after? The reason I ask is that there are only a few builds of this on the internet (all of which don`t show every step) and all seem to show the deck in place before it is planked.  Regards delboy271155 (Derek) COME BACK GUY FAWKES "YOUR COUNTRY NEEDS YOU"
|
|
|
Rank: Pro Groups: Registered
Joined: 26/06/2013 Posts: 174 Points: 490 Location: Lancaster, PA
|
suey wrote: Don't expect it to go very quickly methinks !! Sue Nobody would expect it to go quickly. I am still in the middle of a build and do not plan to start another until my current one is done. Take your time and enjoy the build. Christopher Current builds:
HMS Victory
Black Pearl
Builds on hold:
Millennum Falcon
USS Constellation
Future Builds:
Hanse Kogge (14th C)
Mary Rose (16th C)
|
|
|
Rank: Semipro Level 1 Groups: Registered
Joined: 25/03/2019 Posts: 66 Points: 191 Location: S Yorkshire, UK
|
Hi Derek,
as quoted from the instructions in post #12 :
"Cut out the main deck … and plank the two halves fore and aft, as shown … Glue the two halves of the deck into place …"
So yes, planking comes before placing & gluing (& temporary pinning until the glue has dried). The ellipses indicating word salad that I do not think relevant.
Now got a paper template in place - took some extreme bending to get around the deck supports, no way would the wooden deck survive. So now I will experiment & see how much I would need to extend the slits.
I see what you mean by splitting longitudinally over the camber, I might have to chance it - rubber bands may be called for, to press into the curve.
Thanks for your suggestions.
Regards Sue
|
|
|
|
|
Hi Sue, I'd be tempted to do as Derek has suggested. Extend the slots on the deck until you can get the deck dry fitted. Once done then you can plank the deck (off the ship), upto where the slots are. Fit the deck then complete the deck planking with the deck in place covering the slots in the process. You could also decide just to plank the complete deck after the deck is fitted. Cutting the deck in half is not something I would recommend. To aid fitting, I would consider painting over the deck with a small brush and warm water, (don't soak the deck otherwise the ply may end up delaminating). The warm water will make the deck piece a little more flexible and easier to fit.
Regards
Alan
|
|
|
Rank: Semipro Level 1 Groups: Registered
Joined: 25/03/2019 Posts: 66 Points: 191 Location: S Yorkshire, UK
|
Gandale / Derek I've decided to go along with the idea of extending the bulkhead slots by about a centimetre. Does take me a bit close to a couple of the hatches and the slot for the bowsprit, so fingers crossed.
Will be a bit delayed as using a no. 11 scalpel whose edge has seen better days. Eventually found my stash of spares and somewhere I know I have sharpening stones, still hiding.
For these kind of cuts, I prefer a chisel type blade, so I have ordered some Swan Morton no. 9's, Let's see how long they take to arrive.
Thanks for your help guys.
Sue
|
|
|
Rank: Semipro Level 1 Groups: Registered
Joined: 25/03/2019 Posts: 66 Points: 191 Location: S Yorkshire, UK
|
Bit back I promised to run build diary from beginning. My photo editor is on a different PC, so fun resizing & moving images to this PC. So here's first few images. suey attached the following image(s):
|
|
|
|
Guest
|
 US
US

