|
|
 Rank: Semi-Pro Level 1  Groups: Registered
Joined: 17/04/2010 Posts: 54 Points: 135 Location: Bradford
|
Thought that I would try keeping a Build Diary for the Bounty. Hopefully having to make regular updates will encourage me to finish it within a reasonable time for once. (Sorry HMS Endeavour - I will get around to building you one day...) First thing before a build, for me anyway, is to see what reference material there is to work with. And for the bounty we have a lot, so I just picked a few that I plan to use. For the Bounty there is of course Bligh's own account of the Mutiny as a primary source of the events themselves.  He is of course not the most 'objective' witness, he being the target/cause of said Mutiny. So best to add a more rounded view to my list, such as  . I also found the Bounty anatomy of a ship book as well. So will be making use of that as well where needed.  And of course for a visual comparison there is always the classic Brando movie as well. Featuring a replica Bounty made for th movie.  . The blu ray has a little booklet as well. So treat myself to that. Cheers
Stuntie.
Building: R2D2 and Sovereign of the Seas
Subscribed: Bounty
|
|
|
Rank: Semi-Pro Level 1 Groups: Registered
Joined: 17/04/2010 Posts: 54 Points: 135 Location: Bradford
|
First pack arrived today. Have opened and looked, but not had chance to start on it yet. Will update once I have built the first parts. Cheers
Stuntie.
Building: R2D2 and Sovereign of the Seas
Subscribed: Bounty
|
|
|
|
|
Look forward to seeing your progress, good luck with the build.....  Regards Alan
|
|
|
Rank: Semi-Pro Level 1 Groups: Registered
Joined: 17/04/2010 Posts: 54 Points: 135 Location: Bradford
|
Starting the Shipyard.had a look at the parts, and the bits for the Shipyard in particular. Photo 1 is a general shot of the 1st set of parts. Photo 2 of the smaller cannon parts.   You don't get instructions or templates, so you will need to download and print them yourself. The shipyard is the base that you build from. So making this a bit wonky will result in a wonky build. So it's worth the extra care to square this up. Photo 3 shows a dry test fit of the parts.  I checked the sizing and both the tabs that stick through, and the rails are both the same size. This means the edges get support from the rails, and the centre parts rest on the tabs. The reason I'm pointing this out is that it will help with supporting and squaring the shipyard. I noticed with all the bits dry fitted that there is small but noticeable step between the two plates, so will need to address that to ensure there is no warp in the final model. You can clamp it between blocks to ensure the step is removed. You can also use two heavy flat sided objects .i.e. 'bricks' if you don't have clamps to push it flush. (mine were too short to clamp the whole width.) I also diverged from the instructions here. They have you gluing it bit by bit, but with little support and a danger of flexing leading to misaligned or warped shipyard. Especially as there is no support at the ends, and that can lead to droop. I decided that I will glue it one set of plates at a time using one of the rails from the other plate to add some temporary extra support for the end of the first part. Showing the 'step' and using the second plate tabs to provide support at the end.  Glued up, and with straight edged objects to help push the sides in line. I also added some tape on the underside where it won't be seen to help pull it into alignment.  And some 'whateverAtHand' for adding weight whilst it dries. And with the thirdplate temporarily added - but not glued, to help ensure the tabs are not too out of alignment when it dries. Will add that tomorrow, once the first two plates are dry and nice and stury.  Plus extra 'whateverAtHand' weights to ensure it ain't going nowhere. Note the added but not glued 'tab support' on the right hand edge to ensure it doesn't droop or bend whilst drying. Yes probably overkill. But I've struggled with a twisted keel before, so am ensuring the shipyard base is nice and straight and level. Cheers
Stuntie.
Building: R2D2 and Sovereign of the Seas
Subscribed: Bounty
|
|
|
|
|
Nice start, am going to enjoy following this build..... Regards Alan
|
|
|
 Rank: Super-Elite       Groups: Registered, Forum Support Team, Administrators, Global Forum Support Team, Moderator, Official Builds Joined: 09/11/2012 Posts: 8,520 Points: 24,651 Location: East midlands
|
Will enjoy watching this come together. Congrats on your "Blue" medal for starting a build diary. Regards delboy271155 (Derek) COME BACK GUY FAWKES "YOUR COUNTRY NEEDS YOU"
|
|
|
Rank: Administration  Groups: Administrator, Administrators, Forum Support Team, Global Forum Support, Global Forum Support Team, Moderator, Official Builds Joined: 24/08/2009 Posts: 1,940 Points: 5,832 Location: UK
|
Looks like it’s going to be fun! (and me, here waiting for official build parts!)
|
|
|
Rank: Super-Elite Groups: Registered, Forum Support Team, Administrators, Global Forum Support Team, Moderator, Official Builds Joined: 09/11/2012 Posts: 8,520 Points: 24,651 Location: East midlands
|
Hi Stuntie,  Having looked at your pics yesterday and again today, I`m concerned that the base plates of the shipyard do not have the outside edges in perfect alignment shown in your post #4, pics 3 and 4. Not knowing what checks you have made, I`m posting this question. (Hopefully not too late  ). When you put the two plates together and found the slight misalignment, did you flip one plate over and see if they then aligned on both sides. The reasons I ask is : a) I would have thought they should be in perfect alignment and b) that the small misalignment may now be replicated in the symmetrical holes in the two base plates. Hope this makes sense.  Regards delboy271155 (Derek) COME BACK GUY FAWKES "YOUR COUNTRY NEEDS YOU"
|
|
|
Rank: Semi-Pro Level 1 Groups: Registered
Joined: 17/04/2010 Posts: 54 Points: 135 Location: Bradford
|
Hi Delboy, The plates have a number lazer etched on one side. So you can check that you have the number on all three plates match up. Lazer cut wood is subject to natural warp and flex when drying, so my assumption is that the plates are cut correctly, and that a very slight bow in the plates occurs after cutting, as it's a natural wood product. It's either that, or they totally messed up the laser cutting templates. With a full kit at hand I could dry fit the whole shipyard, and see which is the case. But have assumed it to be natural warp given how small the step is. But at least it's a very small step, and not banana shaped wood... Edit: did a lot of dry fitting and measuring to check. Same bend when plates turned over. So looked to be flex in the plates, not a misalignment to me at least. Note though that I got the middle plate flipped when glueing. So Doh! But looks and measures the same, so should not really matter. (Least I hope not...) Cheers
Stuntie.
Building: R2D2 and Sovereign of the Seas
Subscribed: Bounty
|
|
|
Rank: Semi-Pro Level 1 Groups: Registered
Joined: 17/04/2010 Posts: 54 Points: 135 Location: Bradford
|
Finished off the first bits of the shipyard. Parts ready for putting together 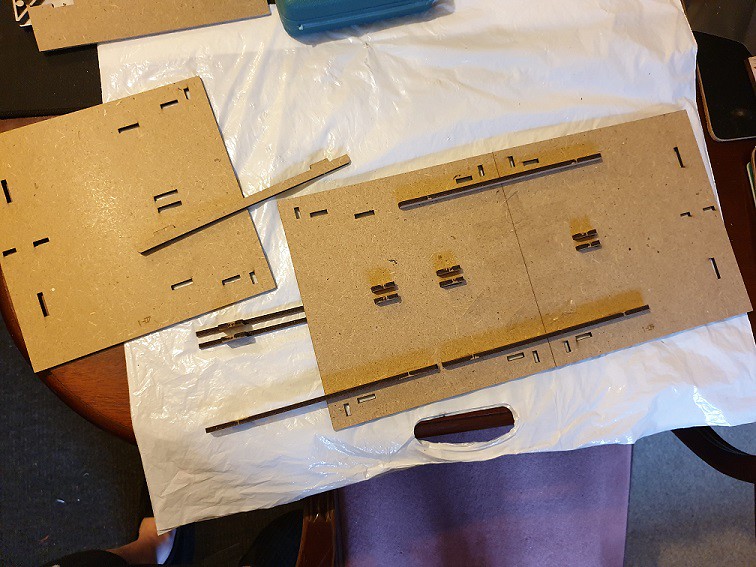 And glued and weighted for drying.  Final shot of glued and dried shipyard base.  Moved on to the first ribs. Used a sharp scalpel blade to get them out cleanly. And usual sand and clean up etc. once popped out. Main bit to get set up will be the two little step wedges.  I popped out each of the steps, the keel and one of the next rib blocks. That allowed me to glue the steps to the keel part. I used the next rib part to help check it fitted into place ok. Hard to spot, but there is a bit of clear plastic under them to stop them sticking to the cutting board etc. I cleaned off any excess glue, but best to be safe. Shot of the keels and steps drying. Note that I used marker to add the #, A, 1 etc. to match the mark on the keel.  And a final shot of one of the ribs fully assembled with the paper template and a clear bit of plastic underneath to stop it sticking whilst glue drying. (yes I did one first, then did the photo's so slightly out of sync chronology wise....)  Will complete the rest of the ribs bit by bit same way. Got a month before next lot of parts, so no big rush... Cheers
Stuntie.
Building: R2D2 and Sovereign of the Seas
Subscribed: Bounty
|
|
|
 Rank: Master  Groups: Registered
Joined: 21/04/2011 Posts: 1,089 Points: 3,296 Location: Buckinghamshire
|
Nice work there, Stuntie.
Looks a lovely build.
Chris
|
|
|
|
|
Good steady progress on show, keep posting..... Regards Alan
|
|
|
 Rank: Elite Groups: Registered
Joined: 13/02/2011 Posts: 2,243 Points: 6,849 Location: Sussex
|
Reading thorough your post Stuntie it looks very interesting and enjoyable build to follow. Regards Trev Work in progress: Tombstone (Scratch) - San Francisco 2. -The Mayflower ( scratch by plan).
OcCre- Santa-Maria (Kit).
|
|
|
Rank: Super-Elite Groups: Registered, Forum Support Team, Administrators, Global Forum Support Team, Moderator, Official Builds Joined: 09/11/2012 Posts: 8,520 Points: 24,651 Location: East midlands
|
Looking good. The completed rib looks spot on, so the laser cutting must be bang on. Keep up the good work. Regards delboy271155 (Derek) COME BACK GUY FAWKES "YOUR COUNTRY NEEDS YOU"
|
|
|
Rank: Semi-Pro Level 1 Groups: Registered
Joined: 17/04/2010 Posts: 54 Points: 135 Location: Bradford
|
First sets of ribs glued and complete. Will give them a clean up light sanding etc. soon.  Popped them aside to start on the keel. I decided to do the flat part of the keel first, and to put that in the shipyard jig to dry. I'll add the prow and the stern bits once it's dry, so I'm not trying to deal with horizontal and vertical alignments at the same time. The first parts of the keel popped out and ready. Careful with the two middle bits. They look identical, and may well be, but are not marked in any way. (I glued the first two bits immediately after taking the photo, so I didn't get them mixed up. But you can take them out only when you are about to glue them.)  And first two bits glued.  [Oops forgot to take photo of the first keel parts glued up., Will add when all dried.] I put a thin sheet of plastic down first, so the bits would not stick together. And then added the first keel parts into the shipyard keel jig.  And popped on 'weights' whilst they dry. 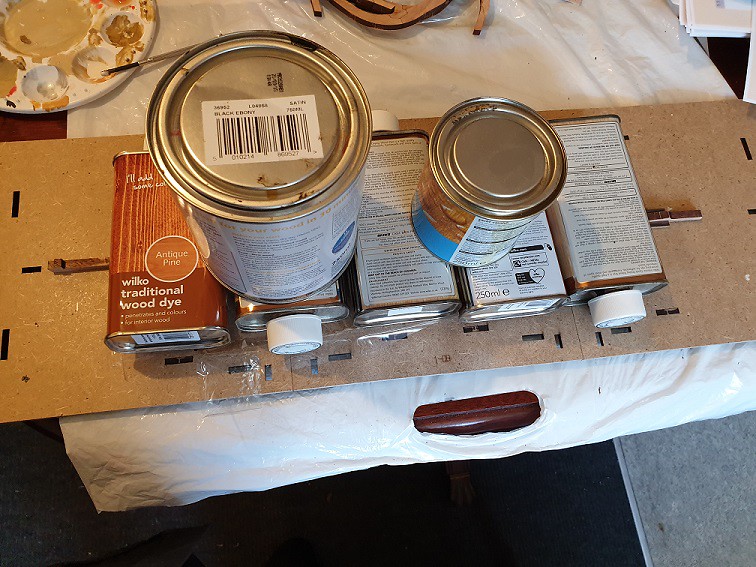 (yes I know - I'll get some proper weights at some point...) Note the peg post on the left, and the start of the prow curve on the right. So easy to ensure it's the 'right way up'. Cheers
Stuntie.
Building: R2D2 and Sovereign of the Seas
Subscribed: Bounty
|
|
|
|
|
Nice work on those ribs, they look as if they fit together very nicely..... Regards Alan
|
|
|
|
Guest
|
 US
US

