|
|
 Rank: Elite    Groups: Unapproved
Joined: 24/05/2010 Posts: 1,761 Points: 5,351 Location: London & Greece
|
WOW, looks like you've been on this as long as I have.
Good to see you back again Tom. Some pics of her current state would be interesting if you get a moment.
|
|
|
 Rank: Pro  Groups: Registered
Joined: 25/03/2010 Posts: 472 Points: 1,357 Location: Hyde
|
Hi John Yeah I need to get her out, clear all the dust and take some proper pics. As far as I remember i got the masts done stored separately, copper is 98% done, still need to plank the rudder, I've stopped at the stage where I had to do cannon doors for entire ship so quite a bit. I've started on rear gallery, etc. There is some custom stuff cone and kit bashing as we did back at the start. I have fitter 8 cannons on the bottom deck, with tons of details added which I need to photograph. Once I get her cleaned up I will take tons of photos and post them all here. Do you know any good solution to clean the copper plates? Thanks Tom
|
|
|
Rank: Elite Groups: Unapproved
Joined: 24/05/2010 Posts: 1,761 Points: 5,351 Location: London & Greece
|
I just used white spirit and some elbow grease on mine. I had to do this a number of times, so I finally gave it a coat of matt polish.
That seems to have stabilised it now.
|
|
|
 Rank: Semipro Level 1 Groups: Registered
Joined: 23/03/2010 Posts: 67 Points: 204 Location: bristol
|
Welcome back Tom i see you joined the forum same time as me back in 2010, i also had an 8 year break from building due to life events etc but ive been working on her since February and i am very pleased with my progress so far from issue 72 up to issue 92 now. i will be posting some pics soon.
|
|
|
Rank: Pro Groups: Registered
Joined: 25/03/2010 Posts: 472 Points: 1,357 Location: Hyde
|
Hi Richard Great to hear from you. I'm getting her cleaned up tonight and I will be doing some copper planking on the rudder. I will be trying different adhesive this time. I've got Stick Like Sh*t by Evo-Stick and I think it will work great. I've got to fill in some copper sheets that had fallen off in the meantime but I think this stuff will work great. I will keep you posted ;) Regards Tom
|
|
|
|
|
Hi Tom, its always great to see a member from the distant past return and I look forward to following your progress as time moves forward.  .. Enjoy the continuation of your journey with your build, am sure it'll give you an enormous amount of pride when done.... .. Will be following..... Regards Alan
|
|
|
|
|
Hi Tom. Nice to see your return, and I look forward to your latest additions.  Mark
|
|
|
Rank: Pro Groups: Registered
Joined: 25/03/2010 Posts: 472 Points: 1,357 Location: Hyde
|
|
|
|
|
|
She looks fab Tom, will be good to see her progress further. Look forward to seeing more...  Regards Alan
|
|
|
Rank: Pro Groups: Registered
Joined: 25/03/2010 Posts: 472 Points: 1,357 Location: Hyde
|
Thanks Alan The first thing I need to go through and finish is copper plating and attaching the rudder. I'd like to have it all out of the way before starting with next steps. I'm thinking of coating all the copper with layer of clear varnish so it doesn't tarnish as before. It will also form nice protective layer and stop any of the tiles from coming off during later build. Of course I will keep you all posted with the progress. In the meantime I'm trying to make my mind up about look of the rudder hinges. I'm blackening all the brass so I think I will do it for the hinges too. It just looks bit weird leaving them in brass finish. What do you think? Regards Tom
|
|
|
Rank: Pro Groups: Registered
Joined: 25/03/2010 Posts: 472 Points: 1,357 Location: Hyde
|
Hi again Today I managed to do little check up of my stash and double check what has been done, what started, etc. I have created little spreadsheet just to keep an eye on the overall progress and where should I continue from as it's been quite few years since I paused my build. So far I'm 59% completed with nearly 11% issues with work in progress and 30% untouched. This will keep me busy for a while ;) Have a great day ;) Tom 
|
|
|
Rank: Elite Groups: Unapproved
Joined: 24/05/2010 Posts: 1,761 Points: 5,351 Location: London & Greece
|
Here's one I prepared earlier you might find useful.
Victory Check Lists
|
|
|
 Rank: Master    Groups: Registered
Joined: 21/04/2011 Posts: 1,043 Points: 3,158 Location: Buckinghamshire
|
I've printed off and used John's check sheets all through my build and it's great to also double check when various stages of the work are/or were planned. Looks like you are really getting back into this now Tom. Will be watching with interest. Chris
|
|
|
Rank: Pro Groups: Registered
Joined: 25/03/2010 Posts: 472 Points: 1,357 Location: Hyde
|
Hello everyone I have accomplished massive milestone in my Victory build. Last night I glued on LAST COPPER PLANK!!! It's done ;) Right now when glue sets properly I will give her a nice clean before spraying on protective coat to prevent tarnishing. Doing the rudder hinges now so I hope to post some nice update photos this weekend. So excited to move on to next steps ;) Have a great day everyone. Tom
|
|
|
Rank: Master Groups: Registered
Joined: 21/04/2011 Posts: 1,043 Points: 3,158 Location: Buckinghamshire
|
Congratulations on completion of the hull tiling.
I didn't tile mine, although sometimes I wish I had (but too late for me to do it now).
Keep the updates coming and well done.
Chris
|
|
|
Rank: Administration  Groups: Administrator, Administrators, Forum Support Team, Global Forum Support, Global Forum Support Team, Moderator, Official Builds Joined: 24/08/2009 Posts: 1,912 Points: 5,752 Location: UK
|
This is looking fantastic! Great job with the build. Very clean!
Best,
Mark
|
|
|
Rank: Pro Groups: Registered
Joined: 25/03/2010 Posts: 472 Points: 1,357 Location: Hyde
|
Hello again Week had past and I have some updates to my build. I'm finally up to speed with everything I've done and what I have missing. Right now I'm concentrating to get all the bits finished off and I got some nice progress recently. Copper hull/rudderAs mentioned in last post I managed to get the hull and rudder finished off. There is a little difference in copper tarnishing as you can imagine as rudder is around 8 years younger :) I hope it will get less obvious after some time. Managed to attach the rudder, I have used the brass hinges provided but I got them blackened so they look better. Overall I'm happy with the result so far - see below 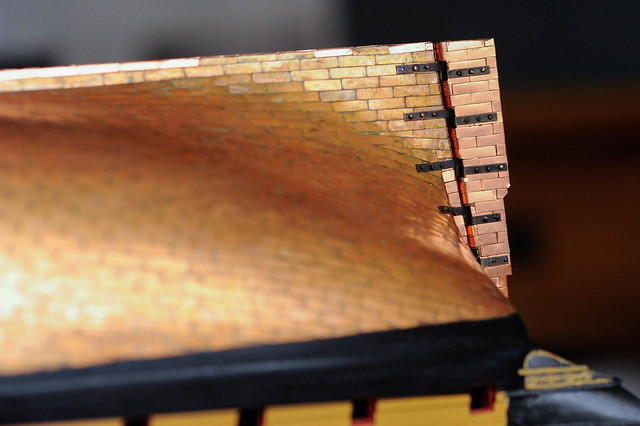 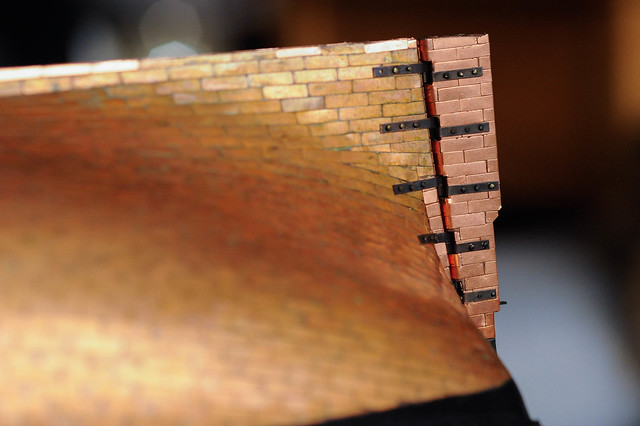 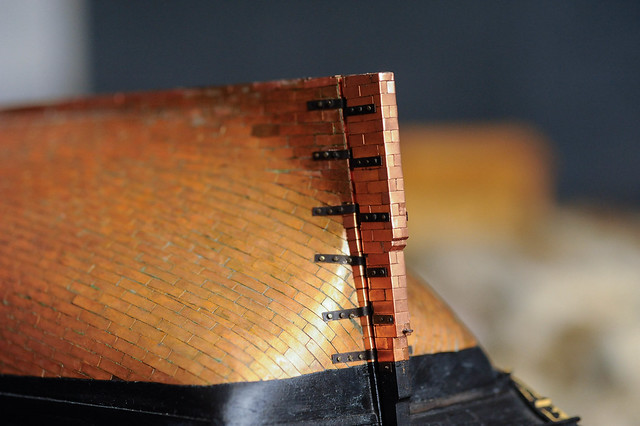 The gun port lids The gun port lidsAnother thing that was long overdue was first 20 gun port lids to fit. I have decided to do some mods as I wasn't happy with what the magazine offered. There is few thing I managed to do. 1. Magazine explained to use just 20x2mm plank and cut the squares. Well don't forget that hull has a different thickness and I needed to follow the shape of the hull so I glued strip of the 1mm thick veneer plank to follow the line of the hull. 2. Next thing that was bothering me was the rigging of the lids. The magazine wanted to drill hole through the lid and feed the thread - well not for me. I used the hinges supplied but instead of sticking it flat to the lid i bent the eyelet 90 degrees so I can feed the thread through it. Then i used very fine one to tie it there so it looks similar to real thing. 3. Last thing needed adding were eyelets on the inside of the ports to pull them shut. This is very nice detail that cannot be missed in my opinion. Well it was easier said than done as I had to make something small enough. With my chunky fingers I'm super proud of myself for achieving this. It was nice exercise before customising my cannons. I used 0.4mm brass wire and 0.5mm cable ferrule. I wrapped the brass wire around the ferrule and then using fine snips I cut them one by one. This gave me nice small rings (around 1.5mm dia). The eyelet was little more tricky as i was using fine tweezers to wrap wire around it and make the eyelet. I guess everyone has its own method and this worked for me. Last part was assembling them together. I've done it - two fine tweezers and tons of patience and eye strain and it's done. No magnifying glass or specs either so I think my eyesight is still strong At the end I got it all blackened and it was time for the assembly. Important note for everyone when dealing with small wooden parts. I always used shellac to ceal the wood before sanding and painting. It makes all the difference as wood stays smooth. In terms of painting don't use too much paint as you will cover up all the details. Thin paint and couple of layers and it's done. Ok enough talking - have a look at some pics...       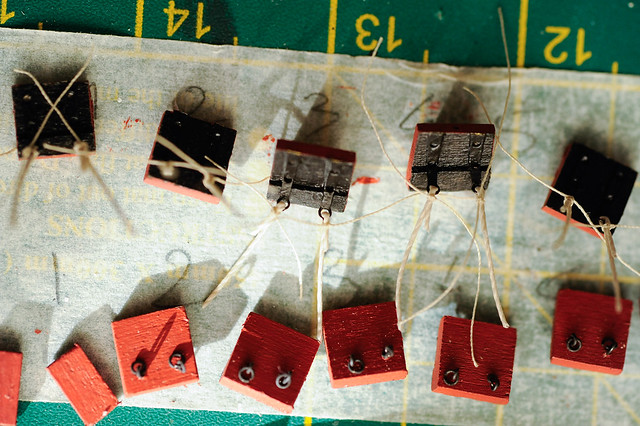 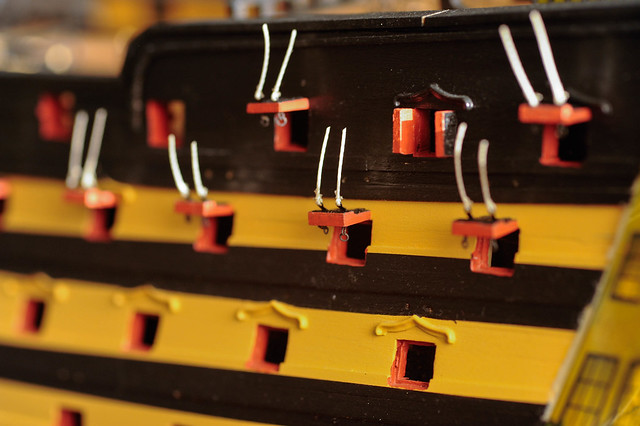    OK See you next time, I think I will have some of the rear gallery done as I'm getting started on this. Also I need to build 6 deck cannons so plenty of work there - I have carriages already done from years ago so it should be fairly quick. I'm thinking about rigging them as I will be adding some crew to the ship but I will see ;) Have a great builds... Tom
|
|
|
Rank: Elite Groups: Unapproved
Joined: 24/05/2010 Posts: 1,761 Points: 5,351 Location: London & Greece
|
Amazing level of detail, Tom.
Great work.
|
|
|
Rank: Master Groups: Registered
Joined: 21/04/2011 Posts: 1,043 Points: 3,158 Location: Buckinghamshire
|
Great detail Tom.
Thanks for sharing with us.
Chris
|
|
|
Rank: Semi-Pro Level 1 Groups: Registered
Joined: 10/03/2016 Posts: 72 Points: 219 Location: ASHFORD KENT
|
That’s some high quality work Tom well done…
|
|
|
|
Guest
|
 US
US

