|
|
 Rank: Pro   Groups: Registered
Joined: 25/03/2010 Posts: 472 Points: 1,357 Location: Hyde
|
Hello again
Ok folks time for a decent update on my build. I managed to take some decent photos tonight but before them I will need to post not so good ones but I think it is important to mention what mods I made.
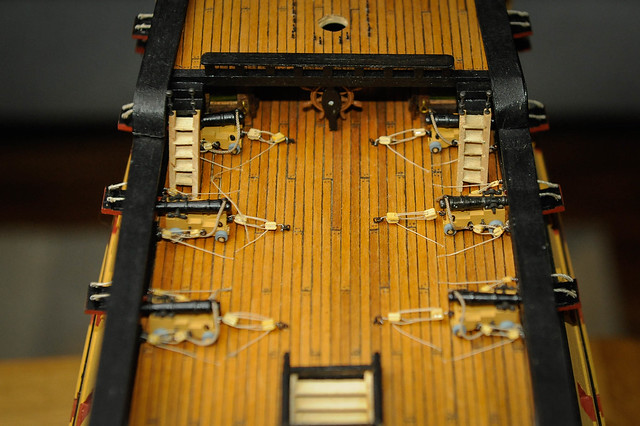
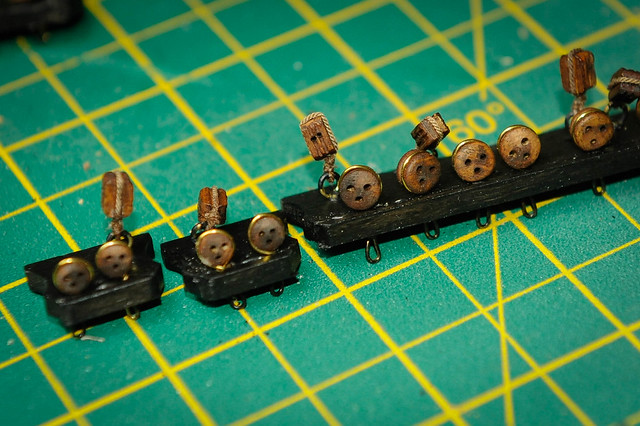
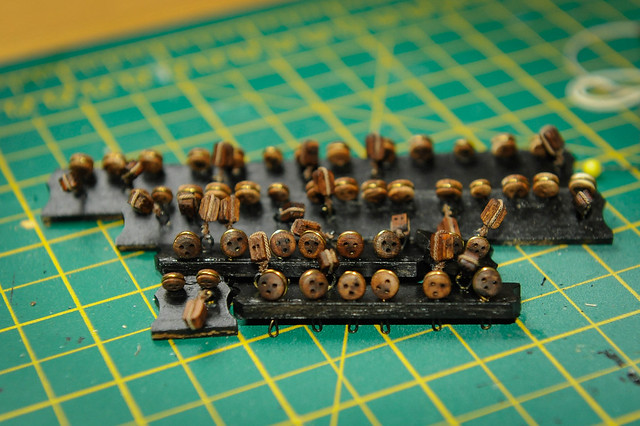
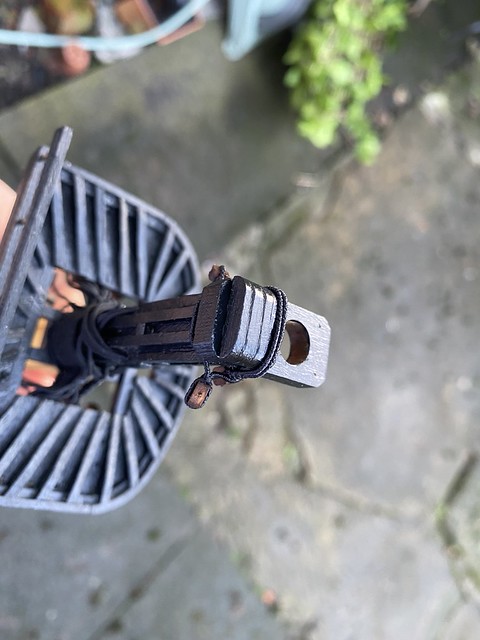
I will start with carronades. The carriages used in the kit are waaaayyyy too big and I had to scrap them. I have used some left over copper plates to make brackets and a sliced skewer to get the wheels in the right size. It took some messing around to get them right but it looks much better. At least carronade is level with the wheels on.

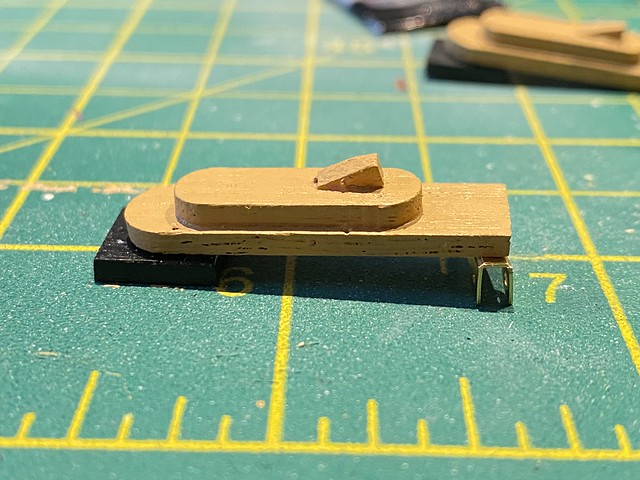

With this done I got them put together, painted all the necessary details and I managed to use my own rope :)
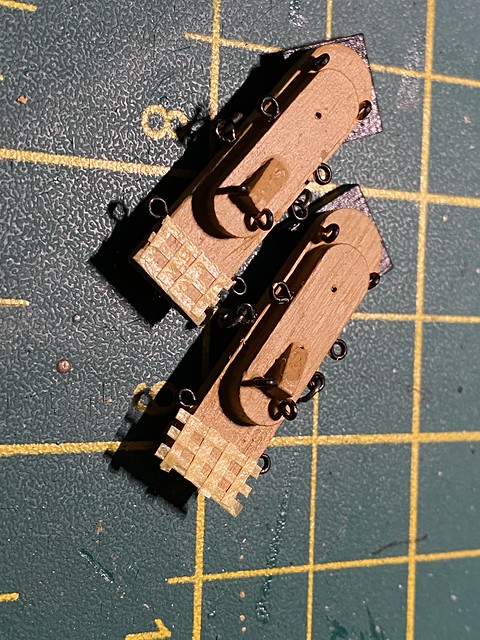
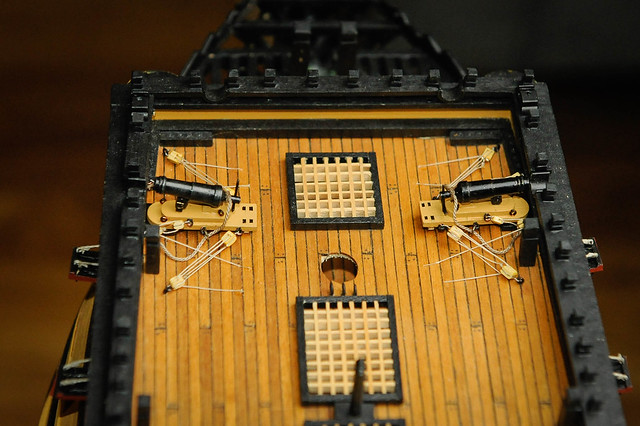
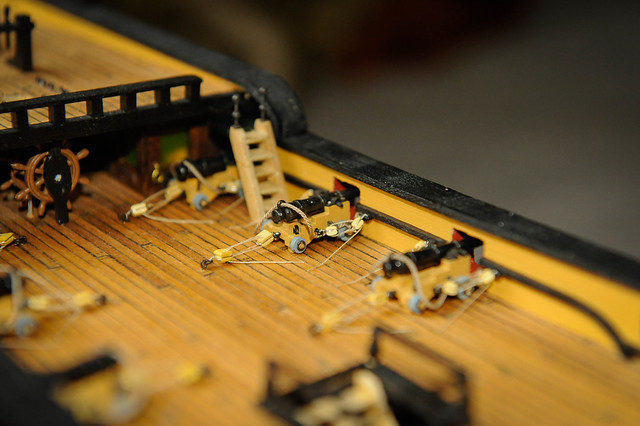
Together with carronades I finished all 6 top deck cannons with rigging. I used 2mm block for side tackle and 3mm doubles for the main one. Only thing I have left to do is coiled up rope but I will get to that at some point ;)


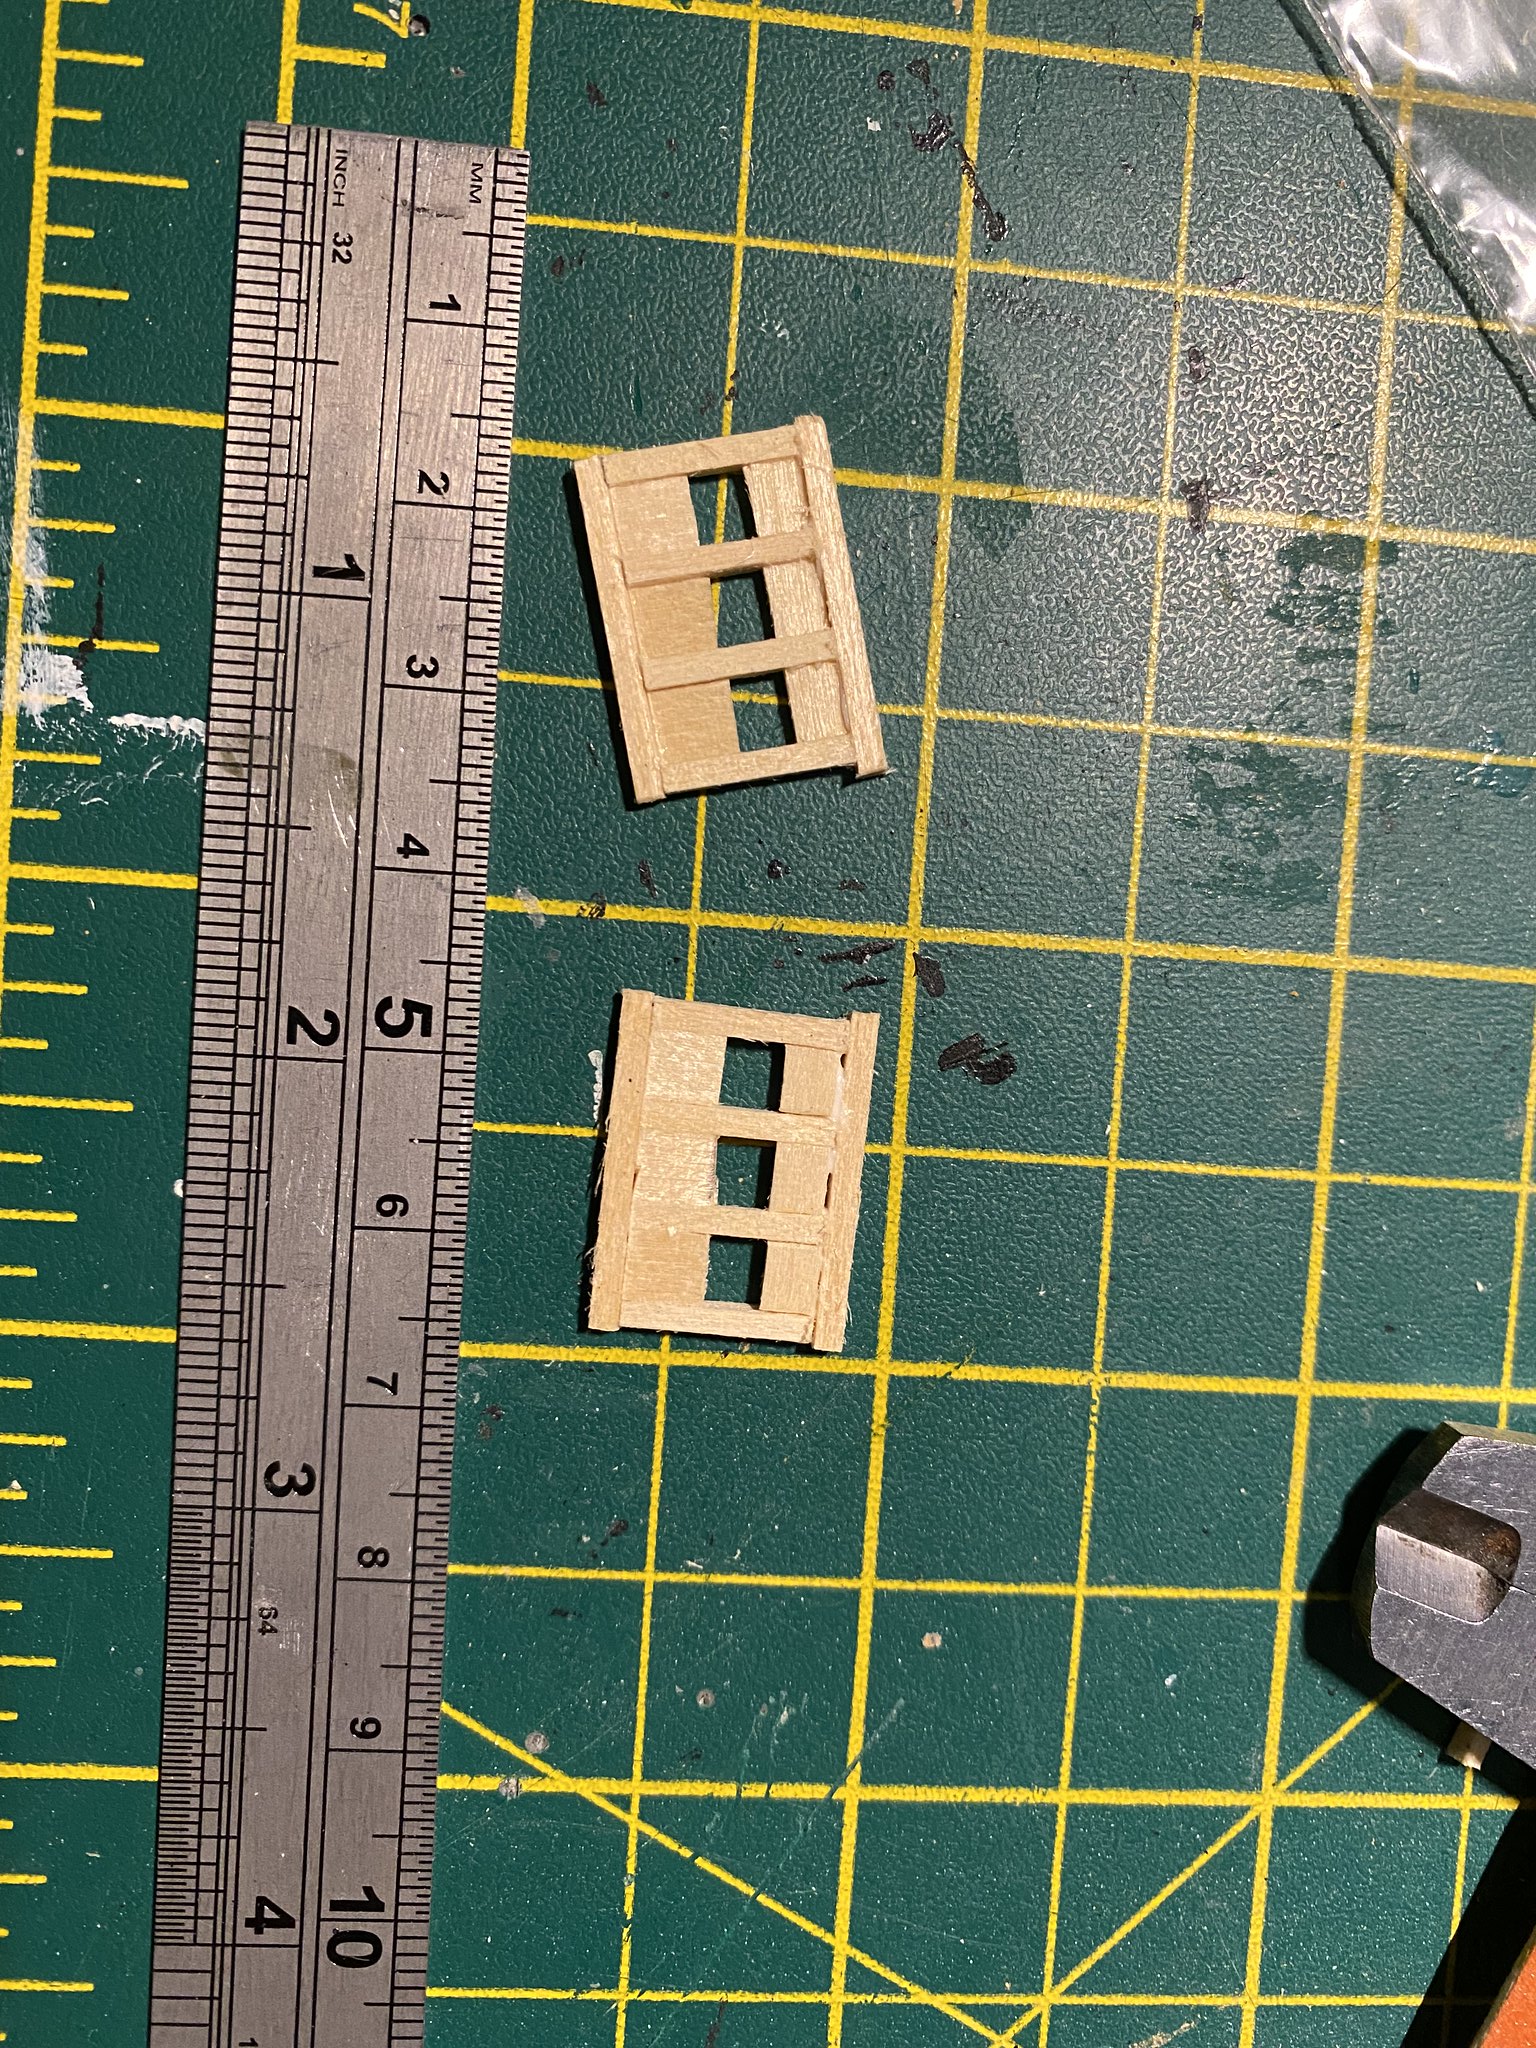
Lastly I finished preparing chainwales and they are nearly ready for fixing onto the hull. I had to remove all the blocks as I decided to stain them so they look better than plain, I stained the deadeyes too. They I rigged them using my own 0.5mm rope which looks much better. I didn't tie just simple knots around them, I did it properly with thin thread and ca glue. You can't see it properly on the pics but I will try to get the better closeups later down the line when doing the masts blocks again.


At the end few pics of the gallery which looks better in this light. Still need to add some black strips (got the masking tape already).


Have a great builds everyone 
Regards
Tom
|
|
|
 Rank: Master      Groups: Registered
Joined: 21/04/2011 Posts: 1,040 Points: 3,149 Location: Buckinghamshire
|
Hi Tom,
A very impressive build.
Keep it coming.
Chris
|
|
|
 Rank: Vice-Master  Groups: Registered
Joined: 26/05/2014 Posts: 912 Points: 2,773 Location: East Sussex UK
|
Some lovely details going into this Tom, the Carronades look fantastic and i reckon you're really chuffed about using your own rope and so you should be. Regards Paul Building: DelPrado HMS Victory. Building: DeAgostini Sovereign Of The Seas.
|
|
|
Rank: Pro Groups: Registered
Joined: 25/03/2010 Posts: 472 Points: 1,357 Location: Hyde
|
Thanks Chris, Paul I'm really happy about how it's all coming along. I can't wait to fit the chainwales as it will give another great detail in. I still have to replace and rig all the blocks on all masts so looks like I'll be busy next week or so ;) Regards Tom
|
|
|
Rank: Pro Groups: Registered
Joined: 25/03/2010 Posts: 472 Points: 1,357 Location: Hyde
|
Hello everyone!!!
I hope you had a great Christmas.
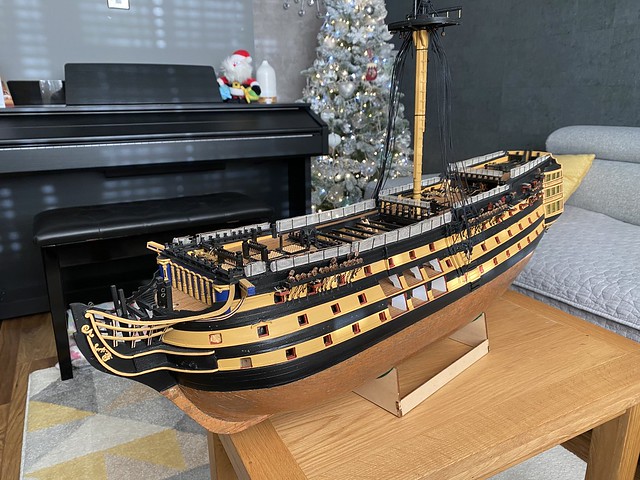
It’s been a while since my last update but it was very productive time for me. I managed to get few things done as planned
1. Gallery
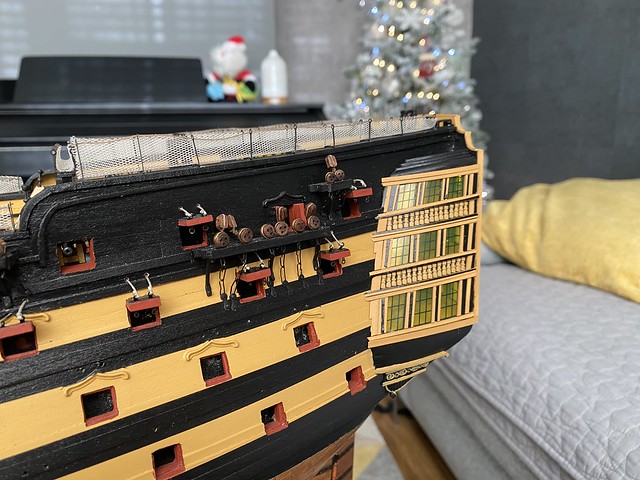
I finished all the painting, got the crest painted and attached too.
I was looking into the official build and real pictures and I modified it slightly. First off I started as yellow orche as base colour and I filled in with black. I used 2mm masking tape which was tricky but it worked well. I did little trick that stopped any paint bleeding under the tape. After sticking the tape I painted over it yellow (base colour) to cover up any gaps. When it dried I used black with paintbrush (no 0) so you can imagine the process. It took two layers. Have a look at before and after pics…
 _DSC9877_edit by Tom Gancarz, on Flickr _DSC9877_edit by Tom Gancarz, on Flickr
 Untitled by Tom Gancarz, on Flickr Untitled by Tom Gancarz, on Flickr
 Untitled by Tom Gancarz, on Flickr Untitled by Tom Gancarz, on Flickr
 by Tom Gancarz, on Flickr by Tom Gancarz, on Flickr
2. Compas cabinet
Well this was a process of deciding what to to do about it. I was sure that I hated the official version. I decided to scratch build one after seeing fantastic build on this forum. Have a lok…
 Untitled by Tom Gancarz, on Flickr Untitled by Tom Gancarz, on Flickr
 Untitled by Tom Gancarz, on Flickr Untitled by Tom Gancarz, on Flickr
 Untitled by Tom Gancarz, on Flickr Untitled by Tom Gancarz, on Flickr
 Untitled by Tom Gancarz, on Flickr Untitled by Tom Gancarz, on Flickr
I’m really happy how it turned out. I made the lantern and compasses from the dowel with some precise painting. The windows have yellow plastic film I used on the gallery which was supplied. It’s not llike you can see much through but I know it’s there and it’s reason good enough for me 😂
3. Brackets for hammocks netting.
I blackened them first and glued with gel super glue. Really tricky process. Once glue dried I dabbed pva on both sides to strengthen the bond. I made a change and instead of wire I used rope as per original. I also ordered ecru netting to replace black one. Will see how itlooks when completed. I’m happy so far.
 Untitled by Tom Gancarz, on Flickr Untitled by Tom Gancarz, on Flickr
 Untitled by Tom Gancarz, on Flickr Untitled by Tom Gancarz, on Flickr
 Untitled by Tom Gancarz, on Flickr Untitled by Tom Gancarz, on Flickr
 Untitled by Tom Gancarz, on Flickr Untitled by Tom Gancarz, on Flickr
 Untitled by Tom Gancarz, on Flickr Untitled by Tom Gancarz, on Flickr
That’s it for now. I’ve started rigging shrouds and I went crazy withdetails but I will post some update on this hopefully tomorrow
All the besr !!!
|
|
|
Rank: Master Groups: Registered
Joined: 21/04/2011 Posts: 1,040 Points: 3,149 Location: Buckinghamshire
|
Hi Tom,
All looking very good to me. Well done and keep it coming.
Chris
|
|
|
Rank: Vice-Master Groups: Registered
Joined: 26/05/2014 Posts: 912 Points: 2,773 Location: East Sussex UK
|
Looks great Tom, looking forward to seeing what you're doing with the shrouds. Regards Paul Building: DelPrado HMS Victory. Building: DeAgostini Sovereign Of The Seas.
|
|
|
 Rank: Elite Groups: Unapproved
Joined: 24/05/2010 Posts: 1,761 Points: 5,351 Location: London & Greece
|
Fantastic work and great pictures, Tom.
BTW, you may want to think about resizing them down to 670px otherwise
the text ends up bleeding across the full page width.
|
|
|
Rank: Pro Groups: Registered
Joined: 25/03/2010 Posts: 472 Points: 1,357 Location: Hyde
|
Thanks
I’m posting from ipad so images look bit big not sure why. Anyway....
I was doing some research before starting rigging and I decided to wind my own ropes. Supplied ones are bit crap.
I got some synthetic thread
Tera 180 for black which is really thin. To give you an idea to make 1.1mm rope I used 3x10 strands so you have an idea.
To start I need to mention rope sizes in the magazine. They are bit off and I follow 1/72 JoTiKa instructions regarding the sizes. I calculated it for 1/84 scale so for example main and fore shrouds are 1.1mm and mizzen is 0.64mm which in this thread gives 3x10 and 3x6 strands. There is big difference in main stay and preventer. In magazine they are both the same thickness but it should be 1.54 for main (3x16) and preventer is 1.1 (3x10). Just as an example.
I got myself a book Anatomy of Nelson’s Ships and this page became my goal...
 Untitled by Tom Gancarz, on Flickr Untitled by Tom Gancarz, on Flickr
As you can see the first shroud is fully served to prevent damage from sails. The shrouds loop around the mast and they are binded together. The pendants are served too as well as all the block fittings on the top of the main and fore mast. I will be doing the sling too to secure main yards.
I’ve done all serving without any machinery - all by hand twisting. I found that treating the rope with diluted pva beforehand helps to get nice results.
I know it’s tons of work but result is well worth the effort.
 Untitled by Tom Gancarz, on Flickr Untitled by Tom Gancarz, on Flickr
 Untitled by Tom Gancarz, on Flickr Untitled by Tom Gancarz, on Flickr
 Untitled by Tom Gancarz, on Flickr Untitled by Tom Gancarz, on Flickr
 Untitled by Tom Gancarz, on Flickr Untitled by Tom Gancarz, on Flickr
And my variations of ropes so far...
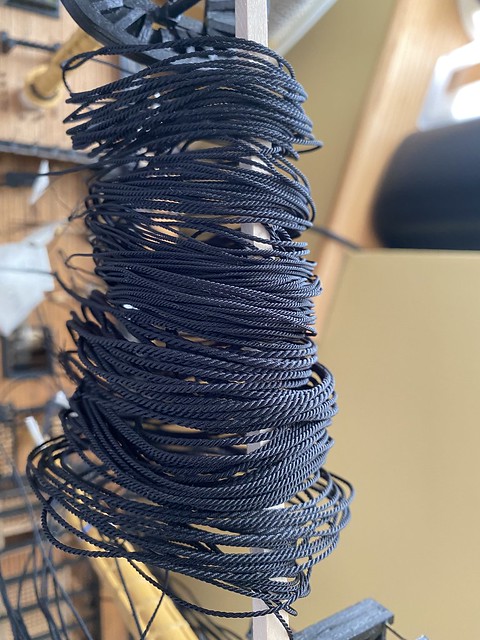 Untitled by Tom Gancarz, on Flickr Untitled by Tom Gancarz, on Flickr
Happy New Year everyone!!!!!!
|
|
|
Rank: Vice-Master Groups: Registered
Joined: 26/05/2014 Posts: 912 Points: 2,773 Location: East Sussex UK
|
Happy new tear Tom, the ropes look fantastic. Building: DelPrado HMS Victory. Building: DeAgostini Sovereign Of The Seas.
|
|
|
Rank: Master Groups: Registered
Joined: 21/04/2011 Posts: 1,040 Points: 3,149 Location: Buckinghamshire
|
In the words of Graig Revel Horwood (dancing thingy) "The ropes look A.M.A.Z.I.N.G!!"
Well done Tom. In all seriousness, they really do make a difference.
Beyond my patience/skill level, I'm afraid.
Happy New Year and look forward to more diary posts in 2022.
Chris
|
|
|
 Rank: Semipro Level 1 Groups: Registered
Joined: 23/03/2010 Posts: 67 Points: 204 Location: bristol
|
Happy New Year Tom and WOW that rope looks amazing and i love the additional detail to the carronades. Thats what i love about this forum getting inspired by others to add more detail, thanks to you i have just ordered a ropewalk and a seizing machine and a whole new side hobby interest has been born.
|
|
|
Rank: Pro Groups: Registered
Joined: 25/03/2010 Posts: 472 Points: 1,357 Location: Hyde
|
Happy New Year everyone!!!
Thanks for kind words guys I’m super excited about the way it all looks.
I managed to get some more stuff done. Glues compass cabinet, fitted white netting too. I was thinking about attaching it to the ropes but I think it will be too much of ropes there. As soon as I put the hammocks in they will hold everything in place nicely.
I came up with quite nice idea of cutting the netting into the shape. First I stained it a little with tea so they aren’t as white 😏
Then I glues masking tape on top of it leaving little excess around so it was stuck to the mat. Then I took the dimensions and using metal ruler I cut it with sharp blade. It worked great. Perfect straight cuts.
In terms if rigging I added slink into the main mast to secure main yard - it looks great.
I managed to serve all remaining yards for fore and mizzen mast so I will be fitting them today. Had a little play with main stay as some of it is served (eye all the way to the mouse) and rest of it is wormed with thin rope. Got to do this too - it will be fun 😂
Have a look at some pics…
 Untitled by Tom Gancarz, on Flickr Untitled by Tom Gancarz, on Flickr
 Untitled by Tom Gancarz, on Flickr Untitled by Tom Gancarz, on Flickr
 Untitled by Tom Gancarz, on Flickr Untitled by Tom Gancarz, on Flickr
 Untitled by Tom Gancarz, on Flickr Untitled by Tom Gancarz, on Flickr
 Untitled by Tom Gancarz, on Flickr Untitled by Tom Gancarz, on Flickr
 Untitled by Tom Gancarz, on Flickr Untitled by Tom Gancarz, on Flickr
Thanks!
|
|
|
Rank: Master Groups: Registered
Joined: 21/04/2011 Posts: 1,040 Points: 3,149 Location: Buckinghamshire
|
Hi Tom,
excellent progress and really nice photos.
Well done and keep it coming.
Chris
|
|
|
Rank: Vice-Master Groups: Registered
Joined: 26/05/2014 Posts: 912 Points: 2,773 Location: East Sussex UK
|
Making good progress Tom, you've gotta be very proud of that rigging. Building: DelPrado HMS Victory. Building: DeAgostini Sovereign Of The Seas.
|
|
|
Rank: Pro Groups: Registered
Joined: 25/03/2010 Posts: 472 Points: 1,357 Location: Hyde
|
Thanks guys. I’m really enjoying the process so it will be great. I can’t wait to get masts fitted and rig the deadeyes…
|
|
|
Rank: Pro Groups: Registered
Joined: 25/03/2010 Posts: 472 Points: 1,357 Location: Hyde
|
Hello everyone!
Finally I managed to take some pics of the latest work I've done.
As you probably know I had done bit of the research in regards to the rigging, ropes, blocks and sizes of them all. In terms of ropes the DeAgostini instructions aren't accurate and I have decided to have a look for more info.
I found JoTiKa instructions with more accurate rope sizes. Their model is 1/72 so quick math and I've had the sizes for 1/84
As I'm twisting my own ropes I have compiled little conversion chart with the sizes and how many strands of thread I need. I'm using Gutermann Tera180 synthetic thread for my standing rigging so here you have. First number is 1/72 scale size, next 1/84 and then number of strands.
I was using my lego set for ropes, I managed to twist about 4m/rope at time so great. In terms of first stage of twisting I was twisting until the length shrunk by no more than 20% its original length. That way strands are nice and tight.
2.5mm - 2.14mm - 3x20
1.8mm - 1.54mm - 3x16
1.3mm - 1.1mm - 3x10
1.0mm - 0.86mm - 3x8
0.75mm - 0.64mm - 3x6
0.5mm - 0.43mm - 3x4
0.25mm - 0.2mm - 3x2
0.1mm - 0.09mm - 3x1
Going to the actual model the fore and main mast lower shrouds are made off 1.1mm rope and mizzen mast 0.64mm
Main stay is 1.54mm and main preventer stay is 1.1mm (DeAgostini has it as one size). Then the main stay rope is wormed, and top end after the mouse is served too so it will be tricky.
I posted some pics previously but I git better ones this time.
1. Shrouds, mast blocks, slings, etc
 _DSC9935 _DSC9935
 _DSC9932 _DSC9932
 _DSC9926 _DSC9926
 _DSC9947 _DSC9947
 _DSC9946 _DSC9946
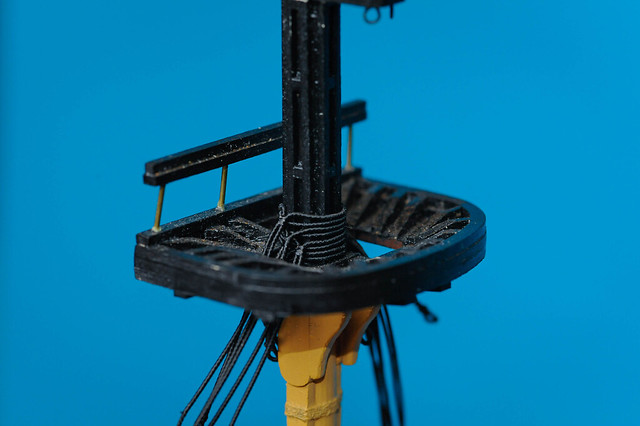 _DSC9944 _DSC9944
 _DSC9942 _DSC9942
 _DSC9939 _DSC9939
 _DSC9938 _DSC9938
 _DSC9937 _DSC9937
 _DSC9936 _DSC9936
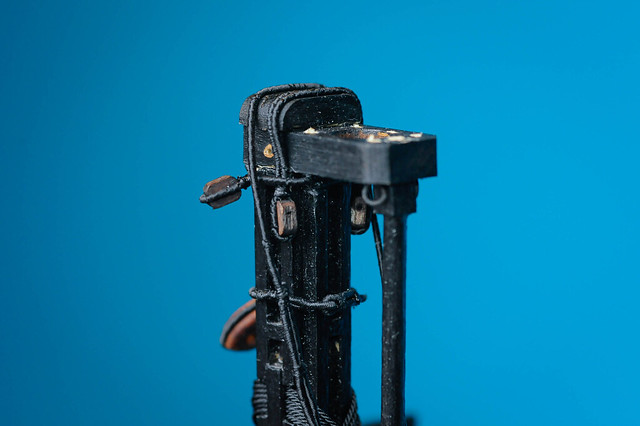
2. Next I had prepared deadeyes for top mast shrouds and I did it different way to the instructions following Anatomy of Nelson's Ships.
Untitled
 _DSC9896 _DSC9896
 _DSC9901 _DSC9901
 _DSC9918 _DSC9918
 _DSC9923 _DSC9923
3. And some stuff waiting to be fitted on mizzen top mast plus served ropes in different sizes...
 _DSC9910 _DSC9910
 _DSC9909 _DSC9909
 _DSC9912 _DSC9912
 _DSC9914 _DSC9914
 _DSC9916 _DSC9916
 _DSC9915 _DSC9915
Ok that's it for now. I've got to fit the deadeyes to the shrouds now so tons of twisting and messing around :)
Will keep you posted shortly
Regards
Tom
|
|
|
Rank: Administration   Groups: Registered, Forum Support Team, Administrators, Global Forum Support Team, Moderator, Official Builds Joined: 09/11/2012 Posts: 7,963 Points: 23,078 Location: East midlands
|
That`s all looking very good.  Regards delboy271155 (Derek) COME BACK GUY FAWKES "YOUR COUNTRY NEEDS YOU"
|
|
|
Rank: Vice-Master Groups: Registered
Joined: 26/05/2014 Posts: 912 Points: 2,773 Location: East Sussex UK
|
You're worming your ropes as well, Incredible detail Tom i'd like to see more of how you're doing that, as for the twisting and messing around you need to be listening to Chubby Checker and Ray Charles while your doing it, i'm seriously looking at a rope walk now i'm very jealous. Regards Paul Building: DelPrado HMS Victory. Building: DeAgostini Sovereign Of The Seas.
|
|
|
Rank: Pro Groups: Registered
Joined: 25/03/2010 Posts: 472 Points: 1,357 Location: Hyde
|
Thanks guys it's great process ;)
Paul, it's like a meditation when I'm serving the ropes. The eye concentration at its max as I'm doing it all by hand and to be fair I got quite good at it. It takes me about 10 min to serve about 30cm of rope which isn't too bad :)
In terms of all the guidance please have a look at her build. I'm basing all my rigging on her level of details which is crazy 
https://en.shipphotographer.com/victory-proces
Regards
Tom
|
|
|
|
Guest
|
 US
US

