|
|
 Rank: Pro   Groups: Registered
Joined: 25/03/2010 Posts: 472 Points: 1,357 Location: Hyde
|
Hello everyone!
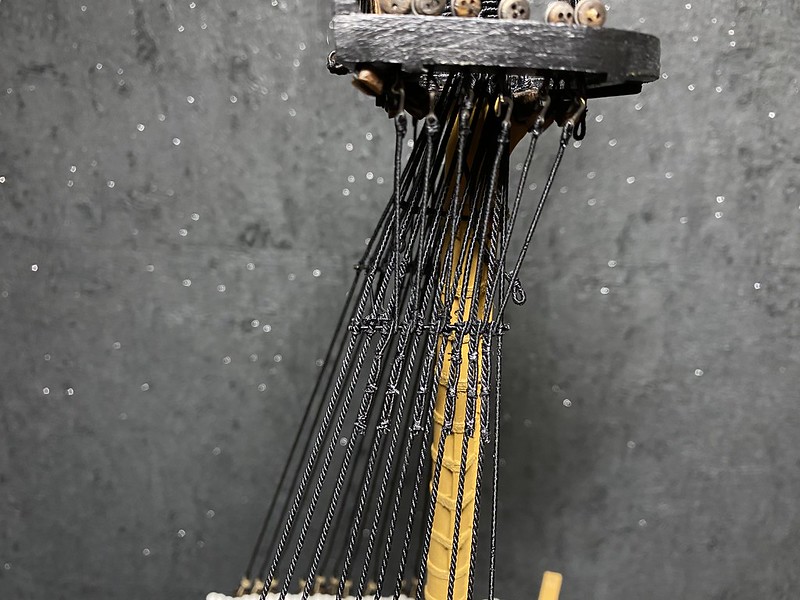
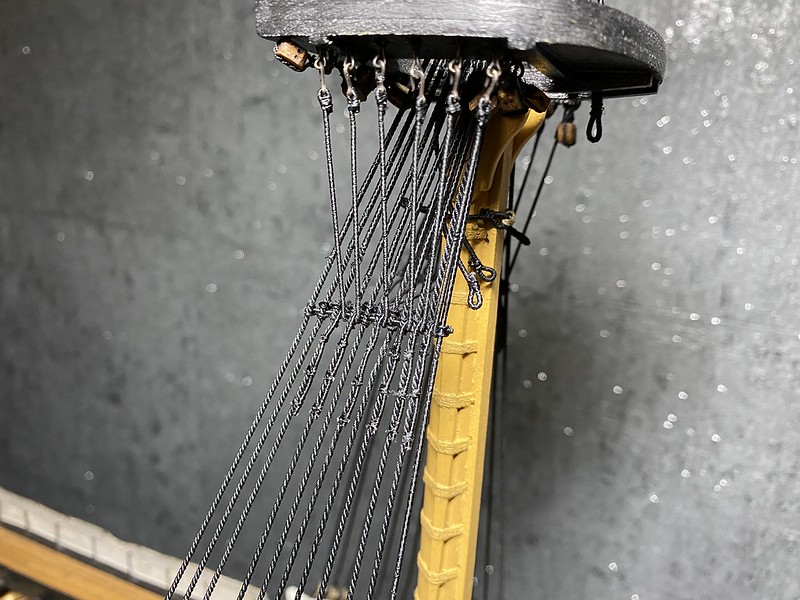
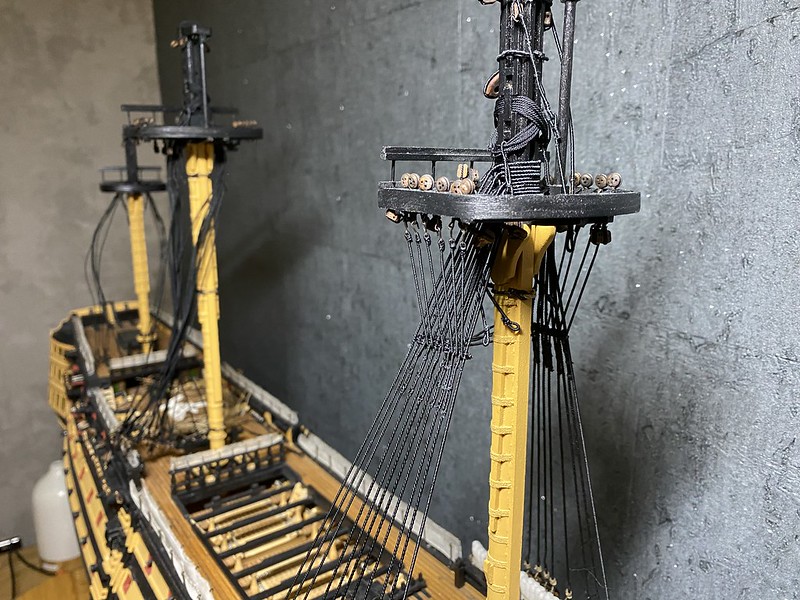
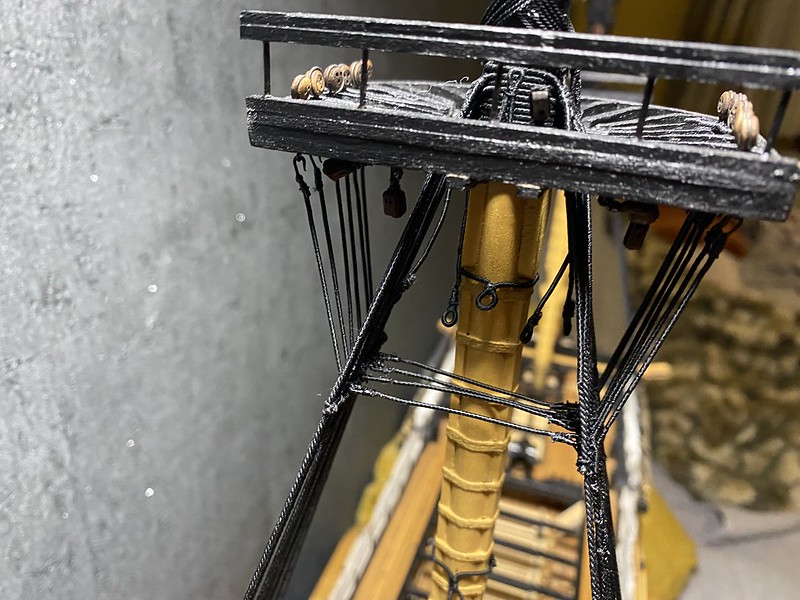
Got some update to my fore mast. I have officially finished doing futtock shrouds. It took long time getting it just right. I'm happy with the results, it will be much easier with other masts as I got some practice doing this one ;)
It would be difficult to say which part was most difficult as all of it was tricky. Futtocks, catharpins and futtock shrouds were tricky enough to install but enough patience will make anything possible. Right no I have already started on the main mast, I hope to get it mounted and rigged this week so stay tuned for more updates.
As usual have a look at some pics from what I've got so far...
 Untitled Untitled
 Untitled Untitled
 Untitled Untitled
 Untitled Untitled
 Untitled Untitled
Stay tuned for more soon...
Regards
Tom
|
|
|
 Rank: Master      Groups: Registered
Joined: 21/04/2011 Posts: 1,039 Points: 3,140 Location: Buckinghamshire
|
Very nicely done.
Speechless.
Chris
|
|
|
 Rank: Semipro Level 1 Groups: Registered
Joined: 23/03/2010 Posts: 64 Points: 195 Location: bristol
|
well done Tom that looks epic.
|
|
|
 Rank: Vice-Master  Groups: Registered
Joined: 26/05/2014 Posts: 912 Points: 2,773 Location: East Sussex UK
|
That looks amazing Tom, well done mate. Building: DelPrado HMS Victory. Building: DeAgostini Sovereign Of The Seas.
|
|
|
Rank: Pro  Groups: Official Builds, Registered Joined: 27/03/2021 Posts: 405 Points: 1,218 Location: US
|
Incredible attention to detail Tom. Taking the rigging to the next level really shows and is inspiring. COMPLETED:• HMS Victory (DeAgostini Subscription) - if you haven't got it, get it...what a beautiful build. This was my first attempt at this stuff and what a great experience. The instructions were spot on for those new to the hobby. • HMS Bounty Admiralty (DeAgostini Subscription) - View the build diary.IN PROGRESS:• USS Constitution (DeAgostini Subscription) - View the build diary.IN NEED OF MY LOVE AND ATTENTION:• HMS Sovereign of the Seas (DeAgostini Subscription) - promise myself I will get to this after I finish the USS Constitution and the HMS Bounty. Need to maintain balance in my marriage.
|
|
|
Rank: Pro Groups: Registered
Joined: 25/03/2010 Posts: 472 Points: 1,357 Location: Hyde
|
Thank you gents. I have modified the structural build and added more details so there was no other choice with rigging that to do it properly. Small details make all the difference and when you compare quality of the ropes supplied it is another planet away. Then it is domino effect, once you start doing your own ropes, then you have control over sizes and many other things. It opens all new universe of possibilities. Of course great input from other modellers helps a ton plus great books available that show how it was done in reality.
I'm ding main mast now, already rigged the shrouds to the deck, now time for the catharpins, futtock shrouds, etc. I have already blackened everything so it should be done within few days.
Stay tuned for more details shortly
Regards
Tom
|
|
|
Rank: Pro Groups: Registered
Joined: 25/03/2010 Posts: 472 Points: 1,357 Location: Hyde
|
Hello again :)
Project accomplished, lower main mast rigged and glued. Futtock shrouds and accessories done too :)
It was much easier than fore mast only because I already practiced doing it ;) It looks amazing so now it is time for either mizzen mast of rigging the bowsprit. I think I will do the latter as I need to mark the stays and preventers for main and fore mast.
Have a look...
 Untitled Untitled
 Untitled Untitled
 Untitled Untitled
 Untitled Untitled
 Untitled Untitled
 Untitled Untitled
 Untitled Untitled
Have a great day ;)
Tom
|
|
|
Rank: Semipro Level 1 Groups: Registered
Joined: 23/03/2010 Posts: 64 Points: 195 Location: bristol
|
Looks absolutely fantastic Tom well done.
|
|
|
Rank: Pro Groups: Registered
Joined: 25/03/2010 Posts: 472 Points: 1,357 Location: Hyde
|
Thanks Richard
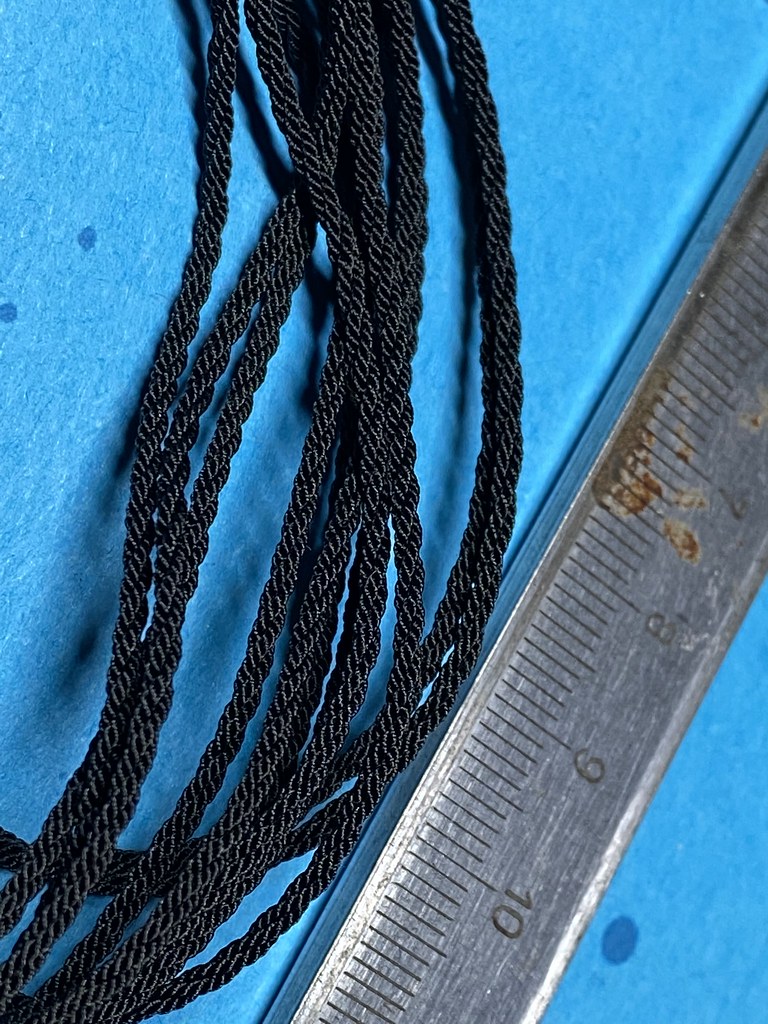
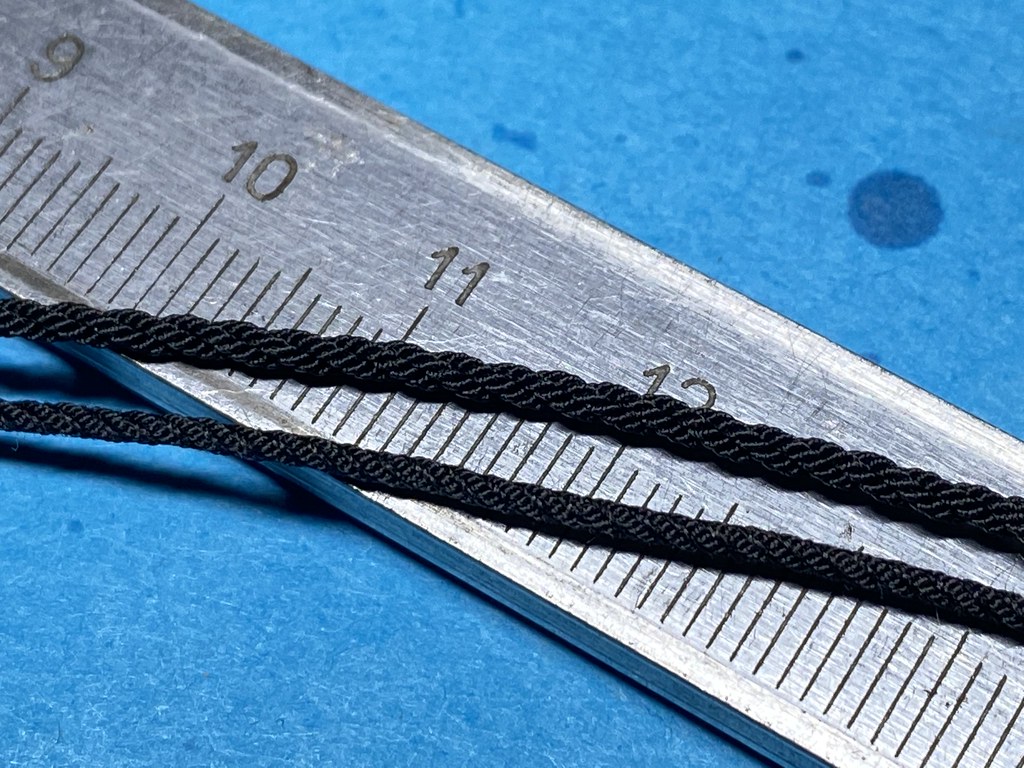
I've got another update, I managed to play with the ropes a little tonight. I wanted to have a go and make cables for main stay and preventer stay. They turned out great, for preventer stay I used 3x(4x3) and for main stay it was 3x (6x3). I went super crazy and I did sneaking on the preventer stay for now, my eyes are bleeding from concentrating and focusing on this. Super hard after a while you don't know what you are looking at :) I managed to stay away from magnifying glass.
This thing will look spectacular once done. Last thing that will make me sweat is making the mouse (the proper way).
Have a look...
 Untitled Untitled
 Untitled Untitled
 Untitled Untitled
 Untitled Untitled
Stay tuned for more...
Tom
|
|
|
Rank: Pro Groups: Registered
Joined: 25/03/2010 Posts: 472 Points: 1,357 Location: Hyde
|
Hello everyone
I got another update on my build. I've been messing with the main stay last couple of days and I managed to complete the mouse and serving. Last thing to do is installing heart block once I order one big enough ;)
 Untitled Untitled
 Untitled Untitled
 Untitled Untitled
I will be posting rope making guide this weekend so stay tight.
Regards
Tom
|
|
|
Rank: Administration   Groups: Registered, Forum Support Team, Administrators, Global Forum Support Team, Moderator, Official Builds Joined: 09/11/2012 Posts: 7,951 Points: 23,039 Location: East midlands
|
Hi Tom, Can`t wait to see this rope guide, you are doing some amazing work. Keep it coming.  Regards delboy271155 (Derek) COME BACK GUY FAWKES "YOUR COUNTRY NEEDS YOU"
|
|
|
Rank: Master Groups: Registered
Joined: 21/04/2011 Posts: 1,039 Points: 3,140 Location: Buckinghamshire
|
Hi Tom,
I'm the same as Derek, can't wait for the rope making guide.
Chris
|
|
|
Rank: Pro Groups: Registered
Joined: 25/03/2010 Posts: 472 Points: 1,357 Location: Hyde
|
Hello guys.
I'm glad you like my work ;)
Long awaited rope making guide.
I have noticed quite interest in the rope making so I thought I will share my findings and experiences when it comes to the process.
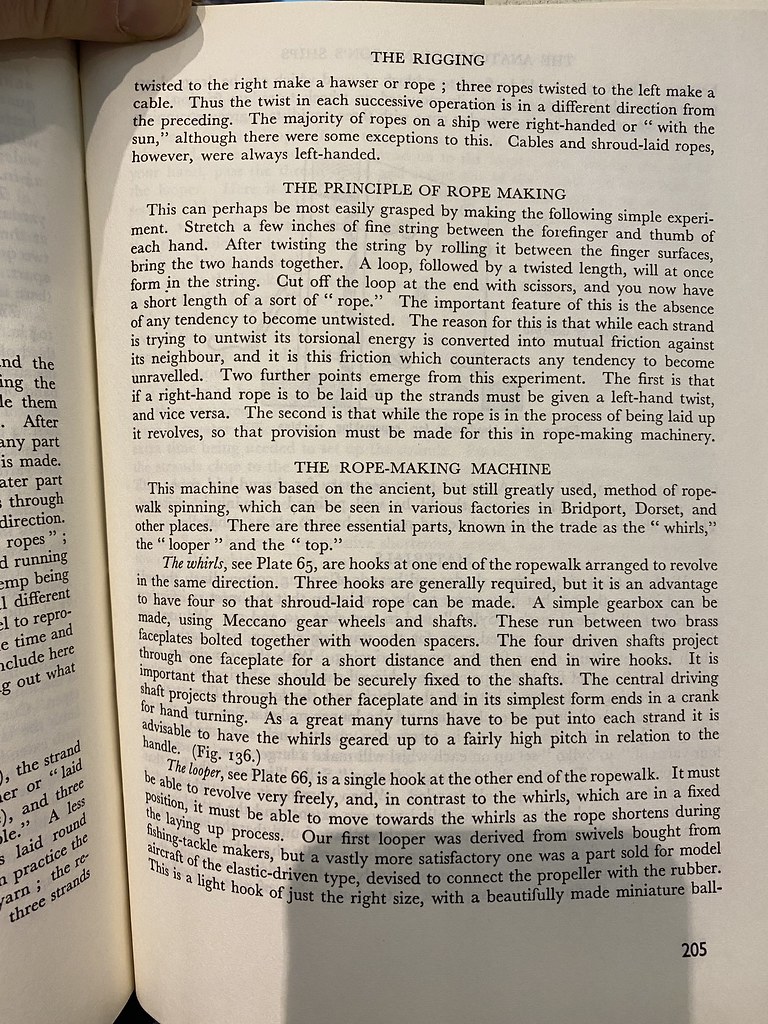
Firstly, we need to understand the process of rope making and there is plenty of detailed information in various publications. I personally have Anatomy of Nelson’s Ships as a guide. Please have a look below on the original description.
 Untitled Untitled
 Untitled Untitled
 Untitled Untitled
 Untitled Untitled
 Untitled Untitled
 Untitled Untitled
 Untitled Untitled
I have made a simple drawing that shows all the components of ropewalk and I’ll try to describe them a little.
 Untitled Untitled
Ropewalk contains main (No1) unit with one larger gear surrounded with 3 or 4 smaller hears in the planetary arrangement. When you turn large wheel clockwise, the small planetary gears will spin anti clockwise.
The second part of the ropewalk is the device that keeps the strands from individual gears separate so they don’t get tangled too quickly (No2). You can use about anything, I personally used one of the lego gears that has some holes in it – it does the job.
The third part of rope walk is anchor point where all the strands join (No3). It is an anchor point which needs to be secured during attaching individual strands. During the process of attaching the strands this should be locked in position but during the winding it should be able to be pulled back at certain force. This will allow you to get similar results every time. I have drawn piece of rope with the weight (A).
The points you attach strands either on main unit and the anchor should have hooks – his will make attaching the strands much quicker.
Let’s talk on sample rope made from 3 cores winded from 8 individual strands each.
You attach the thread to the anchor (at least 3 knots so it is secured). Then you run back to the main unit’s first gear’s hook and back to the anchor. You do it until you have 8 strands. Next you go back to wheel no 2 and so on. Once you have all 24 strands you tie it up again at the anchor point.
Then you release the anchor but remember to apply tension to it otherwise it will not work. In my case I attach two water bottles (1.5l). They stand up and are being dragged back slowly as strands are getting twisted. You can use anything as long as you apply force pulling it back. The more you stretch it the better the rope so please make some testing as this will depend on the type of thread you use. I normally allow 10-20% length reduction during twisting. By length I mean the parameter L1 on the drawing. For example if your distance from the gears to the anchor is 1m you are looking to shorten this to approx. 80-90cm by twisting the strands.
Once you’ve done twisting, you have to move to the anchor point. There is an important note. I’m using the electric drill to operate everything. When I operate gears drill spins clockwise but because of the gears conversion the gooks will spin anti clockwise. When I’m moving to the anchor my drill rotation settings don’t change but because there is no additional gearing the hook will spin opposite direction to the twisted strands. I hope this is clear. You have to try and experiment a little, be prepared that first ropes will not be perfect but even that they will look much better than supplied in the kit 😉. Once you start the spinning of the anchor, the strands separator (No2) will come into play as when rope is being formed it will be pushed away from the anchor. Make sure to apply some tension to the rope while doing this so you don’t for any knots. Once separator reaches the gearing station (No1) I keep twisting it a little until I feel the rope shortening a little then I let it rest for a minute or so. Before you cut the rope from the hook please make sure you dabbed it with CA glue so it doesn’t get untwisted. The rope itself will untwist slightly releasing excess of tension but this is normal and it depends on the flexibility of the thread used.
Congratulations! You have just made your first rope 😉
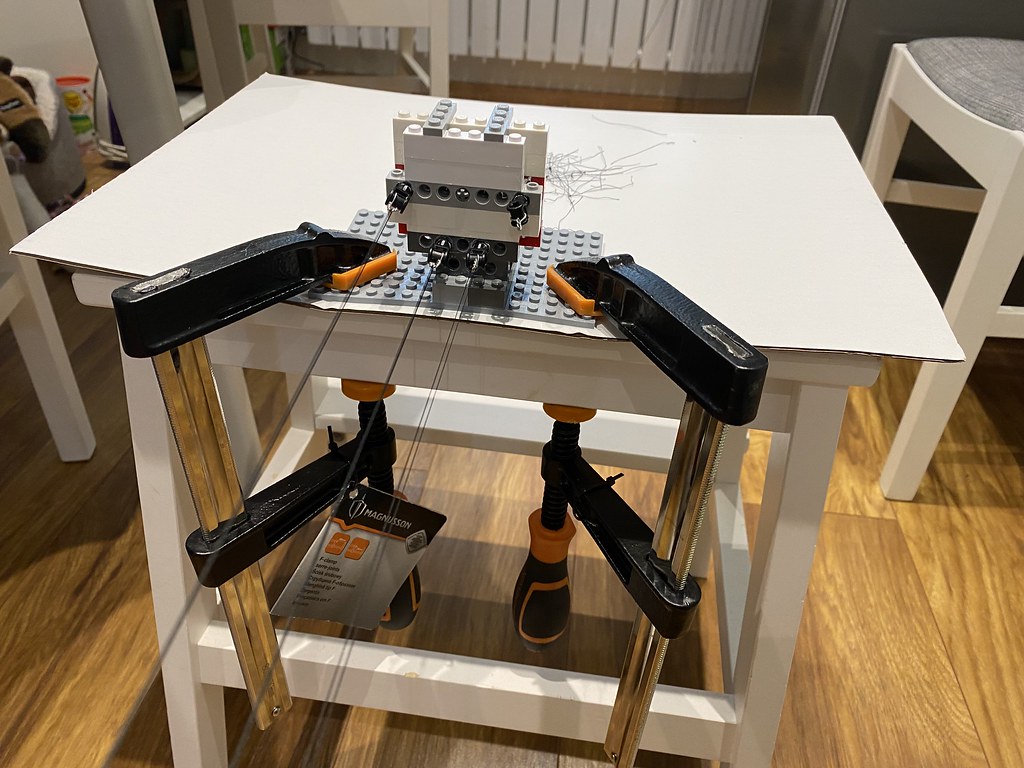
I’m attaching some pictures of my rig, you should be able to figure out all the parts used there. I couldn’t take it apart as I glued all the blocks together as when doing larger ropes the tensions are so high some of the blocks were popping out 😉
If you have any questions please fire away…
Gear station (NO1)
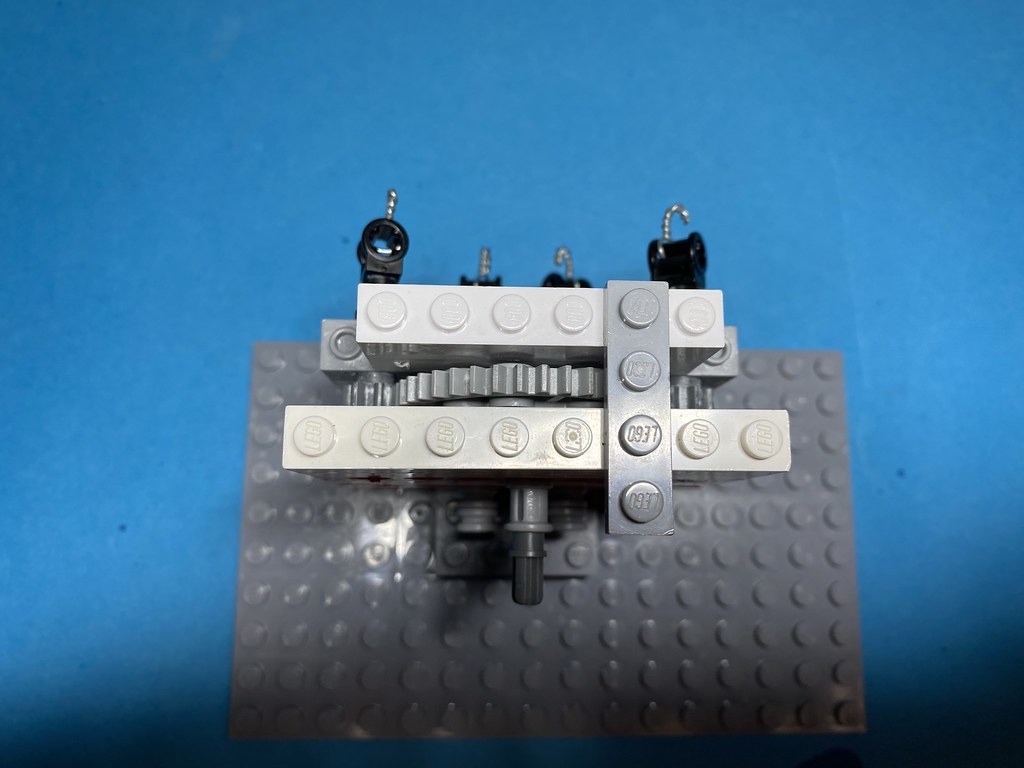 Untitled Untitled
 Untitled Untitled
Strands Separator (NO2)
 Untitled Untitled
Anchor (NO3)
 Untitled Untitled
 Untitled Untitled
 Untitled Untitled
Rig in action
 Untitled Untitled
 Untitled Untitled
 Untitled Untitled
 Untitled Untitled
 Untitled Untitled
I hope it is all helpful and I can't wait to see your versions :)
Happy modelling
Tom
|
|
|
Rank: Master Groups: Registered
Joined: 21/04/2011 Posts: 1,039 Points: 3,140 Location: Buckinghamshire
|
That's amazing Tom and very helpful.
So pleased to see that you take your high heels off when walking on the wooden floor in the hallway!!
Chris
|
|
|
Rank: Pro Groups: Registered
Joined: 25/03/2010 Posts: 472 Points: 1,357 Location: Hyde
|
goddo wrote:That's amazing Tom and very helpful.
So pleased to see that you take your high heels off when walking on the wooden floor in the hallway!!
Chris HAHAHA I realised that after taking the photo. That's what you have to deal with when you have teenage daughter :) All the best ;)
|
|
|
Rank: Master Groups: Registered
Joined: 21/04/2011 Posts: 1,039 Points: 3,140 Location: Buckinghamshire
|
Hi Tom, me again.
A bit of stupid question if I may?
!. Do the number of teeth on the gears drastically affect the "weave" of the cable?
2. Haven't really studied too closely but what about multiple "weaves" where you twist one rope into another to make it heftier?
I must say I'm inspired by your ingenuity with the lego and general household implements.
Chris
|
|
|
Rank: Pro Groups: Registered
Joined: 25/03/2010 Posts: 472 Points: 1,357 Location: Hyde
|
goddo wrote:Hi Tom, me again.
A bit of stupid question if I may?
!. Do the number of teeth on the gears drastically affect the "weave" of the cable?
2. Haven't really studied too closely but what about multiple "weaves" where you twist one rope into another to make it heftier?
I must say I'm inspired by your ingenuity with the lego and general household implements.
Chris Hi Chris, firstly there is no such a think like stupid questions. We adults overcomplicate things and we should learn from children. If there is anything on their minds they just ask. To answer your question, the number of the teeth on the gears affect only speed in which you will be twisting the strands together. So for example if your main gear has 100 teeth and small has 10 it is 10x speed multiplication. When you twisting the strands you may overdue it and then you will be forming little knots. As soon as you notice them you k now you've gone too far.
If you are making really heavy cable (like for the stays), instead of twisting individual strands you use single ropes, give them a little twist and then spin the anchor to create large cable. Effect is spectacular as I already tried it on my stays.
I hope it helped.
Regards
Tom
|
|
|
Rank: Pro Groups: Registered
Joined: 25/03/2010 Posts: 472 Points: 1,357 Location: Hyde
|
Hello everyone!
How is the rope making progress? Has anybody got something to show? I can't wait to see some of your tries.
Quick update on mine, I've been busy finishing mizzen mast shrouds rigging, futtock shrouds, etc. It is all done now and I have moved to the bowsprit as I made a start with attaching the stays. Really tight there but I'm getting the result I like slowly. I will be posting some pics later this week.
Lastly I've been thinking about the stand I put my Victory on. The original one isn't available any more so I think I will be making something bespoke.
What about yours? What do you have?
Regards
Tom
|
|
|
Rank: Pro Groups: Registered
Joined: 25/03/2010 Posts: 472 Points: 1,357 Location: Hyde
|
Hello again everyone.
I promised some pics so I snapped couple this morning. Lower mizzen mast completed, it's time to start attaching the shrouds to the upper section and I think I will start with mizzen mast and work my way to the front.
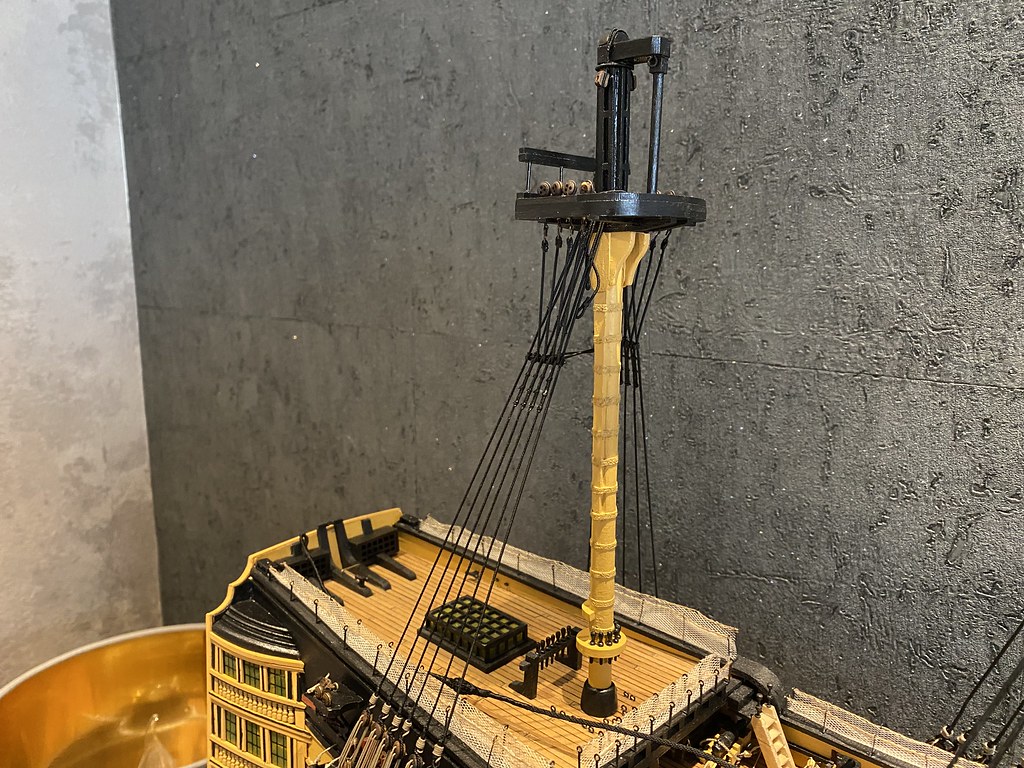 Untitled Untitled
As mentioned yesterday I'm doing bowsprit slowly, I had to buy some open and closed heart blocks from Vanguard models as the supplied ones are wrong size and quality. I'm hoping to get this done by the weekend so I can share detailed photos.
 Untitled Untitled
|
|
|
Rank: Pro Groups: Registered
Joined: 25/03/2010 Posts: 472 Points: 1,357 Location: Hyde
|
Hello again everyone.
I promised some pics so I snapped couple this morning. Lower mizzen mast completed, it's time to start attaching the shrouds to the upper section and I think I will start with mizzen mast and work my way to the front.
Untitled
As mentioned yesterday I'm doing bowsprit slowly, I had to buy some open and closed heart blocks from Vanguard models as the supplied ones are wrong size and quality. I'm hoping to get this done by the weekend so I can share detailed photos.
Untitled
|
|
|
|
Guest (2)
|
 US
US

