|
|
 Rank: Pro Groups: Registered
Joined: 31/12/2011 Posts: 123 Points: 369 Location: Graz, Austria
|
Hello, there! My name is Bernd, I am from Austria, and I have been lurking for some time now without contributing. Now it is about time ... I apologize in advance for wrong or bad use of English. As you may guess, my native language is German. In Austria, I'm now at issue 90 of the German edition of de Agostini's HMS Victory. I have been working on it since about one and a half years, and I love it! And I appreciate very much the valuable support from this forum. It is perhaps better not to start at the beginning, but to tell you about my modification of the stern and quarter gallery using Mike's enhancements, because this appears to be a hot topic right now. But let me first try to figure out how to post an image ... 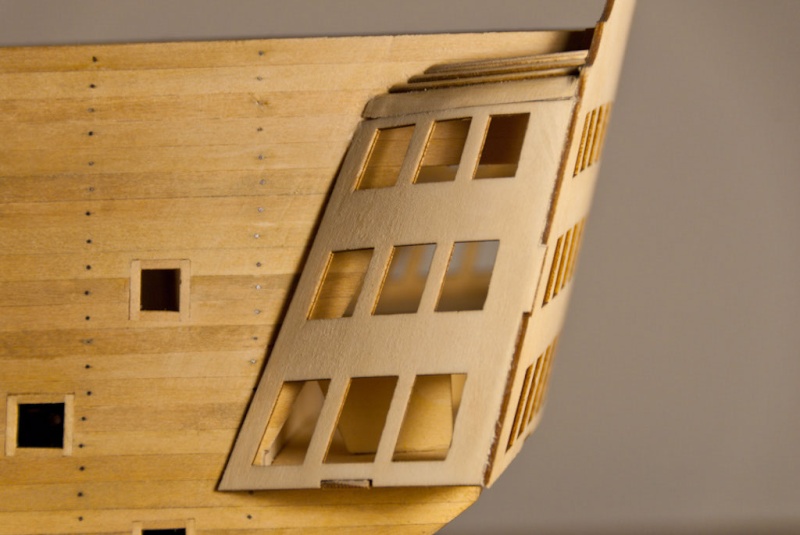
|
|
|
 Rank: Elite      Groups: Registered
Joined: 13/02/2011 Posts: 2,243 Points: 6,849 Location: Sussex
|
Hi Bernd, Welcome to the English Forum your build looks very good,I can see you take care with your work please keep sending in your pictures. Regards tf64. Work in progress: Tombstone (Scratch) - San Francisco 2. -The Mayflower ( scratch by plan).
OcCre- Santa-Maria (Kit).
|
|
|
Rank: Pro Groups: Registered
Joined: 31/12/2011 Posts: 123 Points: 369 Location: Graz, Austria
|
Well, posting pictures appears to work. Actually, I have been posting a build diary to a German-language forum and I do not want to re-upload the images if that can be avoided ... I am quite new to the hobby of modelling and the Victory is my first ship. The instructions provided by de Agostini (and in the official and unofficial build diaries here!) are a great help. And, as you can see in my first image, I have fitted the gallery parts closely following those instructions. But, like Mike, I was never quite happy with this. Already here you can see that the windows are far to big. So, I subscribed to Mike's gallery enhancement project, as soon as I heard about it. Last week, I finally got these parts 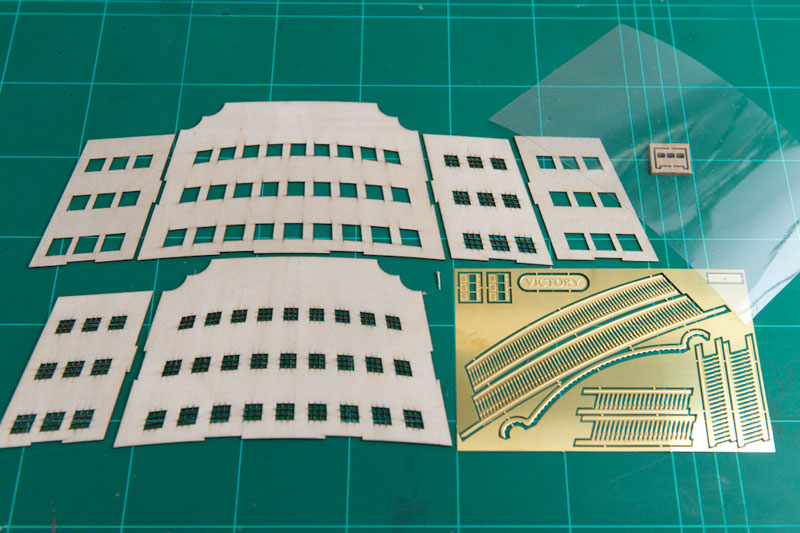 Thank you, Mike for this initiative. It's really a great service! It would have been no problem, to remove the gallery parts at the early stage shown in my first post. But meanwhile I had done some work on the poop deck, where the knees and flag lockers are allready glued to the gallery panel 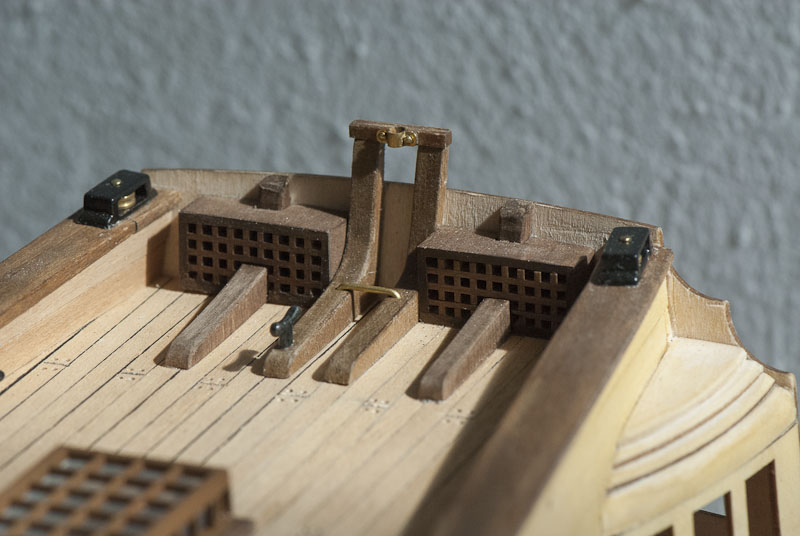 So a complete removal is out of question. I started with a rather conservative approach, hoping that I could use the frame of the old gallery as a support for the new parts:  Other preparations while waiting for the new parts are shown here: 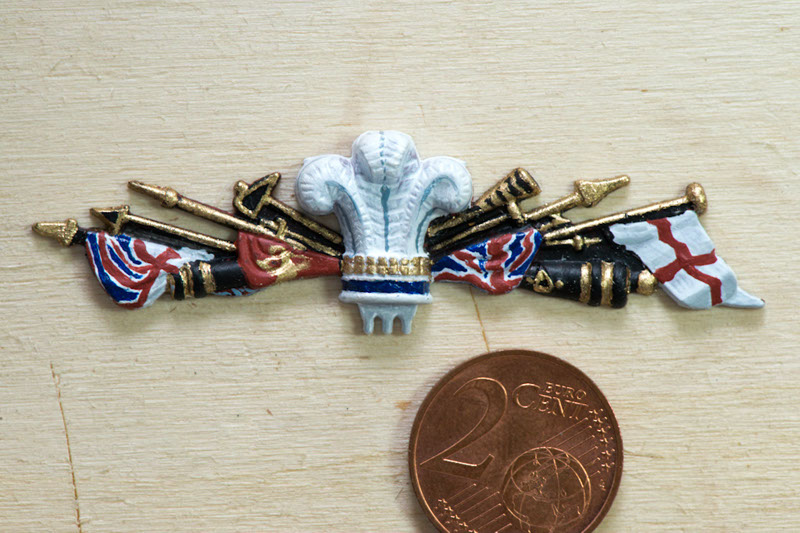 In my next post I will tell you about my work on the new gallery parts Greetings from Austria, Bernd
|
|
|
Rank: Pro Groups: Registered
Joined: 31/12/2011 Posts: 123 Points: 369 Location: Graz, Austria
|
Hello again! As you can see in my last post, I do not paint my Victory. Therefore, I stained the wooden parts using a dark walnut stain, in order to get a dark background for the balustrades. 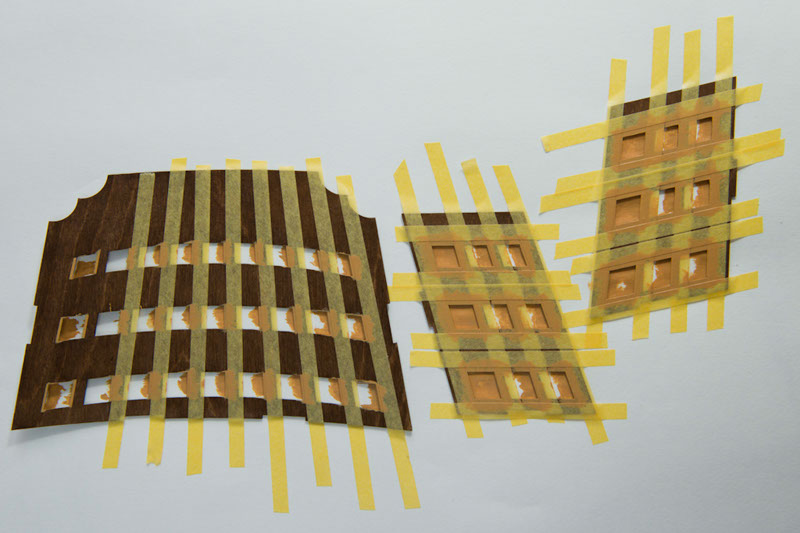 I painted the window frames with yellow ochre 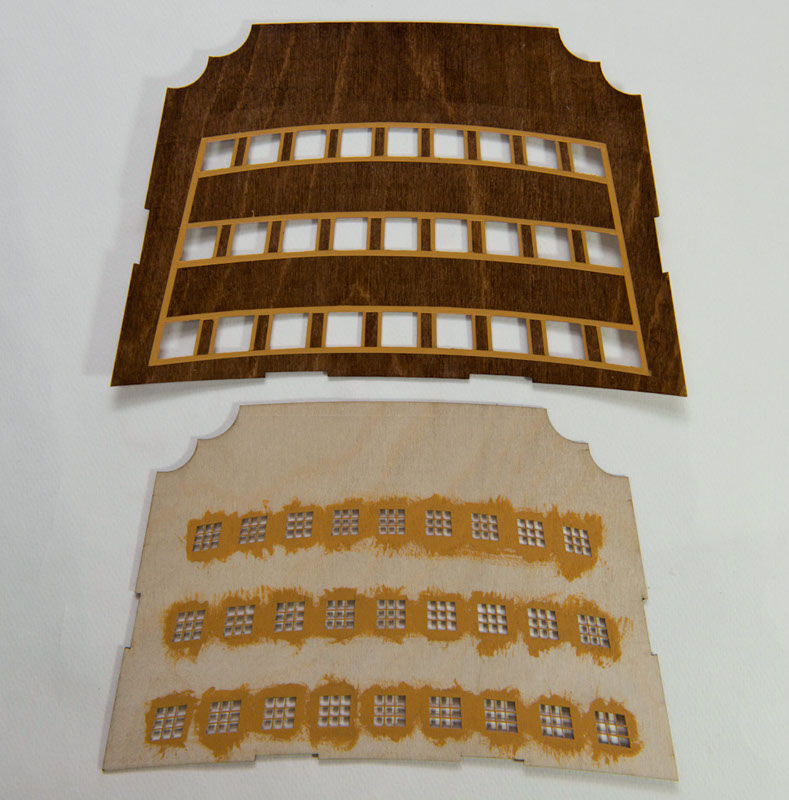 and finally glued everything together 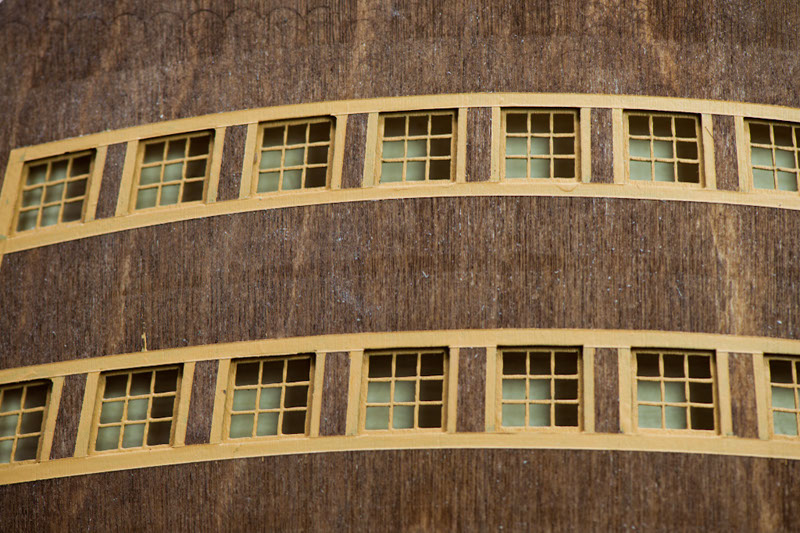 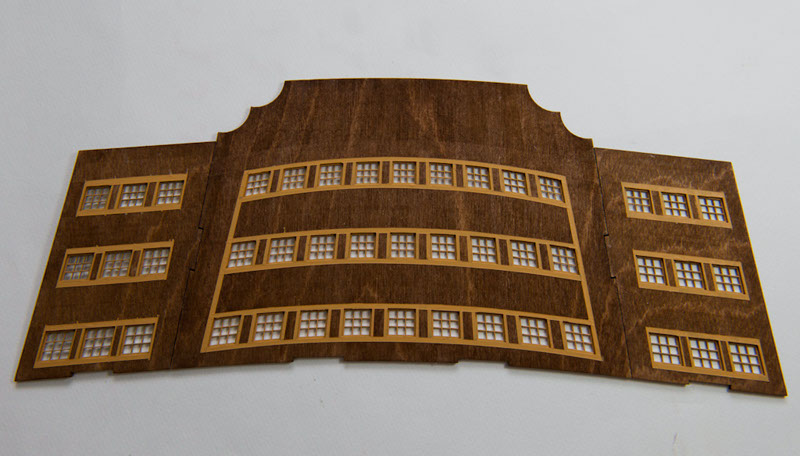 Here, just to get an idea .... 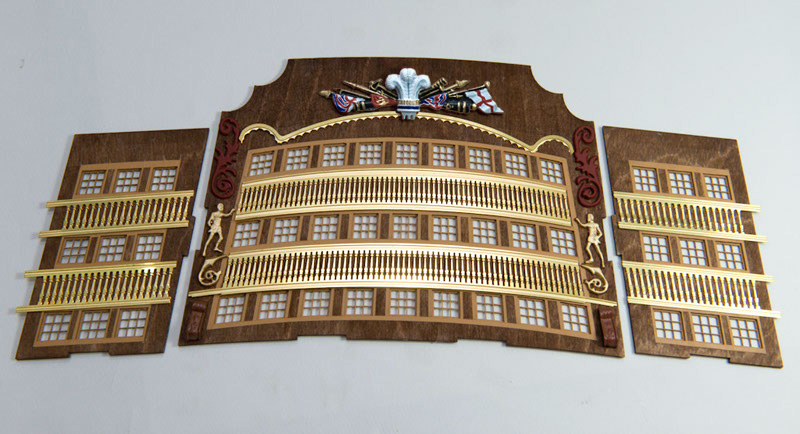 I can't wait to continue .... Best regards, Bernd
|
|
|
Rank: Pro Groups: Registered
Joined: 31/12/2011 Posts: 123 Points: 369 Location: Graz, Austria
|
I painted the some details on the brass with brown color, and, where necessary, sanded away any excess color ... 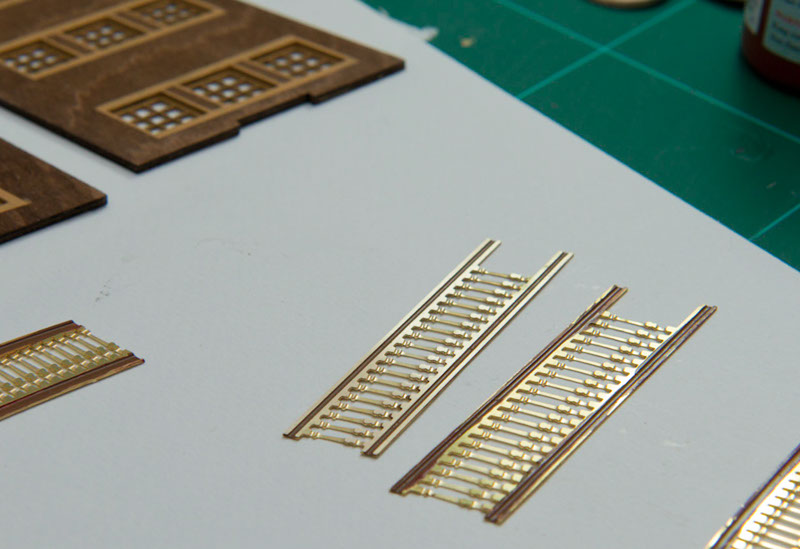 Next, I tried to bend the wood, using an electric plank bender ...  ... while trying to prevent the parts from separating again due to the heat softening the glue. 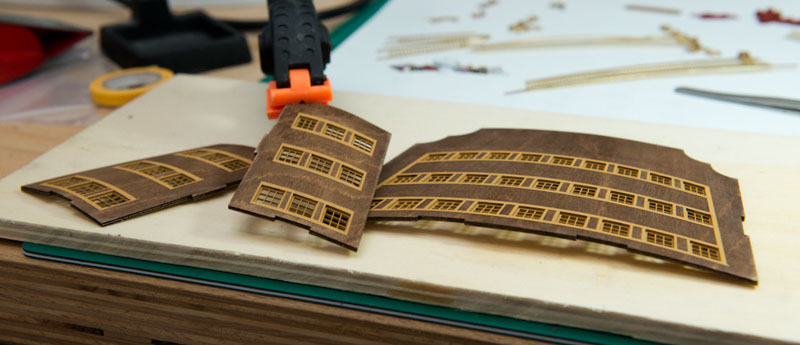 For the glass I used a translucent polypropylen which does not let you see through the windows. It is 0,8mm thick and I fixed it with ordinary PVA glue 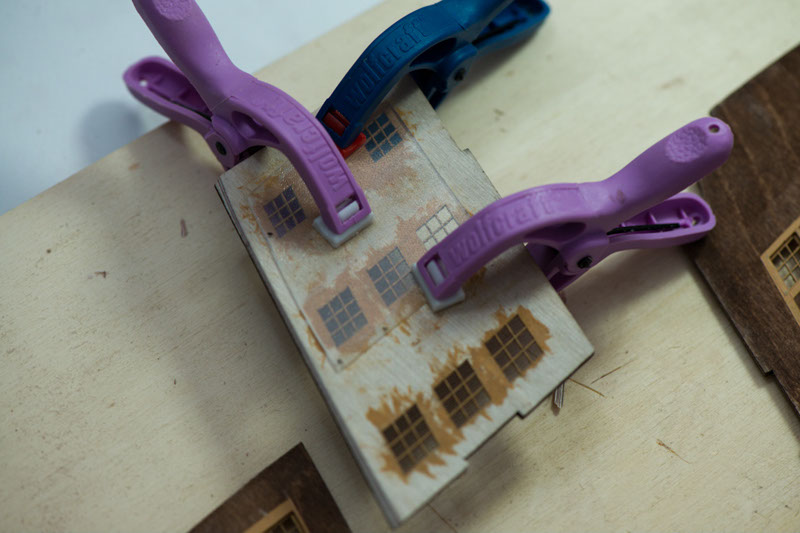 When I tried to fit the parts to the Victory, I removed more and more of the old gallery 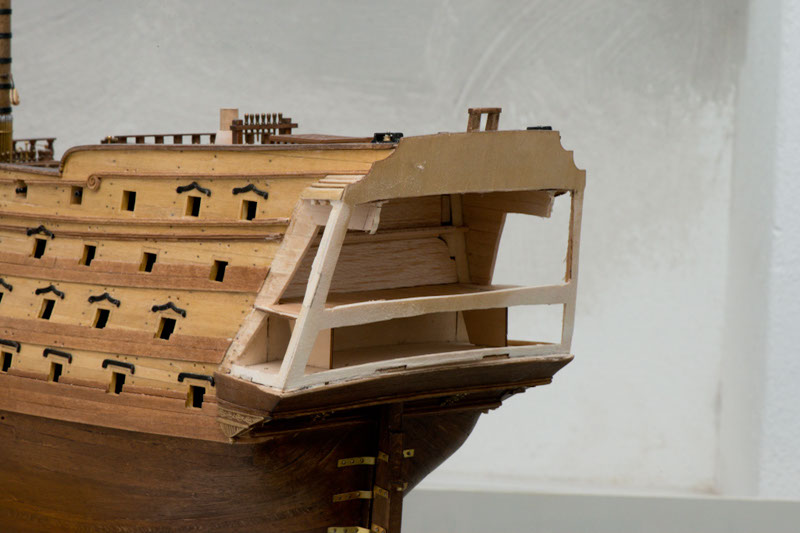 and, most importantly, I saved part No 79 (see issue 41) to give the rear panel the correct shape 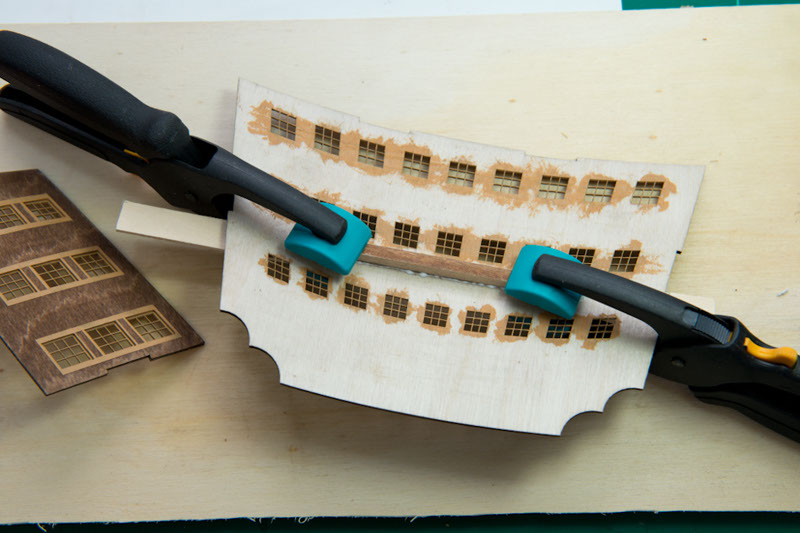 Finally, I removed pretty much everything of the old gallery, except the uppermost part. Here I even glued two additional planks, because I wanted to correct the inclination of the rear panel, which was too steep in its original position. 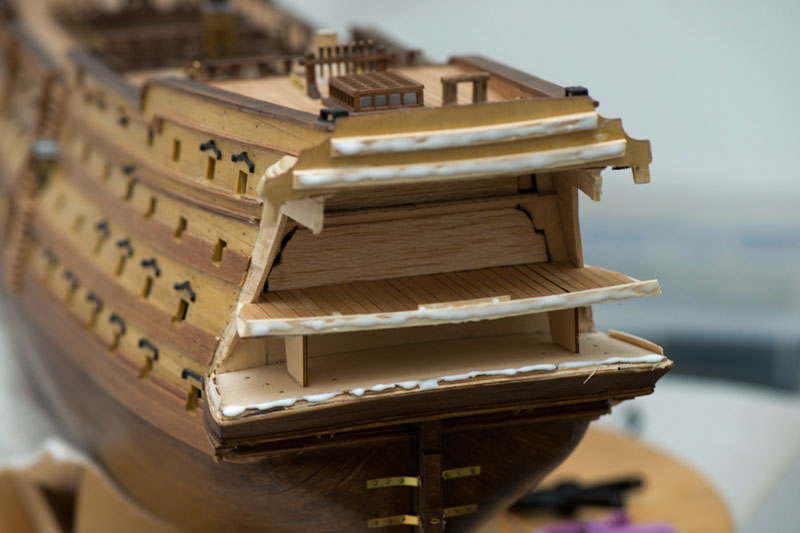 After all these preparations, it was now easy to put everything in place The quarter gallery panels had to be shortend on the top by about 2 mm. 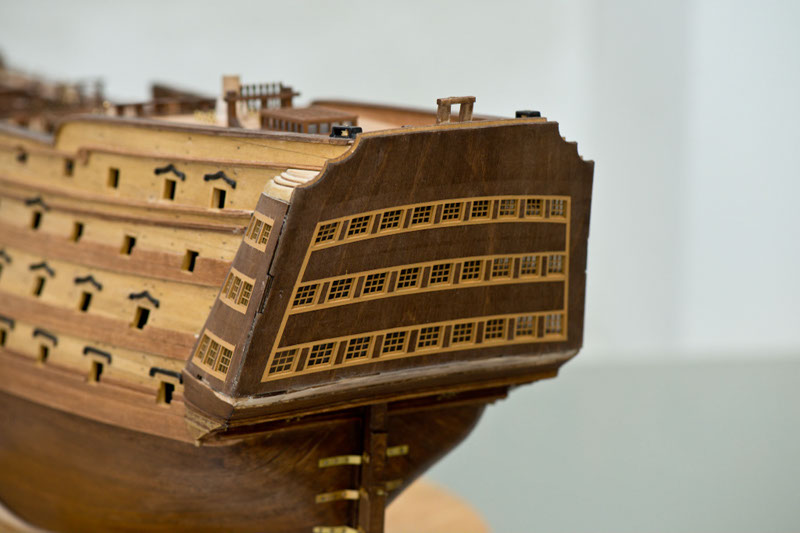 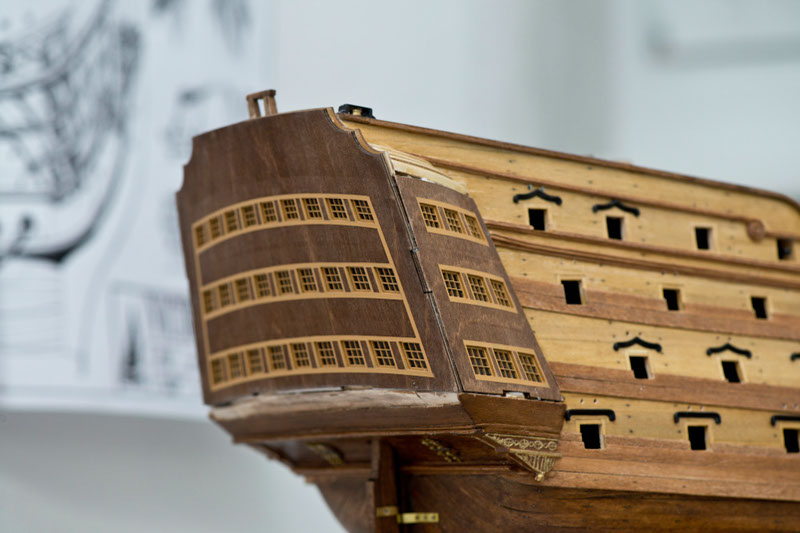 A lot of work along the edges remains to be done ... Greetings from Austria, Bernd
|
|
|
|
|
The new gallery does look fantastic. I am concerned about bending the galleries looks tricky  “Whenever you find yourself on the side of the majority, it is time to pause and reflect.”
-Mark Twain
|
|
|
Rank: Pro Groups: Registered
Joined: 31/12/2011 Posts: 123 Points: 369 Location: Graz, Austria
|
jase wrote:The new gallery does look fantastic. I am concerned about bending the galleries looks tricky It is a bit tricky, indeed. But the wood has good quality, it wouldn't break easily. Just don't do everything in one step and do not use excessive force. Good luck, Bernd
|
|
|
Rank: Pro Groups: Registered
Joined: 31/12/2011 Posts: 123 Points: 369 Location: Graz, Austria
|
Hi folks, I know, I should be waiting with the gallery until Mike returns from his holidays, but when he returns, I will have to leave and then I will not be able to continue my build for several weeks. I just couldn't wait that long. So, here is what I did next. I build a decor strip at the bottom of the gallery and inserted some wood on the sides for a smooth transition between the gallery and the body. 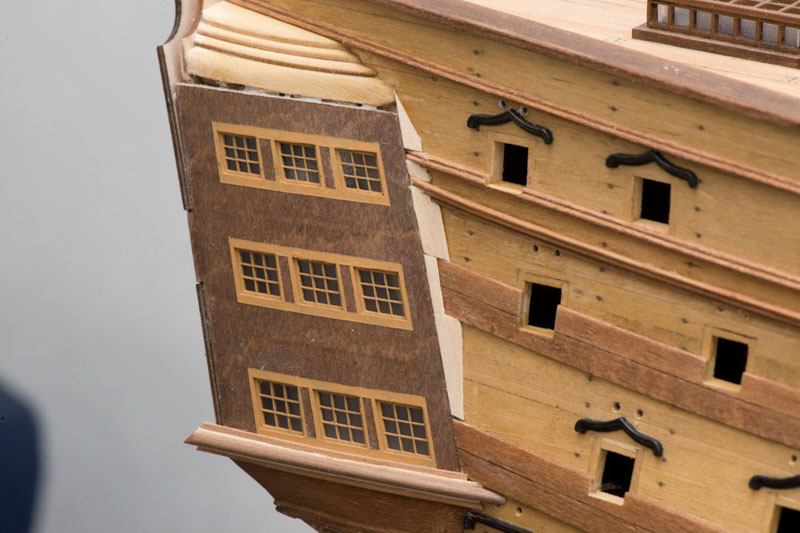 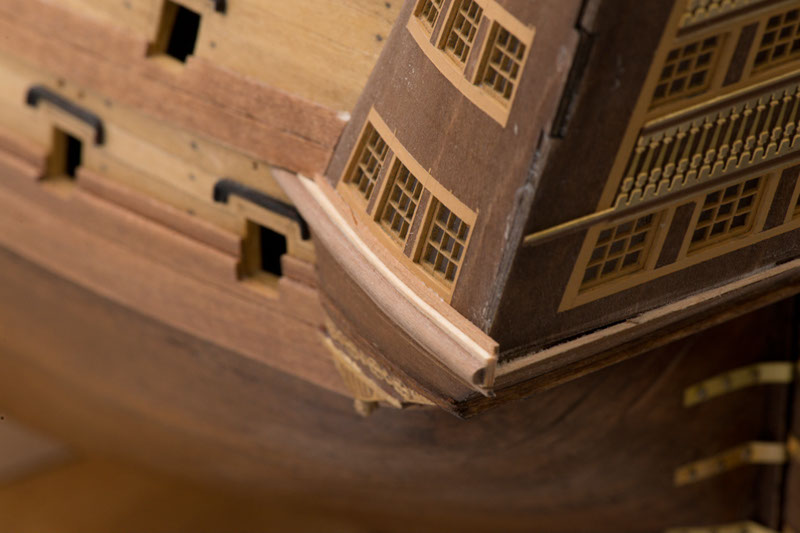 I also fixed the balustrades to the rear panel 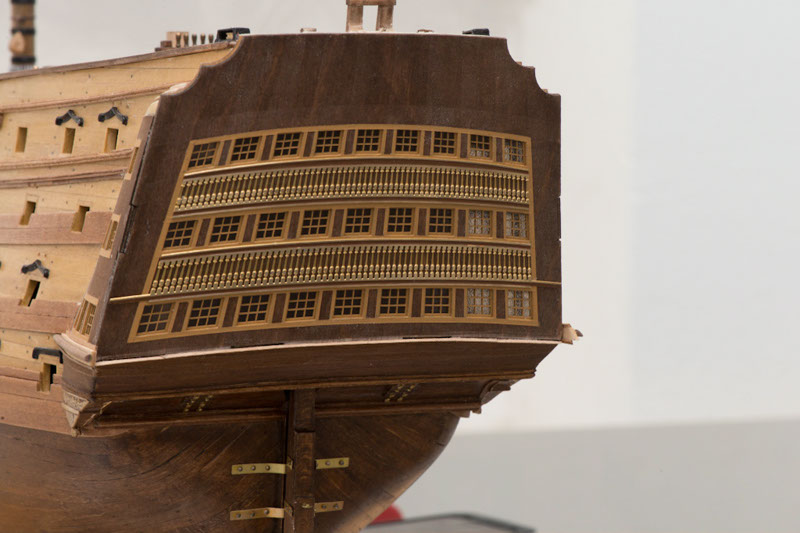 This helps with the placement of the vertical wood strips on the quarter gallery, which I made from 1x1 mm strips. 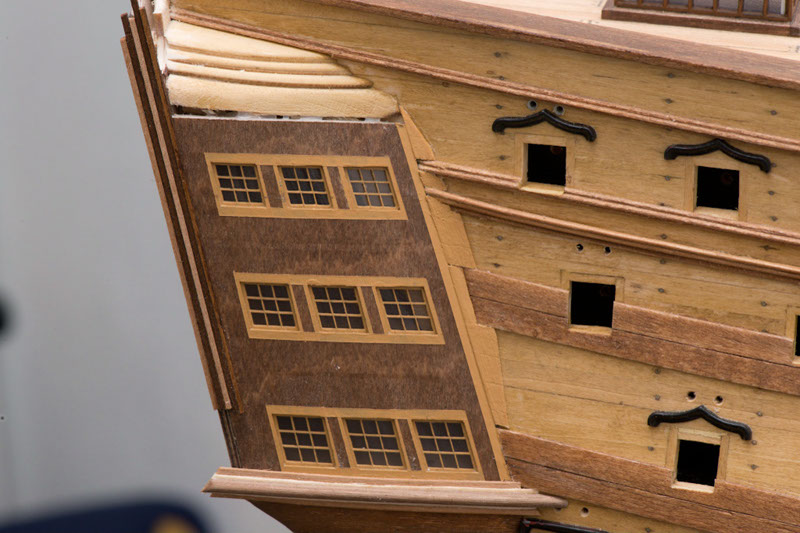 After fixing the balustrades, it looks like this 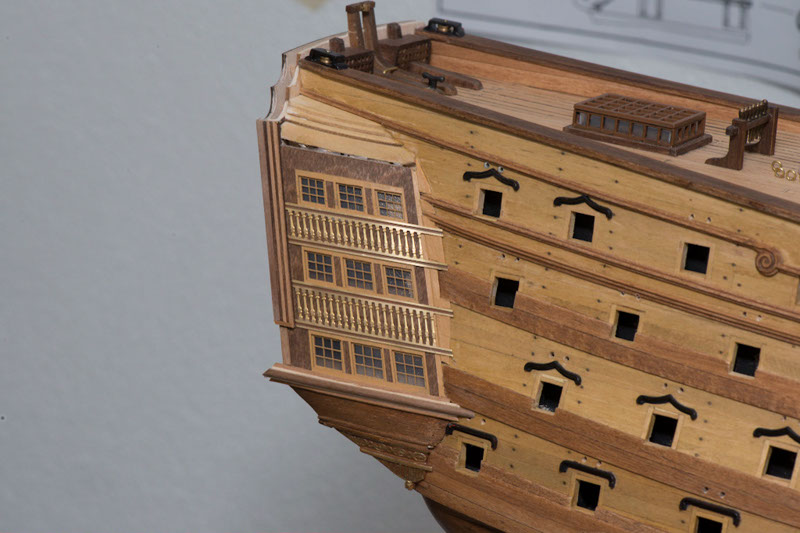 Now, compare with the real HMS Victory  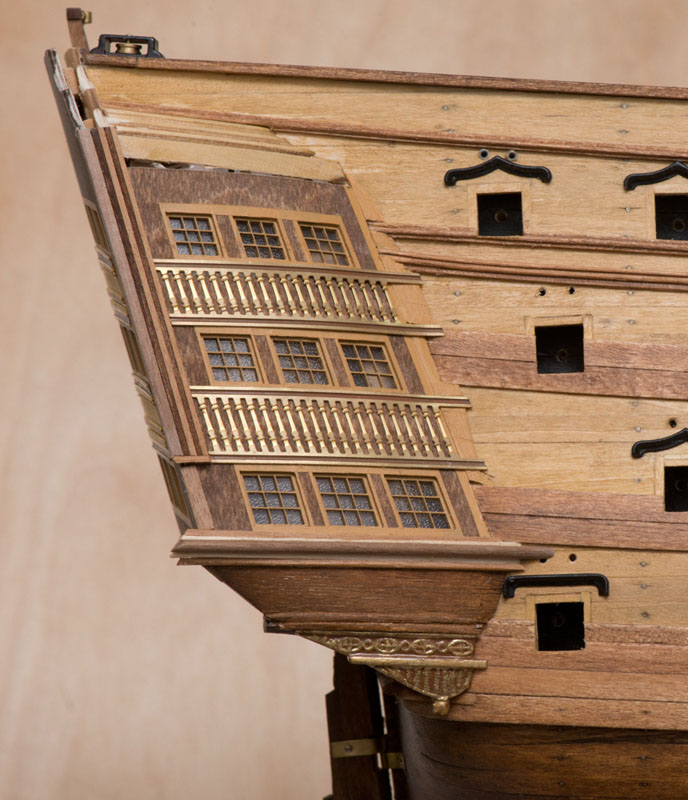 Well, there is some similarity. But I have the impression that the whole gallery isn't sitting high enough on the ship's body. Just look at the line of the quarter-deck windows and gunports. They should be roughly at the same height, and they aren't. At the same time, the height of the gallery support is already too large if compared to the original. So if one would shift the gallery panels a bit upwards, the support would be even more out of scale! (This is perhaps one reason for the wrong proportions of the windows on deAgo's gallery?) I think that there is no easy way to correct this, because the placement of the gallery is decided at a very early stage in the build. Certainly, one cannot do anything about this problem at this stage of the build. I had to correct another mistake, which was purely mine: 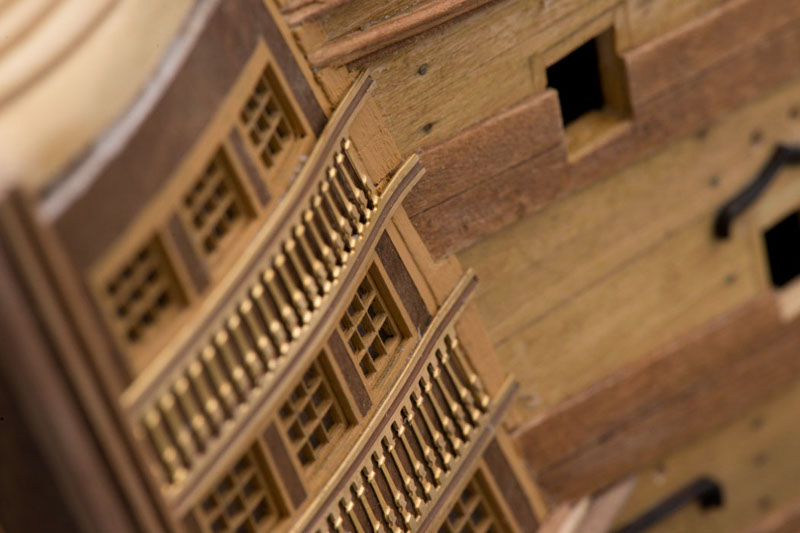 The transition between gallery and body doesn't yet look right. I had to remove the brass strips again and rework these parts so that the gallery meets the ship's body at the right angle. Here is the result 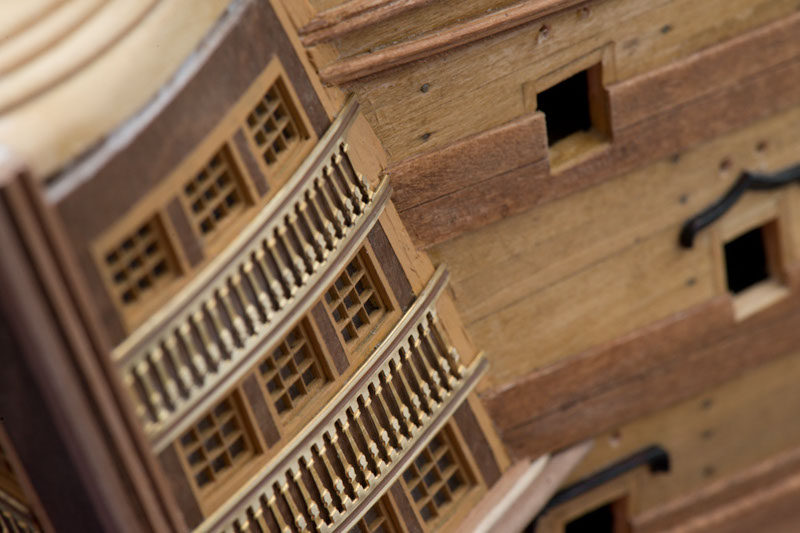 Then I completed the decorative strip around the stern and competed the planking of the gallery support  The decorative strip is more or less pure fantasy. For building it I used five different woodstrips that I found in my drawer.  And here is a purely cosmetic change, hoping that the small strip later would not disturb the placement of the decorations  Best regards, Bernd
|
|
|
Rank: Pro Groups: Registered
Joined: 31/12/2011 Posts: 123 Points: 369 Location: Graz, Austria
|
Finally, this is the last of my today's series of postings. I completed the roof of the quarter gallery with two woodstips ... 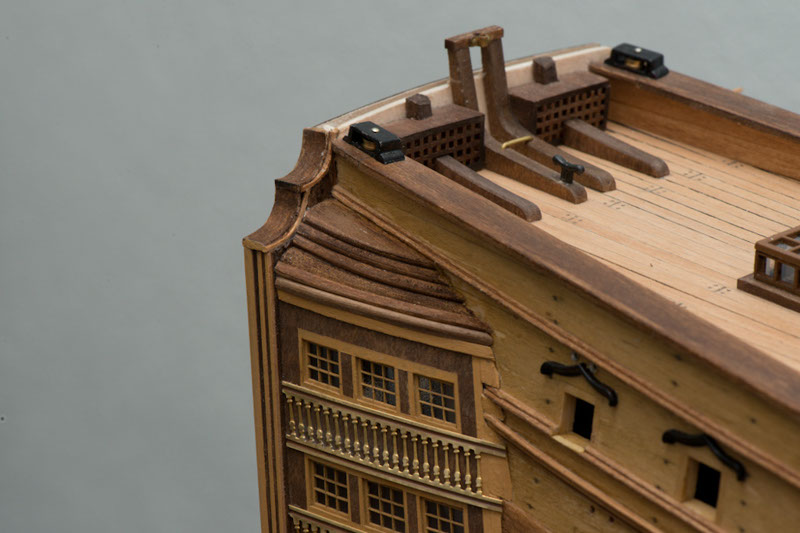 and decided to paint it with an acrylic paint (metallic lead) 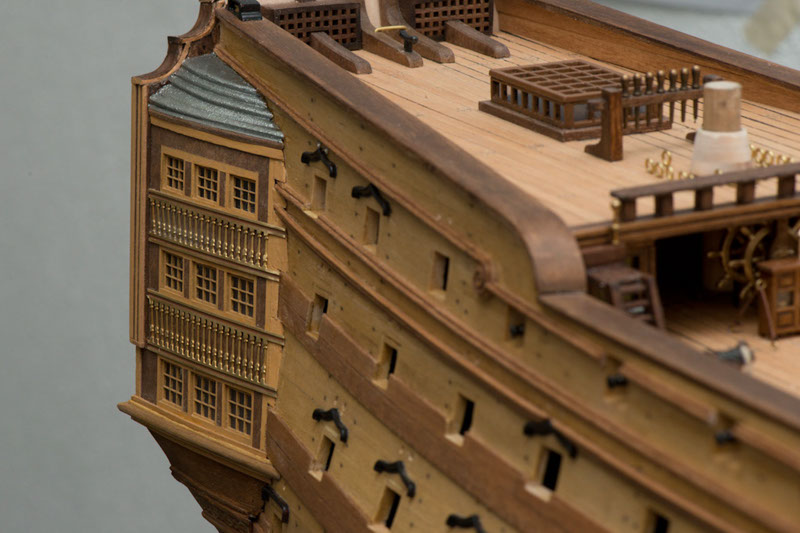 It thus has the same color as the roof of my entry port: 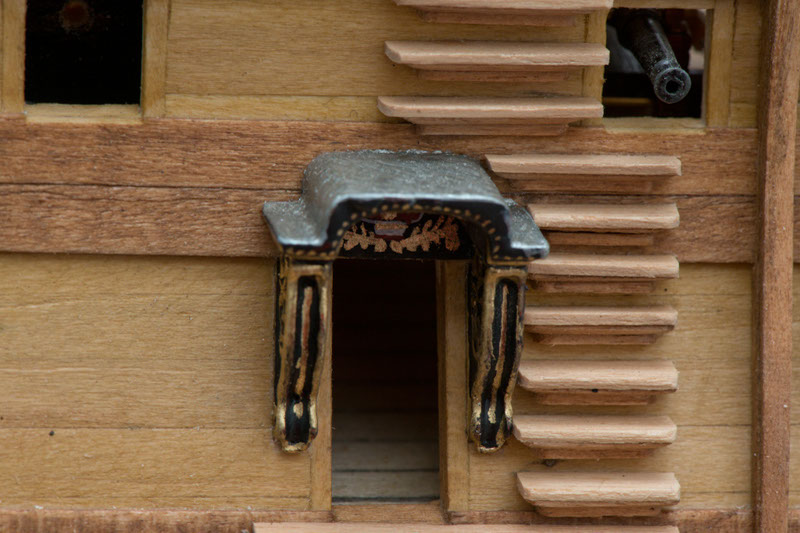 Finally, we have to complete the framing of the rear gallery panel. That means bending some 1,5x6 mm panks 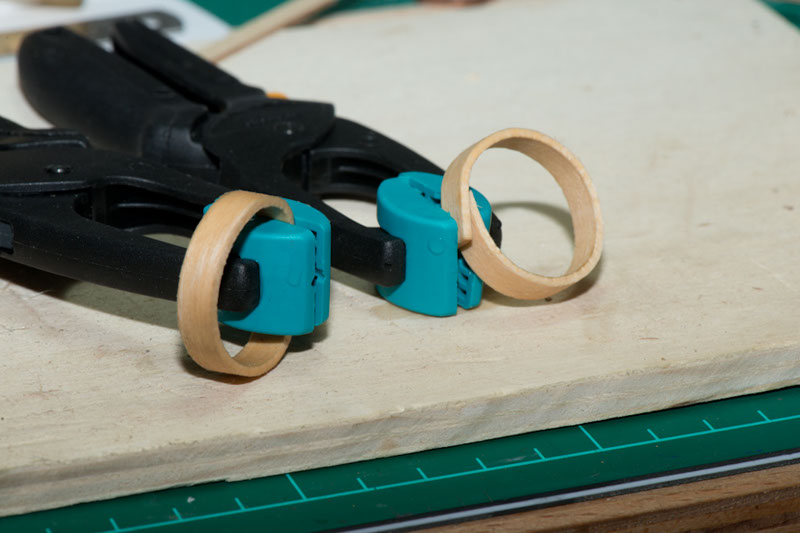 and putting them where they belong: 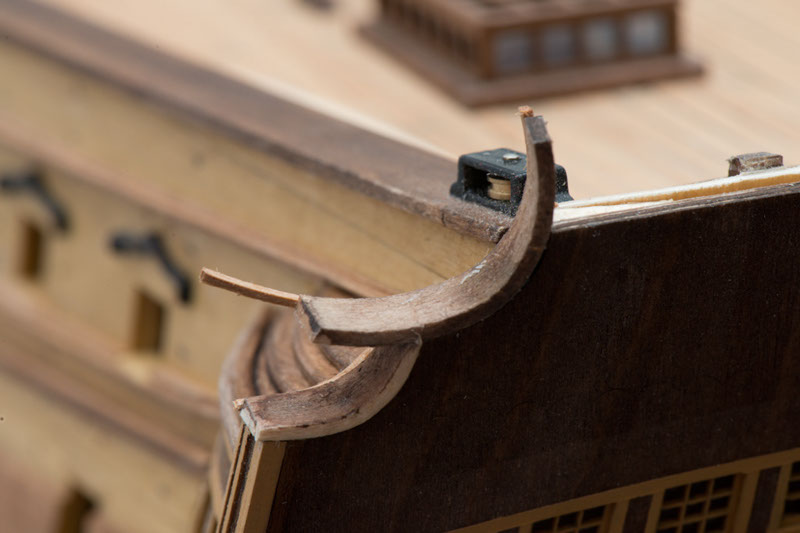 And the last wooden part has to be glued to the top - it is kept in place in a very unprofessional way until the glue gets dry (sorry, nothing else was within reach at that moment) 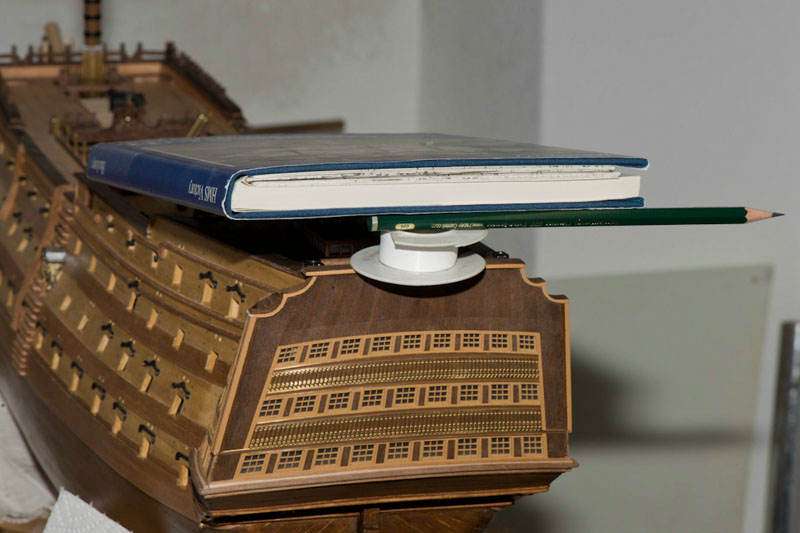 That's it (well, apart from some final retouching): 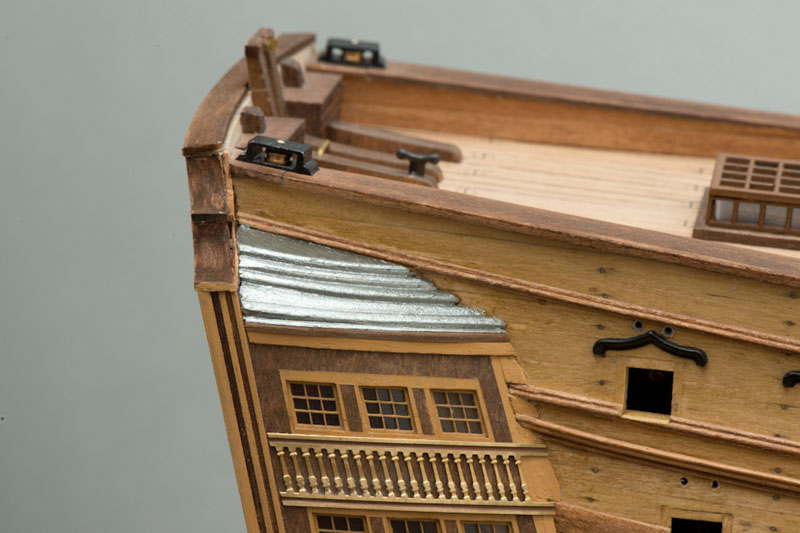 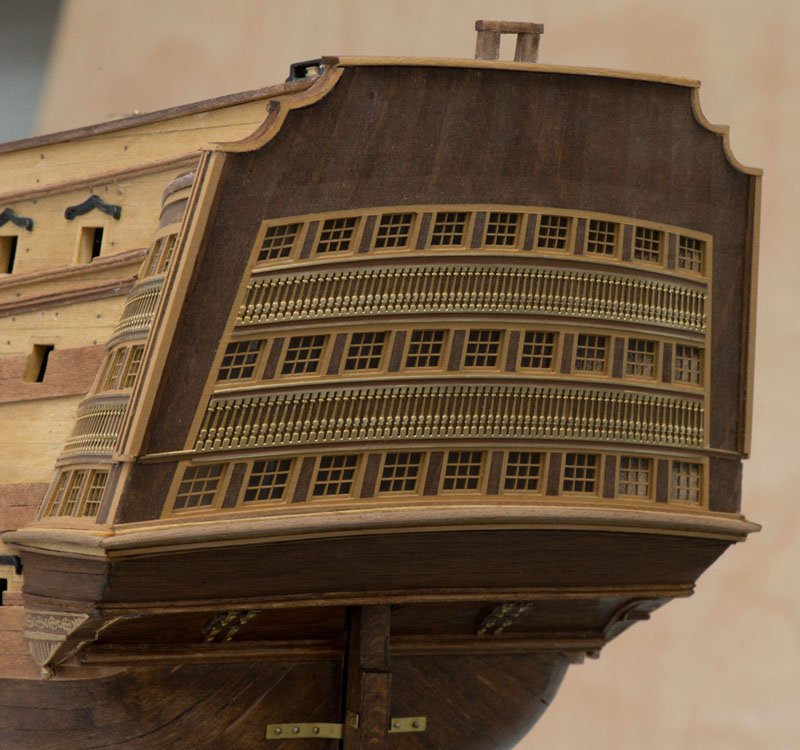 Last step is attaching the decorations 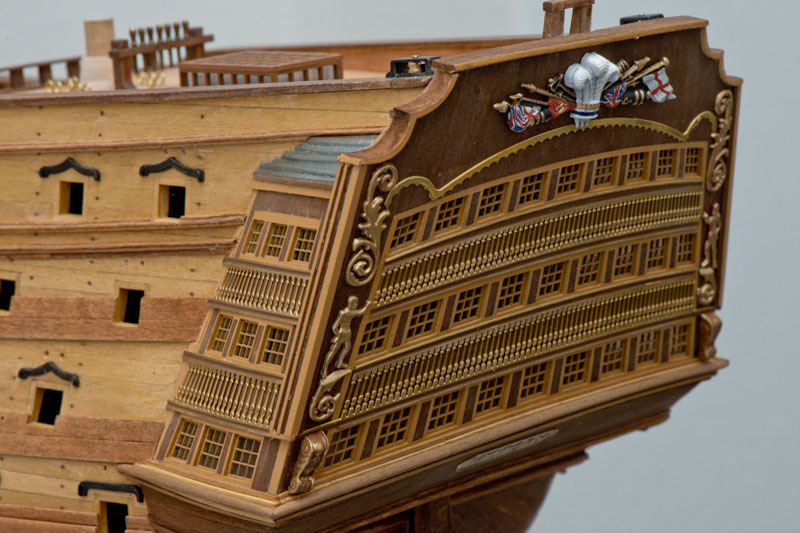 and, oops, I promptly misplaced two of these pieces ...  Here is the final result 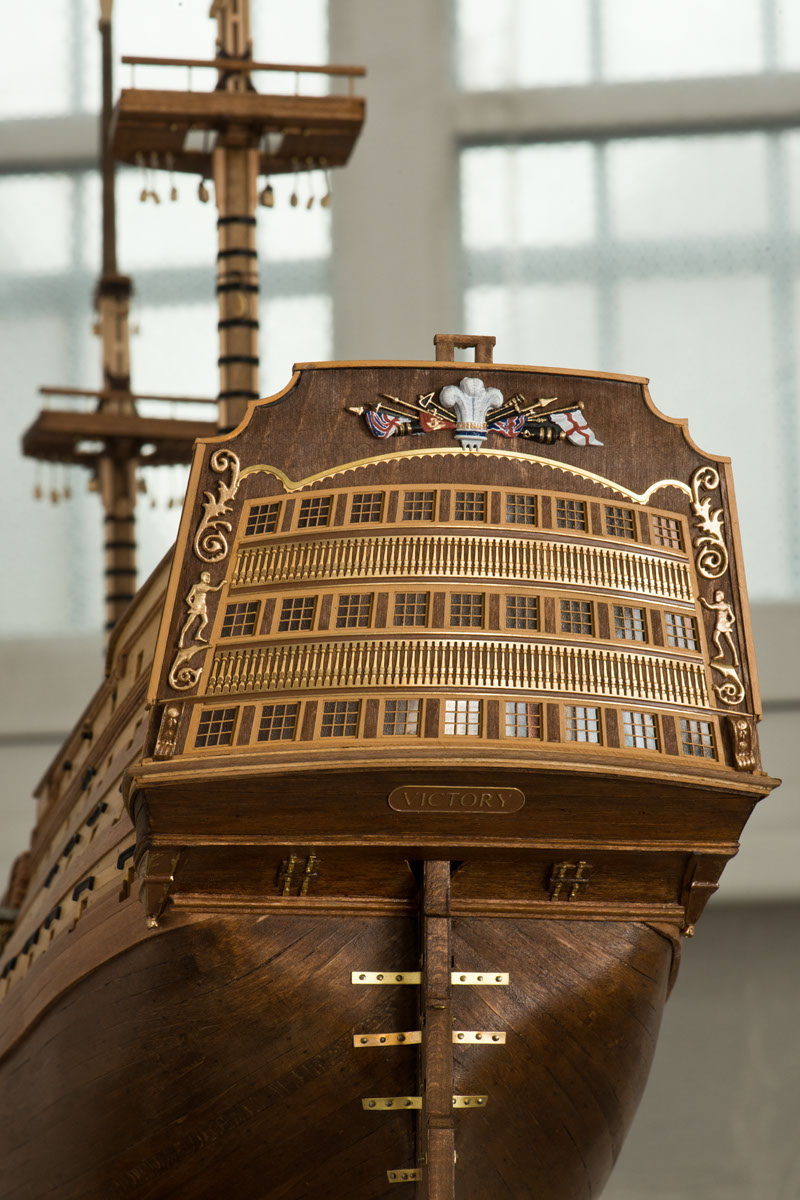 It was pretty straightforward to build, I didn't encounter any serious problems. Thank's again, Mike, for your initiative, and sorry for not waiting. But starting this weekend, I will be abroad and not be able to continue with my build for several weeks and I really wanted to see how it would look with the gallery enhancement in place. I must say that I am very happy with the result.  The gallery enhancement is a huge improvement and it is worth every cent.
|
|
|
 Rank: Semi-Pro Level 1 Groups: Registered
Joined: 22/07/2012 Posts: 69 Points: 144 Location: Belgium
|
|
|
|
|
|
|
|
|
Rank: Elite Groups: Registered
Joined: 13/02/2011 Posts: 2,243 Points: 6,849 Location: Sussex
|
Hi Bernd, Great job Bernd what skill's you have,thank you for the update. Regards tf64. Work in progress: Tombstone (Scratch) - San Francisco 2. -The Mayflower ( scratch by plan).
OcCre- Santa-Maria (Kit).
|
|
|
Rank: Pro Groups: Joined: 24/08/2009 Posts: 48,827 Points: -13,348
|
Very very nicely done 
|
|
|
Rank: Pro Groups: Registered
Joined: 31/12/2011 Posts: 123 Points: 369 Location: Graz, Austria
|
Thank you, shipmates, for the nice comments. Glad you like my work! Greetings from Austria, Bernd
|
|
|
Rank: Pro Groups: Registered
Joined: 31/12/2011 Posts: 123 Points: 369 Location: Graz, Austria
|
|
|
|
Rank: Elite Groups: Registered
Joined: 13/02/2011 Posts: 2,243 Points: 6,849 Location: Sussex
|
Hi Bernd, Again thank you for your update on the binnacle that will be a great help to all of us. Rergards tf64. (trev). Work in progress: Tombstone (Scratch) - San Francisco 2. -The Mayflower ( scratch by plan).
OcCre- Santa-Maria (Kit).
|
|
|
Rank: Pro  Groups: Joined: 04/05/2012 Posts: 362 Points: 1,089
|
Hi Bernd Welcome to the English Forum And it`s nice to see your great Build here 
|
|
|
Rank: Pro Groups: Registered
Joined: 31/12/2011 Posts: 123 Points: 369 Location: Graz, Austria
|
Hi Peter, it's good to meet you again in a new environment ... Best regards, Bernd
|
|
|
Rank: Pro Groups: Registered
Joined: 30/06/2012 Posts: 207 Points: 583 Location: Dunfermline, Scotland
|
Hi Bernd, not actually building this model but i can really appreciate the build quality & skill you have.It looks superb.How long have you been building models? Hopefully with patience i'll be as skilled as you one day.Stuart
|
|
|
Rank: Pro Groups: Registered
Joined: 31/12/2011 Posts: 123 Points: 369 Location: Graz, Austria
|
Stupot wrote:Hi Bernd, not actually building this model but i can really appreciate the build quality & skill you have.It looks superb.How long have you been building models? Hopefully with patience i'll be as skilled as you one day.Stuart Hi, Stuart, the Victory is my first model. As a child I did some paper aircraft models and about 10 years ago I build some miniature furniture, but I have no other experience in modeling. The HMS Victory partwork was a great occasion to start, because of the detailed instructions, and I try to do my best but I am still learning. As you say, one main ingredient is patience (probably also helpful for a therapeutic side effect ) Best regards, Bernd
|
|
|
|
Guest
|
 US
US

