|
|
 Rank: Super-Elite        Groups: Official Builds, Administrators, Moderator, Global Forum Support, Registered Joined: 04/06/2011 Posts: 4,213 Points: 12,784 Location: ipswich
|
I deleted the above message as I couldn't attach any pics to it for some reason.... Here it is again - I've fitted my body panels now and lo and behold - they fit without any aggro. I made a few very simple mods to achieve this after looking at where the panels didn't fit: Bad gaps at the front of the upper panels, just behind the air intakes. Uneven fit along the side of the cockpit - panel tilted up at the front. Uneven fit along the length of the panel joins at the sides. Large gap at the rear/sides of the panels. (commented on at length in the forum) First, I glued the upper panels together to make one large 'Y' shaped upper panel. Then I trimmed down the height of the locating pins at the fronts of the upper 'deck'. I made two small tabs from 1mm plasticard and glued them along the front edges of the panels. These tabs now slide under the intake panels and pull the whole front of the upper deck down nice and tight. The shortened pins let it 'click' into place. I made two 'L' shaped brackets from 1.5mm plasticard and glued these to the insides of the rear cowl. They click into place on the insides of the side panels where there is a nice handy step. This pulls the sides and rear of the upper deck into place. The upper air intake fairing isn't glued in place. It clips nice and firm into its correct location. Best of all - NO GAPS!!! (Well, virtually no gaps) The tabs have since been painted silver, and red to hide them. The last pic shows how tight the join is now. (No - not finished yet...) I've posted a scruffy little picture to show how the rear tabs are made, for anyone who is interested. Roy. roymattblack attached the following image(s):
|
|
|
 Rank: Vice-Master  Groups: Registered
Joined: 31/08/2011 Posts: 629 Points: 1,963 Location: Plymouth
|
 Hi Roy, What a great idea!!!  You have solved the bad panel fit! When my replacement arrives, I will heat it first to see if it fits. If not I will go with your amazing idea! Kudos to you sir!! Great build too! Chris
|
|
|
Rank: Super-Elite Groups: Official Builds, Administrators, Moderator, Global Forum Support, Registered Joined: 04/06/2011 Posts: 4,213 Points: 12,784 Location: ipswich
|
Thanks for that. The car is now 99% complete - just the Johnny Walker decals to add. It's been an amazing, fun build and now I can't wait for the Senna car!!! One other tiny mod I made was to make my own aerial using thin steel wire and the two ends of the plastic part. I have also trimmed the panel clips I made and moved the rear holding tabs to pull the panel down even tighter. The clips are now painted to match the car and they really do hold the panels tight, and close. No gaps at all now. A simple inward 'squeeze' of the rear upper deck releases the clips and the upper body lifts off. I'm not sure about the rest of you guys, but I'm seriously wondering WHERE I'm going to display it! It measures out at over 4" longer than my 1/8 E Type and Stingray. They will shortly be going inside a 7-shelf glass display cabinet along with my other 1/12 stuff, but the McLaren is too big! I'm going to look into making a display case, as shelling out around £100 for a ready-made one seems a bit ouch. £100 would buy me another 1/12 kit...... I might have to 'box it up' for a while, as I don't want it to get dust infected..... Roy. roymattblack attached the following image(s):
|
|
|
 Rank: Pro Groups: Joined: 24/08/2009 Posts: 48,051 Points: -13,308
|
Nice job Roy she looks good and glad to see that you used my mod on the aerial, a vast improvement on the original 'over scale' kit part? Well done!!  
Kev
|
|
|
Rank: Super-Elite Groups: Official Builds, Administrators, Moderator, Global Forum Support, Registered Joined: 04/06/2011 Posts: 4,213 Points: 12,784 Location: ipswich
|
Just a quick update - I've pretty well completed now and I've added the missing Johnny Walker logo's on the rear wing end planes and the mirrors. Still need a permanent home for the beast though.... Roy. roymattblack attached the following image(s):
|
|
|
Rank: Super-Elite Groups: Official Builds, Administrators, Moderator, Global Forum Support, Registered Joined: 04/06/2011 Posts: 4,213 Points: 12,784 Location: ipswich
|
Hello chaps.
I've 'bumped' this one up as there's a suggested fix for the occasional poor fitting rear bodywork a few people have had...
Roy.
|
|
|
Rank: Vice-Master   Groups: Registered
Joined: 13/02/2012 Posts: 651 Points: 1,903 Location: croydon
|
Hi Roy.
Wow it looks fantastic.
Top job.
Best regards.
Mark
|
|
|
Rank: Super-Elite  Groups: Registered
Joined: 19/06/2013 Posts: 4,588 Points: 13,553 Location: West Yorkshire
|
Always a pleasure to admire your work Roy, great job.
Al
|
|
|
|
|
Fantastic job Roy! The body panel mod is a great idea.
can't wait to see the Senna 4/4 lined up next to it.
Malc.
|
|
|
Rank: Super-Elite Groups: Registered
Joined: 27/01/2014 Posts: 5,060 Points: 14,980
|
Really nice job Roy!!
Will you be displaying it in a glass case?
|
|
|
Rank: Super-Elite Groups: Official Builds, Administrators, Moderator, Global Forum Support, Registered Joined: 04/06/2011 Posts: 4,213 Points: 12,784 Location: ipswich
|
Yes - it's in a display case now along with a name plate. The DB5 in the pic has a case now too... Roy. 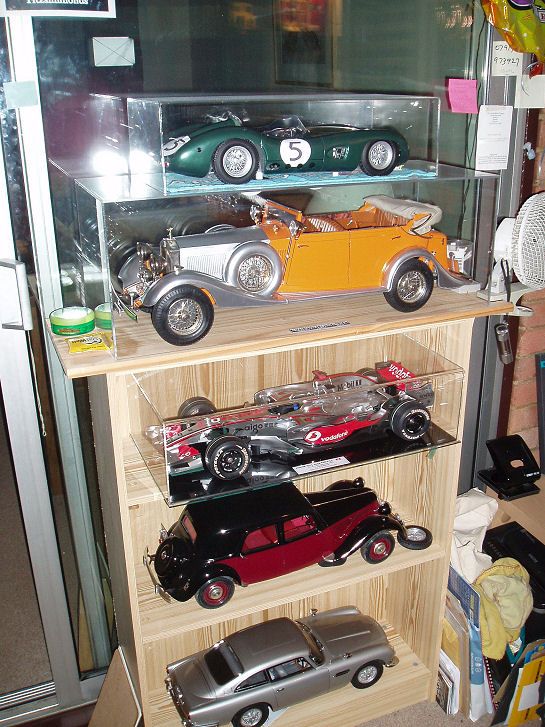
|
|
|
Rank: Super-Elite Groups: Registered
Joined: 19/06/2013 Posts: 4,588 Points: 13,553 Location: West Yorkshire
|
Some great looking cars there Roy.
Al
|
|
|
|
Guest
|
 US
US

