|
|
|
|
The Great War Centenary Project – A Tribute to the Heroes of All Sides in 1/72The Battle of the Messines Ridge, 7th – 14th June 1917Part One
Introduction and thoughts. When it came to thinking up a diorama build to honour the centenary of the start of the Great War there were obviously many, many battles, events and locations to choose from so why pick the Messines Ridge? Messines was the final choice from a shortlist of four possible models that I originally came up with. Those subjects were: The Allied landings at Gallipoli
The Charge of the Australian Light Horse at Beersheba
The Battle of Cambrai
The Assault on the Messines Ridge. The Gallipoli landings would have made an incredible diorama with a huge amount of work to create the water effects and the wooden launches to carry all those figures of British and Anzac infantry. Apart from all that work, one other thing put me off that idea, the Gallipoli landings and the battles that followed will forever be regarded as the ‘coming of age’ of the Anzac forces, and so it should, the Diggers fought like heroes there as did the British and the Turks. Even though numerically, more British fell than Anzacs, Gallipoli rightly belongs to the Aussis and their memories. The Light Horse at Beersheba is one of my favourite episodes from the Great War, ranking alongside other heroic actions like the Charge of the Light Brigade and Isandlwana / Rourke’s Drift. For those not conversant with this action, a combined British and Australian army under General Allenby had carried out a spectacular flanking action against the Turks in the Palestine Campaign by crossing the desert to capture the 19 wells at the railhead of Beersheba. Success depended on capturing those wells before the Turks and their German advisors could destroy them. The Turkish infantry and artillery had kept the British infantry at bay for almost a day and with time running out the Australian Light Horse demanded the chance to fight. The Light Horse were Australian Mounted Infantry; they rode to the battlefield and then dismounted to fight on foot as Infantry. The order was given and the Light Horse formed up in three ranks and advanced towards Beersheba. The three ranks broke into a trot and when still out of range of the Turkish guns they charged. They were observed forming up by the German Officers commanding the Turkish artillery and, recognised as Mounted Infantry, the order was given to wait until they halted and dismounted before opening fire. The Australians galloped on, passing the point where they reached rifle range and should have dismounted and to the horror of the Turkish gunners they kept right on coming. Belatedly, the order to open up was given but so fast was the charge that the guns only got off a few rounds before the horsemen had got past the minimum range for the artillery pieces, they were ‘under the guns’. The Australians thundered through the Turkish lines using their Lee Enfield sword bayonets as short swords on the Turks before finally dismounting and fighting on foot. After a day of conventional fighting and heavy losses, the 800 men of the Light Horse took Beersheba and its precious wells in less than thirty minutes, taking 10 Field Guns, 4 machine guns and 1148 prisoners in the process for the loss of 31 killed and 36 wounded. A fantastic feature film called simply “The Light Horse” shows the entire battle in glorious detail, if you can get a copy like I did on Ebay you’ll love it! Again, sadly I rejected this idea, partly because once again this episode is burned in to the Australian psyche and the victory was rightly theirs but mainly, because in the British memory, the Great War means only one theatre – the mud, blood and carnage of the Western Front, the Somme, Ypres, Passchendaele and many more. The desert campaigns despite the victories of Allenby and Lawrence of Arabia are largely forgotten. So it was back to the trenches. Narrowing Choices. One image of the Great War, which had always caught my imagination, was the old flickering cine film footage of the first examples of the weapon which we British invented and which would go on to dominate the battlefields of the world for generations to come – the Tank! The sheer terror which these lumbering monsters instilled in their footslogging enemies must have been awful to behold and, judging by some of the mechanical leviathan’s names (“Squash ‘em Flat” for one) their crews knew it too! The greatest tank assault of the war took place in the Battle of Cambrai which was one of the two choices I came up with. Cambrai was the obvious choice but there was another battle just a few months before Cambrai, which, after the war, was considered to be one of the finest examples of a combined ops attack employing infantry, cavalry, aircraft and tanks ever conceived and planned before the infamous ‘Blitzkrieg’ campaigns of the Second World War. This was the assault on the German positions on the Messines Ridge conducted from the 7th to the 14th June 1917 and this was the subject that I decided on, a decision greatly helped by the chance recording of a Channel 5 archaeology program the day before, concerning an excavation of the very German trenches I was thinking of modelling! Having decided finally on the Messines Ridge therefore, it was time to start researching in earnest. I downloaded and printed off the entire Wikipedia page about the battle (all 21 pages of it!) and saved some other websites in my favourites folder for future reference. In this I was helped greatly by Jase and Andy (Arpurchase) who PM’d me with further links to investigate. My initial thoughts on the design of the diorama were to try and depict the moment when the first wave of the new MkIV tanks broke through the first line of the German defences, crushing through the barbed wire obstacles and cresting over the top of the German trenches. In order to accomplish all this on a small(ish) diorama base, I would be working to the scale of 1/72, a scale I had not been to in donkeys years! 1/72 was not just the best scale to achieve what I wanted to fit in, it was also the most prolific scale for WW1 figures and vehicles. 1/35 is obviously better for highly detailed models but in WW1, it’s also very poorly provided for by the main model manufacturers (although, with the centenary fast approaching next year, that is beginning to change). After a good trawl through the internet I came up with the following shopping list for the ‘active’ inhabitants of the battle scene: Canadian Infantry, British Heavy Weapons, German Infantry and German Heavy Weapons, all made by HaT Industrie and British Cavalry (Late) made by Strelets. HaT do make a set of British Infantry but many of them are wearing greatcoats which would not be worn here. This company is bringing out a large range of WW1 figures in time for the centenary next year including British Expeditionary Force (probably in the earlier cloth caps), British Khaki Drill (have no idea what that one is) and British Cavalry, unfortunately, until I have some idea of what they are going to look like or when they will be released, I don’t know if they will be worth adding to the list. The largest items on the diorama (though smaller than I thought!) will be the Emhar MkIV Male tanks, I’ll be buying two of these kits although there will actually be three of them in the model (more on that later!) The ground scenery would be a lot of work in itself. I always thought the trenches of the Western Front were simply an excavated long hole in the ground with a bit of timber here and there, WRONG! As the archaeology program proved, those trenches were incredibly complicated structures, all of which I was going to have to try and reproduce in miniature to do justice to the subject, and as much as possible was going to be scratch built, partly for cost reduction and partly because doing that was part of the fun and sense of achievement! Right! So that was the route of my thoughts, which led up to this, the first Great War diorama that I had ever conceived and planned so before the actual construction begins, the first postings on this model will be a brief history lesson and description of the battle itself. Once the modelling ‘proper’ begins the build diary will consist of separate ‘mini topics’, a sort of ‘in-build workshop’ series alongside the base and groundwork, which will be an ever-evolving background into which the smaller items will be fitted. The photo below shows the majority of the components which will be going into this build. There are a few extras still to get, mainly more paints for the authentic uniform colours but also some items which you might not expect but which will prove very useful indeed!   (Apologies for the 'next year centenary' quotes, you can tell how long ago I began this text!)  In Part Two: The Preparations for Battle. In Part Two: The Preparations for Battle.See you soon! Robin Plymouth57 attached the following image(s): First wooden ship: The Grimsby 12 Gun 'Frigate' by Constructo Second: Bounty DelPrado Part Works Third: HMS Victory DelPrado Part Works 1/100 scale Diorama of the Battle of the Brandywine from the American Revolutionary War Diorama of the Battle of New Falkland (unfinished sci-fi), Great War Centenary Diorama of the Messines Ridge Assault Index for the Victory diary is on page 1
|
|
|
|
|
Robin, this is going to be so enthralling to see come together.... It is a build I am going to be following with a great deal of anticipation. Judging by the skills you have shown to date I believe this is going to be something special..... The very best of luck with this one.....  . As for the book, I think I have enough reference material for now except for some detailed pics or drawings of the Thermotanks located on the aft well deck..... going to keep hunting though..... Thanks again.... Regards Alan
|
|
|
 Rank: Super-Elite        Groups: Registered
Joined: 30/01/2013 Posts: 4,604 Points: 13,607 Location: Monmouthshire UK
|
Looking forward to this one Robin, making me think about doing something for the anniversary in August too, have to have a think . Steve
|
|
|
|
|
Thanks for those kind wishes Alan and Stevie! This is going to be a long and complicated build. The base itself is beginning to take shape now and is still evolving despite all the planning! I had a brainwave a few days ago (which surprised even me at it's simplicity!) but the change will make the detailing far easier to accomplish which is great! Oh, nearly forgot Stevie, Emhar do a very nice range of British tanks of WW1 from the little Whippet up to the massive Tadpole, why not do one of them in a single vehicle diorama! That would be a great diary to follow. You should begin to see the project 'on screen' so to speak, from the end of next week, until then here's the history bit! Happy Building to all. Robin “Kaiser Bill is feeling ill, The Crown Prince, he’s gone barmy! And we don’t give a XXXX, For Old Von Kluck, And all his bleedin’ Army!” Marching song of the ‘Old Contemptables’ to the tune of ‘The Girl I left behind me’ Part One: Preparations for the Battle. It is June 1917, many of the professional soldiers of the British Army who sang their defiant songs in 1914 are gone, as are the Germans they first encountered, sacrificed in the insanity of the trenches where hundreds of thousands on both sides are scythed down in suicidal charges across the killing grounds of No-Man’s Land, the war has degenerated into carnage with bayonets and cavalry swords facing relentless artillery and the obscenity of poison gas. The French led Nivelle Offensive of April and May failed to achieve any major breakthroughs and caused a general demoralisation of the French Army. It was now agreed that the British would plan and implement a fresh Offensive in the Belgian West Flanders area, which would draw the German reserves away from the French sector, relieving the French armies which were rapidly cracking under the relentless pressure. It was decided therefore that the British Second Army, commanded by General Herbert Plumer would launch an assault against the high ground to their east occupied by the Germans in a strong defensive line along the Messines Ridge. The attack would take place from Ploegsteert Wood in the south (called Plugstreet by the Tommies) through Messines itself to Mt. Sorrel in the north, this whole area lay between the British lines to the west and Passchendaele Ridge to the north east, the real objective of a further assault beyond Messines which would allow the Allies to capture the entire Belgian coast up to the Dutch frontier. General Plumer was, to look at, the spitting image of a Colonel Blimp! Chubby cheeked with a great bushy white moustache, but there the similarity ended. Popular with his men, he was not a favourite of Haig who thought about removing him on various occasions. Unlike many of the armchair warriors leading the British Army from miles in the rear, Plumer was a meticulous planner who went into every detail of an operation, accounting for everything and leaving nothing to chance. In actual fact I would regard General Plumer as a ‘Local Boy’, as he was born just up the coast from me at Torquay in 1857. The Second Army consisted of five Corps, with twelve Divisions, totalling about 216,000 men, incorporating regiments and brigades from Britain, Australia, Canada and New Zealand. They would initially face the five Divisions of the German XIX Corps commanded by Crown Prince Rupprecht and General Sixt von Arnim. Although this seems like a huge advantage in numbers for the British, only three of the five Corps would actually be involved in the assault, the other two remained on the northern flank to prevent a counter attack by the Germans from cutting through the thinned Allied rear from the north. The attack had been planned since 1916 and theoretically, had actually been underway since then as the British conducted a huge mining offensive, secretly driving long underground shafts from behind the front lines, under no-man’s land to finally excavate large chambers beneath the German trenches. Twenty one mines were dug although only nineteen would be detonated on the day, of the other two, one failed to detonate for some unknown reason, and the final mine was abandoned due to German counter mining operations although it was already packed with several thousand pounds of explosive before it was abandoned. A new high explosive called Ammonal was used which was rendered unusable when wet so it was packed into rubber sealed tins and boxes before being transported to the mines by mules led along specially deepened trenches to protect them from enemy observation. Four hundred and forty seven tons of ammonal were packed into the twenty three mines during the weeks before the attack was planned to start. The mines were dug by experienced miners who formed a special battalion, and were paid six times what the front line soldiers received. They were a special breed, known as ‘Clay Kickers’, the shafts were dug, not with picks and shovels, the sound of which would have alerted the German listening posts but with a special tool which the miner forced silently into the soft London Clay with his feet whilst laying back on a purpose built wooden frame. This was a very dangerous game of cat and mouse with the German counter miners (hence the high pay). If the enemy detected the digging they would dig their own shaft under the British one, pack it with explosives and detonate it below the defenceless men, if the British detected the Germans doing that, they would sink a deeper shaft below the German miners and do the same to them! In fact the British tunnelers dug sacrificial shafts above the main tunnels to distract the Germans from the real objectives, the ‘Horrible Hun’ were allowed to blow up the empty upper tunnels thinking they had killed the miners who then carried on silently ‘Kicking the Clay’ deeper down. Of the twenty one mines, only one was actually compromised by enemy action and that was after it had been filled up with the high explosive ready for the offensive. The bodies of two British miners are still entombed in that tunnel to this day, as are the tons of high explosive, which were never detonated. As the date for the attack drew near, large numbers of heavy machine gun posts were constructed along the front line, these would not be advancing with the first wave but would provide an ‘overhead barrage’ of plunging fire onto what remained of the German trenches as the British and Colonials advanced through No-Man’s Land. As further examples of Plumer’s detailed planning, three Field Companies of Engineers were kept back in reserve, their job was to repair the blasted roads and set up defensive positions as the troops advanced. Artillery support from 4.5”, 6” and 8” Howitzers would land on all German positions within 1500 yards of the advance, ceasing fire only when the British infantry got within 300 yards when the closer 18 pounder Field Guns would open up on the next line of trenches. Where the opposing trenches were too close for artillery support, the troops own Trench Mortars would provide the initial barrage. As the attack would be going in under cover of darkness after the mines were exploded, an observation balloon was reserved to relay messages sent back by signal lamp from the front lines as insurance against telephone lines being cut and runners not getting through. The artillery support was commanded by Major General G. McK. Franks, and great care was taken to identify every possible German artillery position and to accurately target those positions to suppress the inevitable German counter barrage. The Second Army Report Centre which co-ordinated all the artillery fire at Locre Chateau, was linked to all the various observation points; Corps Report Centres, Corps Artillery HQs, Balloon, Wireless and Observation stations by a deeply buried telephone cable and staffed by a dedicated Counter Battery Staff Officer who held daily evening conferences to collate the day’s Intelligence reports. One particularly brilliant young Officer had even devised a sonic detection network using a variety of odds and ends including empty rum ration jars and electrical wires. These ‘listening’ posts could detect the initial ground tremors whenever a German battery opened fire (before the shells arrived of course) and by recording the exact time of the disturbance and the strength of the tremor and passing this information back to the young Officer, by means of incredibly complex formulae and mathematics, he could pinpoint the enemy battery to within a few yards. This enabled the British to counter fire and destroy the German guns even in thick fog or mist. The entire 17,000 yard front line of the offensive was divided up into squares on the maps and individual batteries assigned to particular squares, all at instant readiness to open fire on any target within them. British aircraft prevented the Germans from observing the changing front line by dominating the sky from the front to the German balloon lines some 10,000 yards to the rear. Better fighters like the Bristol F2, the SE5A and the Sopwith Triplane matched the best the Germans had and in fact Plumer had managed to secure more aircraft for his assault sector than the Germans had for the whole Western Front. No British aircraft were shot down until the actual day of the attack. The British even developed a wireless detection system, obtaining bearings on the few German observation aircraft that were sent up and used it to great effect, guiding British fighters to intercept them! Finally, in a ruse which pre-dated the famous D-Day Deceptions, the radio traffic was increased at other points along the front lines, non existent units talking to one another day and night, all of course being intercepted by the German listening posts behind the lines. Part Three to follow: The Battle Begins Plymouth57 attached the following image(s): First wooden ship: The Grimsby 12 Gun 'Frigate' by Constructo Second: Bounty DelPrado Part Works Third: HMS Victory DelPrado Part Works 1/100 scale Diorama of the Battle of the Brandywine from the American Revolutionary War Diorama of the Battle of New Falkland (unfinished sci-fi), Great War Centenary Diorama of the Messines Ridge Assault Index for the Victory diary is on page 1
|
|
|
|
|
Great start Robin with simply a fascinating read into history.... Looking forward to seeing the first pics..... Regards Alan
|
|
|
 Rank: Pro Groups: Joined: 24/08/2009 Posts: 48,827 Points: -13,348
|
As Alan says, simply fascinating and looking forward to see your hard work
|
|
|
|
|
Many thanks indeed to Alan and Mr T! One more 'Historical' after this and then the hard work begins! (Hope you like photos of green 'blobs'! Part Three: The Battle begins.“Gentlemen, we may not make history tomorrow, but we shall certainly change the geography!” The slow preliminary bombardment began on the 8th May, just enough shells to keep the Germans occupied but not enough to signal a forthcoming assault. This ‘annoying’ of the German front lines suddenly increased in ferocity on the 23rd May with the great majority of the breastworks and concrete shelters being demolished on both sides of the Messines Ridge. So accurate was the shelling due to the complete air superiority of the British observation planes that on the 26th May the German troops manning the front lines were ordered to move forward fifty yards into No Man’s Land before dawn and spend the daylight hours sheltering in shell holes away from most of the British bombardment, returning to their trenches for the night. So many casualties were being caused by the British artillery, the front line battalions were being rotated every two days instead of the normal five. German morale was already low and was not helped by a British prisoner, captured on the 6th of June letting slip that the assault, by now pretty obviously expected would be synchronised by mine explosions. On the 1st of June the British bombardment was stepped up another notch as the Germans finally began to offer counter battery fire of their own, directed by 62 German observation aircraft, each one escorted by up to 7 fighters. Again though, when the enemy aircraft radioed their sightings to their batteries, British wireless interceptions pinpointed the guns for another ‘pasting’. In the lead up to H-Hour on the 7th of June the British guns had destroyed almost every strongpoint, road junction and railway and road bridge along with several ammo dumps and strategically important villages. Only the smaller pillboxes, too well-camouflaged to be seen from the air were still left untouched. All preparations were completed the day before the assault would take place, and in a final briefing conference, General Plumer’s Chief of Staff, Major General Charles Harrington in a memorable understatement remarked to the invited members of the Press, “Gentlemen, we may not make history tomorrow, but we shall certainly change the geography!” Zero Day was fixed for the 7th of June and Zero Hour was set for 3.10am. (This was before military parlance became formalised to D-Day and H-Hour as in the Second World War). The reason for the 3.10am start was that at that time it was expected that a man would be visible at one hundred yards, obviously you can’t shoot them if you can’t see them! During the evening of June 6th there was a sudden thunderstorm but the skies had cleared by midnight and the ground remained relatively dry with only surface puddles to worry about. The first wave troops began moving up to their designated jumping off positions. At 2.00am, squadrons of British aircraft took off and began flying over the German lines, not to attack any targets but so the sound of their engines would drown out the noise of the MkIV Heavy tanks driving up to their starting points. All the troops except some units in the II Anzac Corps area (the subject of the diorama) reached their jumping off positions unnoticed, the Germans gas-shelled the Anzac’s approach road causing some five hundred casualties but the Aussis still made it to the start lines on time. Some of the tank crews were similarly affected when they discovered that their gas masks didn’t work. Fortunately the gas wasn’t lethal but many of them fought the battle half blinded by the effects of the irritating chemicals. At 3.10am, the first mine detonated on the northern end of the line and the next in turn blew up with only a second between them, the entire line taking only nineteen seconds from north to south. We can only imagine the sheer terror those poor Germans experienced, especially those on the southern edge who could see the first mines going up in the far distance, each new explosion a few hundred yards closer and all the time knowing that there was absolutely no escape from the rapidly approaching annihilation. So large were those detonations that they were clearly heard in London, were reportedly heard by a medical student in Dublin and were the largest planned explosion in history, not exceeded until the Trinity Atomic Weapon test in 1945. The Swiss Geological laboratory registered an earthquake at the time. Approximately 10,000 German soldiers died in less than thirty seconds, 7,548 of them have no known graves, either buried or vapourised in the initial explosions. As the deafening noise of the detonations rumbled away, the British artillery opened up at maximum speed with three belts or curtains of creeping barrage, each one 700 yards deep directed onto the German lines between the still smoking craters. The designated counter batteries began to gas shell all known surviving enemy guns as the nine Divisions of infantry and their lumbering tanks began to advance. When the German artillery replied it was scattered and intermittent, falling on the now empty assembly trenches. The assault on the extreme right of the line, (the subject of this diorama) was conducted by the II Anzac Corps, (I’ll be using Canadian Infantry figures for their better poses, but all the Commonwealth troops were similarly equipped to their British comrades). Although the mine beneath Petite Douve Farm was never exploded, the Anzacs did benefit from four mines under Trenches #122 and 127. They advanced over the dried up Steenebeke river and took the German forward trenches, the farmhouse itself and then swung north towards Messines village. All along the entire front, the advancing Second Army found the same result, hundreds of dead, wounded and stunned Germans. There was some light resistance in places but this was quickly dealt with by the MkIVs co-operating with the infantry, strong points were shelled with the male tank’s 6pdrs firing HE whilst the infantry, only a hundred yards behind their own creeping barrage took on the pillboxes from the rear using Lewis guns, rifle-grenades and trench-mortars. As the barrage reached the German second lines hundreds of Germans could be seen retreating back to the stronger defences beyond although, by the time the British and Commonwealth infantry arrived at those second lines, many of the Germans had returned, the barrage having passed over their heads. The Anzacs arrived at Messines village to find that the entire area had been turned into a fortress with a line of trenches skirting around the perimeter and an inner defence of five concrete pillboxes. In addition, all the house cellars had been converted into shell proof dug-outs. Two enemy machine guns and fire from Swaynes Farm held up the advance until a MkIV rumbled in and drove straight through the farmhouse walls convincing thirty Germans inside to ‘pack it in’. Messines was defended with great courage and determination by the German infantry until their Commandant was captured. Knowing the Aussis and their love of the P1907 bayonet, the captured Officer was possibly persuaded to order the capitulation! The fighting continued on along the battle line, in the north the 16th and 19th Divisions advanced through the charred remains of Wytschaete Wood and Grand Bois (Great Wood) which had been destroyed by the buried Livens Projector, a huge static underground flame thrower which projected 2,000 oil drums worth of primitive napalm hundred of yards into the German positions a few days before the battle. (This weapon was the target of another Time Team Special last year!) Stiff resistance was encountered and several German counter attacks by reserve regiments were beaten back by the infantry with targeted artillery fire and tank support. By 5.00am, all of the German Hohen or Second line had been taken. Fresh British battalions now advanced and leapfrogged the first wave who were now digging in to consolidate the captured positions (in effect, turning their defences around 180 degrees). Captured German papers in the front line later revealed that the German High Command had under estimated the effects of the mines and British strategy, expecting that the first line of trenches would hold out until the reinforcements arrived. A German Artillery HQ five hundred yards beyond Messines was captured by the New Zealanders and another tank waltzed into the strong point of Fanny’s Farm capturing another hundred Germans in the process. Another two tanks, accompanied by the 36th Division infantry captured a German battalion HQ near Wytschaete. The opposite (East facing) slope of the Ridge was taken by 8.40am with a company from each battalion advancing behind another barrage several hundred yards down the slope to form an Observation line. They were aided in this by eight more tanks and patrols of British Cavalry. Most German troops encountered surrendered quickly, resistance, where it was faced was very light, the British fighter aircraft helping the enemy on their way with low level strafing runs. Here the British and Commonwealth forces halted. Their task now was to consolidate the defences they had taken to enable the inevitable German counter attack (expected by 11.00am) to be engaged at long range rather than meet them head on in the open, still advancing. The third line of enemy trenches was not to be attacked until the afternoon, when fresh battalions would be arriving from the rear, until then the offensive was ‘on hold’. In Part Four: The final push and the aftermath of Messines. Plymouth57 attached the following image(s): First wooden ship: The Grimsby 12 Gun 'Frigate' by Constructo Second: Bounty DelPrado Part Works Third: HMS Victory DelPrado Part Works 1/100 scale Diorama of the Battle of the Brandywine from the American Revolutionary War Diorama of the Battle of New Falkland (unfinished sci-fi), Great War Centenary Diorama of the Messines Ridge Assault Index for the Victory diary is on page 1
|
|
|
|
|
A great history you are providing. I have visited the creators and you just don't get it until you stand on the rim and look down.
looking forward to your build.
jase“Whenever you find yourself on the side of the majority, it is time to pause and reflect.”
-Mark Twain
|
|
|
|
|
Many thanks for that Jase. I'd love to visit those places one day and like you said we can't imagine what they went through until we see it first hand. My old boss travelled to see his Uncle's grave in the Somme area some years ago and he said he drove along a dead straight road through the countryside for mile after mile and all along the roadside the whole distance were shells dug up by the farmers, all awaiting disposal! Robin First wooden ship: The Grimsby 12 Gun 'Frigate' by Constructo Second: Bounty DelPrado Part Works Third: HMS Victory DelPrado Part Works 1/100 scale Diorama of the Battle of the Brandywine from the American Revolutionary War Diorama of the Battle of New Falkland (unfinished sci-fi), Great War Centenary Diorama of the Messines Ridge Assault Index for the Victory diary is on page 1
|
|
|
|
|
Plymouth57 wrote:Many thanks for that Jase. I'd love to visit those places one day and like you said we can't imagine what they went through until we see it first hand.
My old boss travelled to see his Uncle's grave in the Somme area some years ago and he said he drove along a dead straight road through the countryside for mile after mile and all along the roadside the whole distance were shells dug up by the farmers, all awaiting disposal!
Robin I went on one of the battlefield tours, for the same reason my great great uncle died a t a dressing station on the somme.
They have a daily bomb disposal collection which is what the piles of shells are for ploughed up by the farmers usually. there are collectors who try and get to them first. 5 or so years ago a history teacher in the Belgium blew his house his family and himself to pieces trying to defuse an artillery shell!!!
I purchased this Germain 'egg' grenade while i was out there, apparently dug up while weeding a garden - The War is still very real for many people in Europe.
 “Whenever you find yourself on the side of the majority, it is time to pause and reflect.”
-Mark Twain
|
|
|
|
|
Hi Robin, another superb history lesson that had me engrossed.... Just cannot imagine the carnage that ensued for both sides nor what those poor men went through..... Have seen some pretty unpleasant things in my service days but the horrors of the great war can only be described as unbelievable..... Keep the lessons coming and look forward to the first posts on your progress..... Regards Alan
|
|
|
|
|
Thanks again Alan and to all those who have been having a look! here's the last of the history section, then the hard work starts!  Part Four: The Final Objective, the Oosttaverne Line. Part Four: The Final Objective, the Oosttaverne Line. Originally, the plan called for a pause of five hours before the third and final assault was begun. This was increased by a further two hours when General Plumer received reports on the condition of the ground, another two hours of June sunshine would help both the infantry and the tanks over the results of the previous night’s thunderstorm. The hidden British artillery positions were bolstered up by new batteries and lighter guns were moved as far into the old No Man’s Land as they could reach. On the west side of the newly captured ridge, 146 heavy machine guns were set up to fire an overhead barrage whilst each battalion digging in to their new positions on the eastern side employed an additional 16 ‘heavies’ for direct fire support. 24 MkIV’s from the reserve had begun to advance from 10.30am to join the II Anzacs and they were to be joined by any surviving tanks from the morning attack. Unfortunately for the 4th Australian Division, they reached the assembly areas for the third wave at the original jump off time, the postponement having not reached them and they were forced to spend those two hours on open ground under German artillery and machine gun fire which caused considerable casualties. The left hand brigade was warned in time however and did not advance until 1.40pm. At 3.10pm the British artillery began its creeping barrage down the eastern slopes at the rate of a hundred yards every three minutes. The troops advanced on a two thousand yard front behind the barrage eventually meeting stiff resistance from the pillboxes set into the third line. These defenders caused many casualties until the three supporting tanks arrived behind the infantry and blew the strong points apart with their HE shells and machine gun fire. As the infantry fanned out behind the destroyed positions the surviving Germans were observed fleeing through the British bombardment which had now stopped creeping forward and was targeted on a position three hundred yards beyond the final line of trenches. The assault, like the morning attack, went pretty much to plan although the delays in some battalions reaching their starting points whilst others had gone earlier than intended, resulted in some link ups between the Brigades taking place up to a thousand yards distant from their intended points on the map as the earlier battalions veered off course looking for their left or right flank comrades. The Aussis for instance advanced an extra thousand yards to the north looking for the 33rd Brigade, which finally turned up at 4.30pm with four tanks in tow (not literally!). When they did eventually link up the two groups promptly took Joye and Van Hove Farms for good measure, the tanks silencing the machine guns firing out from both of them. Further north, the British formations also met some resistance but were able to keep up with the barrage capturing many farms and undefended pillboxes. In the process they also captured 289 Germans along with six field guns for the incredibly light loss of six casualties. Advancing another eight hundred yards they then took Ravine Wood on the left flank (unopposed). The left flank battalion was then pulled back to aid the 47th Division which was encountering heavy machine gun fire from a line of spoil tips ahead. This was the high point of the Messines Ridge Assault with every objective apart from those spoil tips and about a thousand yard stretch of the extreme rear of the third line between the Anzacs and IX Corps where delays in the link ups had allowed the Germans to bring up reinforcements. The same thing happened at the spoil tips and a later infantry attack met heavy machine gun fire, losing a third of their number before withdrawing. A German counter attack was seen massing near the 12th Australian Brigade who called back for an ‘SOS’ barrage. This was duly delivered but tragically fell not on the Germans but on the Aussis who had inadvertently dug in 250 yards beyond its objective, right on the spot in fact that they had called the artillery fire down on. The untouched German attack, when it came, was successfully repulsed by the surviving Australians with small arms fire alone. After the enemy had retreated however, many of the Aussis decided to do likewise and pulled back to the relative safety of the ridge. At dusk, and under the impression that all of the Australians had pulled back, and fearing another German build up, the New Zealand artillery observers called for a second barrage of the same area which fell on to those Anzacs who had held their positions. Those brave soldiers then did fall back, unfortunately with many casualties leaving the southern part of the third line unoccupied. ‘Panic barrages’ continued into the night, some of them also landing on friendly positions until the infantry managed to get all artillery stopped from 10pm after which many of the abandoned enemy trenches were re-taken before dawn. Throughout the entire assault, the British air force provided overhead reconnaissance. This proved a great help where the troops on the ground were experienced. In those areas the troops lit flares and waved anything they could get hold of to signal their location. As the attack progressed the pilots and observers would note these positions onto copies of their sector maps and when their relief aircraft arrived, they flew back to the Divisional HQs and dropped the maps for continual updates to the High Command. It did not work so well where inexperienced and poorly trained units were concerned. Quite sensibly not wanting to expose themselves in the middle of a shooting match, these units refused to identify themselves to the circling planes, forcing them to fly very low to obtain a positive identification and resulting in four of them being shot down by enemy fire. Apparently, with such a superiority in the numbers of British aircraft, the German infantry were just as disinclined to reveal themselves to their own observation aircraft too, forcing them into low passes as well. Two of the fourteen British fighters were shot down by ground fire but their contribution to the battle in strafing infantry, transport, gun crews and machine gun nests were out of all proportion to their numbers and losses. During the entire day’s battle, only one British aircraft was lost to a German fighter. The Aftermath:As usual with any battle, military analysts and later, historians, disagreed on the significance of Messines. Although generally described as a “British tactical success” it was not regarded as a magnificent breakthrough which would ‘end the war by Christmas’. General Plumer would probably have regarded those who claimed that view as complete idiots – he had never intended that the assault on Messines should be a complete breakthrough! That was one of the main reasons why Haig had nearly had him removed on several occasions, where Haig was always convinced by the ‘one more push’ planners (it later transpired that his own intelligence staff repeatedly gave him ‘doctored’ information on the state of the German army, for what reason, only they can ever know) and he was continually expecting the enemy morale to collapse which is why he ordered some attacks in places and at times that they were doomed to failure. Far from the “Butcher Haig” tag that he received during and after the Great War, he was very concerned with reducing his own casualties which was why he was such a great supporter of the first tank developments. General Plumer on the other hand never believed in the ‘final push’ doctrine, to him, every assault he planned was designed to simply take the desired objectives as quickly as possible with as few losses as he could take them with. His was a war of ‘chipping away’ at the enemy lines, not punching straight through them and damn the casualties and in this respect, Messines was a good 95% successful. His thorough planning and preparation resulted in far less casualties than earlier ‘over the tops’, in usual conditions the losses on the attacking side would be expected to be at least three times those of the defenders, at Messines the losses on both sides were almost identical at around 25,000. The Germans lost most of their dead in the initial mine explosions, about 10,000 killed in nineteen seconds! The British and Commonwealth troops lost most of theirs not in the attack itself, but in the days before and after, defending the former front line and the newly captured positions from German counter attacks and artillery. If there was one tactic which secured the victory and reduced casualties (probably on both sides) it was the use of the MkIV Heavy Tank. Where ever the infantry was held up by determined resistance from surviving bunkers and pillboxes, a tank would come crawling out of the smoke and gloom. The defenders once engaged would either be blasted out or, in many cases simply surrendered, saving both their own lives and those of the attackers who might have otherwise been cut down storming the position in the ‘good old way’. In this respect, the tanks had suffered an unexpected stroke of good luck, much to the consternation of not just the German infantry and High Command but to various members of the British High Command who, by various means had tried to destroy the whole concept of the armoured fighting vehicle. The designers and builders of the very first fighting tanks the MkI had come up with not only the concept of the vehicle itself but also how it was supposed to be used in battle. That concept in all but name (and speed) was Blitzkreig! The first tanks were supposed to be kept a total secret until a) they had built at least a thousand of them, b) the problems with the early gearboxes had been rectified and c) a battleground suited to their performance could be found. In essence, the very first time that British tanks appeared on the battlefield, they would swamp the enemy, completely demoralising him and gaining the almost mythical ‘break through’. To the complete horror of the designers, everything they had planned for was disregarded, by Haig, again mislead by deliberately incorrect intelligence and also by many in his staff who wanted nothing more than to see this new ‘ungentlemanly’ weapon of war melted back down into more artillery pieces which they regarded as far more useful! The first appearance of the tank therefore was in the battle of Flers during the Somme offensives, an area so soft and muddy that the tank corp pleaded not to send them there! Nevertheless, every tank then built was grabbed by the army and rushed to France, an attack which the tank’s designers had envisaged beginning with a thousand machines was hijacked by the top brass and conducted with 49! Not only were there a mere 49 tanks to begin with, the army had also grabbed all the special training tanks from the mechanised warfare school (included in that 49!). These vehicles were never designed for combat, although they were armed (for training the crews on the 6pdr QF cannons, they were not fitted with armour plating at all, all they had as their outer skin was un-hardened boiler plate. As the ‘49’ began to move up to the front lines, 17 broke down before even reaching them and of the 22 tanks that did arrive at the front, another 7 broke down at zero hour which left a grand total of 15 tanks to scream across the battlefield at half a mile an hour. When the attack began the effect on the Germans was all out of proportion to their numbers, those tanks that didn’t sink almost out of sight in the deep mud instilled such a sense of hopelessness in the enemy infantry that, just as at Messines and other battles later in the war, they surrendered in droves. By the end of the battle however, most of the tanks engaged had either been knocked out by artillery or had ditched themselves and been captured. This however, was the German’s biggest mistake because most of the ones they captured were in fact the training machines. The tank crews hadn’t stood a chance (just as those who sent them into battle well knew), they had been riddled by the standard German armour piercing bullet the ‘K’ round. Further tests against the captured tanks proved that the K round was quite sufficient to stop the new British terror weapon in its tracks (literally!). If they had bothered to try, they would probably have found that even a 9mm Luger round would have gone through the armour too! The German opinion therefore was that the tank could be stopped by their existing ammunition, there was no need to develop better rounds and no point in developing their own tank to fight against the British. When the MkIVs attacked at Messines Ridge, the German machine gunners fired off entire belts of K rounds only to watch with mounting horror as everyone of them bounced harmlessly off the MkIV’s even thicker hardened armour, merely alerting the tank to the gunners location. Perhaps the best way to answer the question of how successful Messines was would be to ask the enemy! Ludendorff later wrote "the British victory cost the German army dear and drained the German reserves" and Von Kuhl called it "One of the worst German tragedies of the war" The result of Messines therefore, was a complete vindication of General Plumer’s planning and intention. Messines was itself only the preliminary phase of the next battle which would take place to the north of the ridge and which could not have been executed without the high ground of Messines being in ‘Entente’ hands. In that battle however, the ground would once again be a boggy mud and water filled hell, totally unfit for the tanks to operate in. The slaughter that would take place on the plains to the north of Messines would become another by-word for carnage – Passchendaele! The Mines, their weight of high explosive and the resultant craters.Hill 60A 53,500lbs 191ft Hill 60B 70,000lbs 260ft St. Eloi 95,600lbs 176ft Hollandscheschour 1 34,200lbs 183ft Hollandscheschour 2 14,900lbs 105ft Hollandscheschour 3 17,500lbs 141ft Petit Bois 1 30,000lbs 175ft Petit Bois 2 30,000lbs 217ft Maedelstede Farm 94,000lbs 217ft Peckham 87,000lbs 240ft Spanbroekmolen 91,000lbs 250ft Kruisstraat 1 30,000lbs 235ft Kruisstraat 4 19,500lbs (same crater as 1) Kruisstraat 3 30,000lbs 202ft Ontario Farm 60,000lbs 200ft Trench 127 Left 36,000lbs 182ft Trench 127 Right 50,000lbs 210ft Trench 122 Left 20,000lbs 195ft Trench 122 Right 40,000lbs 228ft Casualties: British and Commonwealth: 24,562 German: 25,000 Civilians: 1 cow* Of the two mines which were not detonated, one still lies under Petit Douve Farm (just beyond the area of the diorama) due to its discovery and German counter mining. The other did not explode for unknown reasons. On the 17th July 1955, the field under which the mine lay was struck during a lightning storm, the resulting explosion killed a single cow! So here ends the history lesson and the story of my chosen diorama the Messines Ridge. I hope you can get some idea of the horrors that were faced by the soldiers of both sides which I hope to do justice to as the build takes off. The first postings for the build should begin towards the end of this week, (I’ve done some early bits and got the photos, just got to write it up for the diary now!) Before I go I’d just like to acknowledge the following as the source of the info and photos I’ve used in the history section. Many of the pictures I’ve noticed appear multiple times on many different sites so, as they say, “other sources are available” but these are the ones where I first came across the photos I wanted to illustrate the text so, my grateful thanks to them all! Most of the history was gleaned from the excellent Wikipedia “Battle of Messines (1917) pages, together with some of the photos, the rest were as follows: The Worcester Regiment Messines website The 36th Ulster Division Messines website www.worldwar1.com Bain News Service Publisher website www.firstworldwar.comAWM London website (Australian War Memorial London) People and Places website (Mike St. Maur Sheil) www.ww1battlefields.co.ukIn Part Five: The Initial Design and the Base work begins. Robin Plymouth57 attached the following image(s): First wooden ship: The Grimsby 12 Gun 'Frigate' by Constructo Second: Bounty DelPrado Part Works Third: HMS Victory DelPrado Part Works 1/100 scale Diorama of the Battle of the Brandywine from the American Revolutionary War Diorama of the Battle of New Falkland (unfinished sci-fi), Great War Centenary Diorama of the Messines Ridge Assault Index for the Victory diary is on page 1
|
|
|
|
|
Hi Robin, thanks for the first class history lesson, it had me riveted from start to finish..... Am so looking forward to seeing this come together and I'm sure you will be able to portray some of the horrors these men had to endure.. I know after reading your lesson my thoughts go out to all those that went through this carnage...... Great work and thank you...
Regards
Alan
|
|
|
Rank: Pro Groups: Joined: 24/08/2009 Posts: 48,827 Points: -13,348
|
The scene is set, look forward to seeing it come together
|
|
|
|
|
Thanks again to Alan and Mr T, well, here we go! Part Five “And so it begins!”Gassed last night, and gassed the night before,
Gonna get gassed tonight, if we never get gassed anymore!
When we’re gassed, we’re sick as we can be,
‘Cos phosgene and mustard gas are much too much for me!The Initial Design Phase. The first photo below is a copy of the initial design that I came up with for the overall ‘look’ of the diorama. Many of the first concepts have since been modified after further research but overall, the plan is still very similar. The first thing to be aware of is that the three tanks featured here are vastly overscale with regards to the size of the base, if this was a 1/35 scale model then it might be about right but in actual fact the tanks will only be about half the size they look here. Secondly, the two simple coils of barbed wire that the tanks are crushing their way through is also very simplified, the model will feature a literal ‘sea’ of wire (much to my consternation once I decided on the most authentic method of producing the stuff! It’s not going to be as quick as I first thought!). And lastly, the trenches themselves have been altered from the zig-zag style to a more authentic castellated or ‘battlement’ design. This was necessary after repeated viewings of the Messines trench archaeology program and closer examination of the contemporary aerial photos. In essence then, the diorama will feature a section of the German front line trench just south of Le Petit Douve Farm (where the abandoned mine didn’t detonate) with three MkIV Heavy tanks advancing up the gentle slope crushing the barbed wire entanglements, generally doing nasty things with their 6pdr cannon with the Anzac infantry following up behind. The German defenders will be featured shooting back, retreating back or a combination of the two! As you can see, there will be three tanks in the model, but as I mentioned in the introduction I have only purchased two kits, one will be built as a single machine but the other one will be built and then cut in half with one half on each flank of the base to represent two tanks. This of course means both halves will have to be fitted with a full set of internal details (fool that I was!) My memories of the old Airfix MkI tank was that it was a lot bigger than these two appear! Still, too late now! The second photo shows the very first stages in the construction of the base work. Photo 1 shows the really basic start. The main elements of the layout have been drawn out onto individual pieces of thin card; the ‘battlement’ trench, the hidden bunker and the communication trench leading back to the second line. I was going to do the three tanks as well, but there’s not really any point just yet and besides, the leading tank will end up being placed where it ‘looks’ most impressive anyway, there’s no hard and fast location for that one. The green material under the white card is the first strip of ‘ Styrofoam Green’, a 25mm thick ‘plank’ of high density polystyrene which I bought from the Hobby’s online catalogue, Part No. SFG25 and quite good value at just under £8 for a pair of 2ft x 1ft sheets. This first, bottom layer goes on in its entirety (depth-wise), the second, later layer will be heavily ‘modified’. Beneath this green board you can just make out the pinewood base board, bought from a local DIY. This is where the first change to the design came in. Originally I was going to make the diorama 18” by 10”, however, when I tried the foam board on top of the pine, the foam was about 1/8” slimmer than the width of the wood, just the amount needed to eventually fit the contoured wooden edges ( like I’ve used on my Brandywine diorama, see its own diary in the military section) so what the hell! Why cut wood and foam when it’s just right anyway! So Messines is now 18” x 12”, two more inches of ground work, but a whole lot less cutting to do. In Photo 3, (sorry they went in the wrong order), the final positions of the elements has been transferred onto the next layer of foam board, this time a part sheet of white 10mm Polystyrol Foam, again from Hobby’s, Part No. POLYST10 at £6.70 for five sheets of A4. At this point, as you can see, the rear part of the main German trench is inset from the back edge of the base and this is where change number two crept in. After placing the white board in the position shown here and thinking it over, turning the base around to look at it from all angles I had an idea! This is usually a bad thing once plans have been made, but in this case it meant less work! Why not move the entire trench system back a little until the rear of the bottom of the trench was level with the back edge of the diorama! Not only would it create more interest by allowing the viewer to actually see within the trench itself, (at eye level so to speak) but it also meant I didn’t have to build the inside lining of the trench in that section! – both simple and elegant! Now back to Photo 2, here the white 10mm board has had that now excess rear section removed and as you can just make out, the drainage system to be featured under the wooden duckboards has been carved out with a safety razor blade. I will be coming back to this feature in the near future as it was the source of brainwave number two! Although you can’t see it in this photo, the rectangular base of the bunker on the right has also been cut through. By having this section removable, the bunker can be built as a sub-section and slotted back into place when the top surface of the ground work is ready. The final photo for this session is Photo 4, basically a repeat of Photo 3 but with the trench moved back to its final position. In Part Six, the trench system begins to take shape with more ‘green’ bits and the first stage of 'landscaping'. Bye till then. Robin Plymouth57 attached the following image(s): First wooden ship: The Grimsby 12 Gun 'Frigate' by Constructo Second: Bounty DelPrado Part Works Third: HMS Victory DelPrado Part Works 1/100 scale Diorama of the Battle of the Brandywine from the American Revolutionary War Diorama of the Battle of New Falkland (unfinished sci-fi), Great War Centenary Diorama of the Messines Ridge Assault Index for the Victory diary is on page 1
|
|
|
|
|
interesting plan looking forward to your build
J“Whenever you find yourself on the side of the majority, it is time to pause and reflect.”
-Mark Twain
|
|
|
Rank: Super-Elite   Groups: Registered, Forum Support Team, Administrators, Global Forum Support Team, Moderator, Official Builds Joined: 09/11/2012 Posts: 8,520 Points: 24,651 Location: East midlands
|
Hi Robin, Looking to be a great tribute I visited Ypres in 2011 and found it a very moving experience. I stood under the arch as with many others with tears in my eyes and I have no experience of war. Here are a few pics of the memorial at Ypres, hope you don`t mind me posting these.  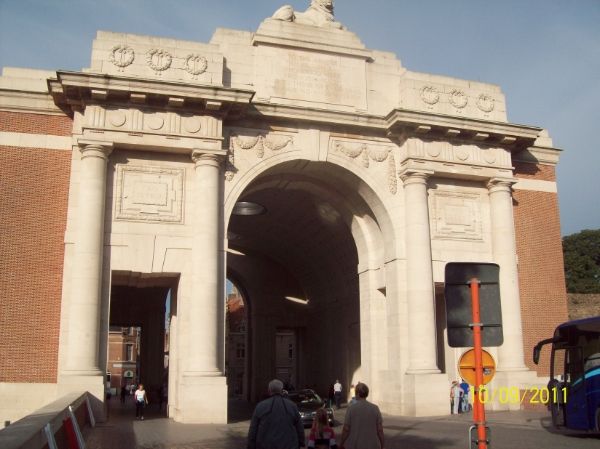   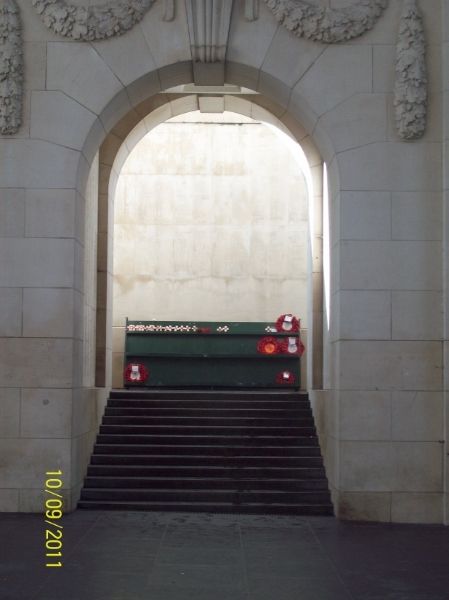 Thanks for this and I`m sure it will be a fitting tribute to those who were lost. Regards delboy271155 (Derek) COME BACK GUY FAWKES "YOUR COUNTRY NEEDS YOU"
|
|
|
|
|
Hi Robin, very interesting start you have made and think the layout you have described is going to be packed full of detail.... Cracking idea too on cutting one of the tanks in two and showing the internal details. This will add a lot for the viewer to ogle at no matter from which angle they view the layout from...... .. Will be following with serious interest.... Regards Alan
|
|
|
|
|
Many thanks to Jase, Alan and Delboy! No problems at all with your pics Derek, this whole project is to honour those who took part and nothing symbolises that more than that Memorial! So on we go! Part Six: “Into the Trenches”. In this session, we begin to see the base come closer to the 3D effect as seen in the initial design drawing. The white layer of foam as seen in the last post is essentially the bottom of the trench level and everything else on the diorama will be above this strata. The first thing to do was to cut out the first of the shaped blocks that will form the actual ground level between the trenches. This is again formed from the 25mm thick green foam and the first two blocks can be seen in Photo 1. In order to save wasting any of the green, the cuts were made into the foam without the width of the trench being removed so in the example in Photo 1, the curved cut for one side of the communication trench was cut into the block and then the straight edge which butts up against the bunker walls was cut leaving the block seen in position in the top right of the photo. The remainder of the green foam was then moved along so that the curved face becomes the opposite side of the trench and then the remaining two sides were cut to shape giving the second green block in the centre of the photo. Also seen in the first photo is the hot knife used to carve the smaller features out of the foam, this is part of the “ Hot Wire Foam Factory” range, the 4” Hot Knife to be exact, this is a very useful little tool for sculpting small sections at a time. I used this one for shaping the hillside and gully in the Brandywine diorama. I used to have an old style ‘U’ shaped cutter with a 4” ‘jaw’ (probably still have if I can ever find it!), this one is more versatile as you can’t really cut off wide slices with the ‘U’ types, they’re more for ‘ arty’ work cutting out shapes and letters from polystyrene tiles etc. The problem with this diorama is its 12” wide so even this tool isn’t long enough, but more on this subject later. In the case of these rearmost blocks, the hot knife was used to add a little unevenness to the edges of the blocks as well as to carve a little off the top edges to round them off a touch. After the knife work was finished the blocks were then given a little sanding down with a medium foam-sanding block, just like we use on our wooden ship hulls (Pound shop specials again!) In Photo 2, the first blocks are being glued down using good old standard PVA adhesive, nothing special here though the foam does tend to ‘float’ on a layer of PVA so sometimes a weight is required to keep the foam blocks in place. If you are not intending to carve into the blocks after they are dry and solid, you can also cut and push the ubiquitous cocktail sticks down through the layers to hold them together too. By Photo 3, the three rear blocks have been cut, shaped and sanded and finally glued down. Also in this shot is the first section of the forward face of the trench system, which completes the sunken trench effect. This is a single block of foam despite what looks like a join under the big protruding square, this was in fact just a light score mark from the initial marking out process prior to cutting the shape. The two white ‘X’s mark the points where the edges of the trench face will be further cut back to create a firing step for the defenders, (there should be a third X on the extreme left as well! ). Before cutting into the foam to create those steps I had to measure the depth so enter little Hans fresh off his sprue to act as a guide. Both the ground level and the firing step will be built up with the terrain putty later so the distance shown by the white arrow remains the same. Photos 5 and 6 show the large shaped block after the firing steps have been cut away, again using the Hot Knife tool, but before the top edges of the foam has been ‘softened’ with the sanding block. The next stage was then to complete the layer of 10mm white foam which joins up with the trench bottom and extends across the remainder of the base. At the moment this is just pinned in place with cocktail sticks, but it will later be glued down with PVA as the top edge blocks were. This can be seen in Photo 7 whilst to the right in Photo 8 is an unusual shot looking down the trench from the bunker position, a ‘Jerry’s eye view’, in both these photos the foam has been sanded down on the rough edges to round them off a little. With this section completed, most of the remaining green foam is used to fill in the space above the white foam layer resulting in a flat green field which is now waiting for the sloping ridge shape to be cut away as indicated by the yellow dotted line in the last Photo. That’s for a future instalment of course! In the next session I’ll be giving the first mini-workshop which I hope will be useful to anybody else thinking up a Great War diorama 'cos you'll probabably need loads of it like me!!! Coming in Part Seven: “Hanging on the Old Barbed Wire!”See you soon. Robin Plymouth57 attached the following image(s): First wooden ship: The Grimsby 12 Gun 'Frigate' by Constructo Second: Bounty DelPrado Part Works Third: HMS Victory DelPrado Part Works 1/100 scale Diorama of the Battle of the Brandywine from the American Revolutionary War Diorama of the Battle of New Falkland (unfinished sci-fi), Great War Centenary Diorama of the Messines Ridge Assault Index for the Victory diary is on page 1
|
|
|
Rank: Pro Groups: Joined: 24/08/2009 Posts: 48,827 Points: -13,348
|
Interesting to see this taking shape.
|
|
|
|
Guest (2)
|
 US
US

